
14 Javanotes 9.0, Section 6.2 — Some Basic Classes
Section 6.2
Some Basic Classes
In this section, we will look at some basic classes,
including classes representing colors, fonts, and images.
We will see how these classes are used in the GraphicsContext
API, which you already encountered in a preliminary way in Section 3.9,
but they are also useful in other parts of JavaFX. There is also a brief
introduction to CSS style sheets, which can be used to control
many aspects of the visual appearance of GUI components.
6.2.1 Color and Paint
Computer color uses an RGB color system.
That is, a color on a computer screen is specified by three numbers, called
color components, giving the level of red, green, and
blue in the color. A color is represented by an object of type Color,
from package javafx.scene.paint. In JavaFX, each color component
is a double value in the range 0.0 to 1.0. A Color
object also has a fourth component in the range 0.0 to 1.0, referred as the alpha color component,
which is generally used to represent the transparency or opaqueness of the color
when it is used for drawing. When a fully opaque color (alpha component equal to 1.0) is
used for drawing, the drawing color completely replaces the current color of the
drawing surface. When a fully transparent color (alpha component equal to 0.0) is used
for drawing, it has no effect at all. When the alpha component is between 0.0 and
1.0, the drawing color is combined with the current color to give the new color of
the drawing surface, as if the original contents of the drawing surface were being
viewed through colored, translucent glass. A Color object
can be constructed by giving its red, green, blue, and alpha components; for example,
Color myColor = new Color( r, g, b, a );
where r, g, b, and a are in the range 0.0 to 1.0.
However, the Color class also has a number of
static methods for making color objects. Static methods whose job
is to create objects are sometimes called factory methods.
So instead of using the
constructor, you could also say
Color myColor = Color.color( r, g, b, a );
and in the common case of a fully opaque color, with a equal to 1.0,
you can use
Color myColor = Color.color( r, g, b );
These static factory methods are preferable to the constructor because they
have the option of reusing color objects. For example,
two calls to Color.color(0.2,0.3,1.0) might return the same
Color object. This is OK because
color objects are immutable; that is, there is no way to change a color
after it has been constructed. So there is really no reason to use
two different objects to represent the same color.
Your computer screen probably uses “32-bit color,” which means that the
color of each pixel is actually represented using just 8 bits for each of the four
color components. Eight bits can represent the 256 integers in the range 0 to 255,
so computer colors have traditionally been specified using
integer color components in the range 0 to 255. The Color
class has the following static method for making colors in this way:
Color.rgb( r, g, b )
where r, g, and b are integers in the range 0 to 255. There is also
Color.rgb(r,g,b,a) where r, g, and b are ints in the
range 0 to 255, and a is a double in the range 0.0 to 1.0.
An alternative to RGB is the HSB color system.
In the HSB system, a color is specified by three numbers called the
hue, the saturation,
and the brightness. The hue is the basic color,
ranging from red through orange through all the other colors of the rainbow.
The brightness is pretty much what it sounds like. A fully saturated color is a
pure color tone. Decreasing the saturation is like mixing white or gray paint
into the pure color. In JavaFX, the hue is given by a double
value in the range 0.0 to 360.0, while saturation and brightness are
double values in the range 0.0 to 1.0. (The hue value is
given in degrees, were the colors are seen as laid out along a circle, with
both 0.0 and 360.0 representing pure red.) The
Color class has static methods
Color.hsb(h,s,b) and Color.hsb(h,s,b,a)
for making HSB colors. For example, to make a color with a random hue that is as bright and as
saturated as possible, you could use:
Color randomColor = Color.hsb( 360*Math.random(), 1.0, 1.0 );
The RGB system and the HSB system are just different ways of describing the
same set of colors. It is possible to translate between one system and the
other. The best way to understand the color systems is to experiment with them.
The sample program SimpleColorChooser.java lets you do that.
You won’t understand the source code at this time, but you can run it to play
with color selection or to find RGB or HSB values for the color that want.
The Color class also contains a large number of
constants representing colors, such as Color.RED, Color.BLACK,
Color.LIGHTGRAY, and Color.GOLDENROD. It might be worth mentioning that
Color.GREEN is the fairly dark green color given by Color.rgb(0,128,0);
the constant representing Color.rgb(0,255,0) is Color.LIME.
There is also Color.TRANSPARENT, which represents a fully transparent
color, with all RGBA color components equal to zero.
Given a Color, c, you can find out the
values of the various color components by calling functions such as
c.getRed(), c.getHue(), and c.getOpacity().
These methods return double values in the range 0.0 to 1.0, except
for c.getHue(), which returns a double in the range
0.0 to 360.0.
Color is a subclass of another class,
Paint, which represents the more general idea of
“something that can be used to fill and to stroke shapes.” In addition
to colors, there are image paints and gradient paints. I will not use these
more general paints in this chapter, but they will be covered in
Subsection 13.2.2. For now, you should just know that when a
method has a parameter of type Paint, you
can use a Color.
6.2.2 Fonts
A font represents a particular size and style
of text. The same character will appear different in different fonts. In JavaFX,
a font is represented by an object of type Font,
from the package javafx.scene.text. Although the Font
defines a couple of constructors, the best way to make a font object is with
one of the static factory methods from that class.
A font has a name, which is a string that specifies a font family such as “Times New Roman.”
A given family can have variations such as a bold or an italic version of the font.
And a font has a size, which is specified in “points,” where a point should really be 1/72 inch
but might in practice be equal to the size of a pixel. The most general function for
making fonts can specify all of these options:
Font myFont = Font.font( family, weight, posture, size );
If the system can’t match the requested font properties exactly, it will return the
font that it thinks best matches the parameters.
Here, family is a String that should specify a font family
that is available to the program. Unfortunately, there is no set of fonts that
is required to be available. “Times New Roman,” “Arial,” and “Verdana” are
likely to work. (These are fonts that were created by Microsoft and released for free
use; they are installed on many systems.) You can pass null as the familyName
to use the default font family.
Font “weight” is given as an enumerated type value from the enum
FontWeight. It will usually be either FontWeight.BOLD
or FontWeight.NORMAL, although there are a few other values such as
FontWeight.EXTRA_BOLD. Similarly, font “posture” is one of the
constants FontPosture.ITALIC or FontPosture.REGULAR.
Both FontWeight and FontPosture
are from package javafx.scene.text.
The Font class has several other static functions for making
fonts, which specify only a subset of the four properties family, weight, posture, and
size. These include: Font.font(size), Font.font(family),
Font.font(family,weight,size), and a few others. The missing properties
will have default values, which can depend on the computer where the program is running.
The static function Font.getDefault() returns a font that has default
values for all the properties. You can call Font.getDefault().getSize()
to find the default point size. (It’s 13.0 on my computer, but might be different
on yours.) Here are a few examples of making fonts:
Font font1 = Font.font(40);
Font font2 = Font.font("Times New Roman", FontWeight.BOLD, 24);
Font font3 = Font.font(null, FontWeight.BOLD, FontPosture.ITALIC, 14);
6.2.3 Image
The term “image” refers to something like a photograph or drawing—anything
that can be represented by a rectangular grid of colored pixels. Images are often
stored in files. JavaFX makes it easy to load an image from a file so that
it can be displayed by a program. An image is represented by
an object of type Image, from package
javafx.scene.image. The constructor
new Image( path )
is used to load an image from an image file. The path parameter
is a string that specifies the location of the file. The location can be very
general, such as an image on the Internet or on the user’s computer, but for
now I’m interested in images from resource files.
A resource is something that is part of a program but is not code. Resources
can include things like sounds, data files, and fonts, as well as images.
The system can load resources for a program from the same places where
it looks for the program’s .class files. For a resource file in the
program’s top-level directory, the path to the file is simply the name
of the file. If the file is in a subdirectory of the main directory, then
the path includes the subdirectory name. For example, the path
“images/cards.png” refers to a file named “cards.png” inside a subdirectory
named “images,” and “resources/sounds/beep.aiff” refers to a file named
“beep.aiff” inside a directory named “sounds” that is in turn inside a
directory named “resources.”
There are many kinds of image files, which store the image data in
a variety of formats. For JavaFX Image objects,
you can use image files whose names end with .gif, .jpeg (or .jpg), .png,
and .bmp. So, for example, if “cards.png” is a file in the top-level program directory,
you can create the image object
Image cards = new Image( "cards.png" );
The image can then be displayed in a GraphicsContext,
as we will soon see. There will be other uses for images later in this chapter.
6.2.4 Canvas and GraphicsContext
The screen of a computer is a grid of little squares called pixels.
The color of each pixel can be set individually, and
drawing on the screen just means setting the colors of individual pixels.
Every visible GUI component is drawn by coloring pixels, and every component
has a coordinate system that maps (x,y) coordinates to points within the
component. Most components draw themselves, but there is one JavaFX component
on which you can draw anything you want by calling the appropriate methods.
Such “drawing surface” components are of type Canvas,
in package javafx.scene.canvas. A Canvas
is a Node and so can be part of a scene graph.
(However, it is not a Parent, so it cannot act as
a container for other nodes and it cannot be the root of a scene graph.
This means that even when a canvas is the only thing that you want to show
in a window, it must still be placed into a container that will serve as
the root of the scene graph.)
A Canvas appears on the screen as
a rectangle made up of pixels. A position in the
rectangle is specified by a pair of coordinates, (x,y). The
upper left corner has coordinates (0,0). The x coordinate
increases from left to right, and the y coordinate increases from top
to bottom. The illustration shows a 20-pixel by 12-pixel canvas (with
very large pixels). A small line, rectangle, and oval are shown as they would
be drawn by coloring individual pixels:
Note that, properly speaking, the
coordinates don’t belong to the pixels but to the grid lines between them,
and coordinates can, in fact, be numbers of type double
and can refer to points inside a pixel. For example, the center of the
top left pixel in a canvas has coordinates (0.5,0.5). In fact, all drawing
is done using coordinates of type double.
The width and height of a Canvas can be specified in the constructor that is
used to create the canvas object. For example, to create a tiny 20-by-12 canvas:
Canvas canvas = new Canvas(20,12)
You can query the size of a canvas by calling canvas.getWidth() and
canvas.getHeight(), which return values of type double.
Canvasses are usually meant to be non-resizable, but the size can be changed if necessary
by calling canvas.setWidth(w) and canvas.setHeight(h).
When a canvas is first created, it is filled with “transparent black,” that is, with a color
that has all RGBA components set to zero. This makes the canvas transparent: You will see
whatever lies behind the canvas in the scene.
In order to draw on a canvas, you need an object of type GraphicsContext.
Every Canvas has an associated GraphicsContext;
different GraphicsContexts draw on different Canvases.
You can get the graphics context for a Canvas, canvas,
by calling canvas.getGraphicsContext2D(). For any given Canvas,
this method will always return the same GraphicsContext object.
Section 3.9 discussed some of the things that can be done with a graphics context.
In particular, you learned that a shape can be stroked and, if it has an interior, it can also be filled.
Methods in GraphicsContext, g, that can be used for drawing
include the following, where all numeric parameters are of type double:
-
g.strokeRect(x,y,w,h) and g.fillRect(x,y,w,h) —
Draw a rectangle with top left corner at (x,y), with width w and
with height h. If w or h is less than or
equal to zero, nothing is drawn. -
g.clearRect(x,y,w,h) — Fill the same rectangle with a fully transparent
color, so that whatever lies behind the rectangle will be visible through the canvas. Note that
this is not the same as calling g.fillRect(x,y,w,h) with a transparent fill
color; doing that has no effect at all on the contents of the rectangle. -
g.strokeOval(x,y,w,h) and g.fillOval(x,y,w,h) —
Draw an oval that just fits inside the rectangle with top left corner at (x,y), with width w and
with height h. -
g.strokeRoundRect(x,y,w,h,rh,rv) and g.fillRoundRect(x,y,w,h,rh,rv) —
Draw a rectangle with rounded corners. The rectangle has top left corner at (x,y), with width w and
with height h. A quarter oval is cut off each corner, where the horizontal radius of the
oval is rh and its vertical radius is rv. -
g.strokeText(str,x,y) and g.fillText(str,x,y) —
Draw the text of the String str. The point (x,y)
is the left end of the baseline of the text. (A string is drawn on top of its baseline, with descenders
such as the tail of a “y” extending below the baseline.) The string can contain multiple lines
separated by newline (‘\n’) characters; (x,y) then gives the baseline of the
first line of the string. Note that stroking text means drawing just the outlines of the characters. -
g.strokePolygon(xcoords,ycoords,n) and g.fillPolygon(xcoords,ycoords,n) —
Draw a polygon, consisting of line segments connecting a sequence of points. The number of points is given
by the third parameter, n. The first two parameters are arrays of type
double[] containing the coordinates of the points. An extra line segment is automatically
added to connect the last point back to the first. That is, the
polygon connects the points (xcoords[0],ycoords[0]), (xcoords[1],ycoords[1]), …,
(xcoords[n-1],ycoords[n-1]), (xcoords[0],ycoords[0]). -
g.strokeLine(x1,y1,x2,y2) — Draws a line from (x1,y1)
to (x2,y2). (It’s no use trying to fill a line, since it has no interior.)
The GraphicsContext object, g has a number of properties that affect
drawing. When anything is drawn using g, the current values of the relevant
properties are used. This means that changing the value of a property does not affect anything
that has already been drawn; the change only applies to things drawn in the future. Each property
has a setter method and a getter method. One of the properties is the Paint
that is used for filling (which in
this chapter will always be a Color); this property can be set by calling
g.setFill(paint), and you can get its current value by calling g.getFill().
Similarly, the Paint that is used for stroking can be set and get using
g.setStroke(paint) and g.getStroke(), and the width of strokes can be
set and get using g.setLineWidth(w) and g.getLineWidth(), where
w is of type double. And you can set and get the font that will be used
for drawing text with g.setFont(font) and g.getFont().
Note that stroking a shape is like dragging the center of a pen along the outline of the shape.
The size of the pen is given by the linewidth property. The stroke that is drawn extends on both sides
of the actual path of the pen by an amount equal to half of the linewidth. For example, if you
draw a horizontal line of width 1 with endpoints (100,100) and (300,100), half of the stroke lies
above the geometric line and half lies below it. The computer might show this by blending the color
of the stroke color with the current color. If you want the stroke to
nicely cover complete pixels, you should actually use (100.5,100.5) and (300.5,100.5) as the coordinates
of the endpoints of the line. (Whenever you draw something, you might find that for pixels that are only
partially covered, the drawing color is blended with the current color instead of replacing it. This is
done to decrease the jagged appearance of shapes that are made out of whole pixels, like the line and
oval in the above illustration. This is known as antialiasing.)
It is also possible to draw an image onto a canvas, where the image is represented by an
object of type Image. There are several methods for drawing
images:
-
g.drawImage(image,x,y) — Draws the image with its
upper left corner at (x,y), using the actual size of the image. -
g.drawImage(image,x,y,w,h) — Draws the image in the
rectangle with upper left corner at (x,y), with width w, and
with height h. The image is stretched or shrunk to fit that rectangle if
necessary. -
g.drawImage(image, sx,sy,sw,sh, dx,dy,dh,dw) — Draws the contents
of a specified “source” rectangle in the image to a specified “destination” rectangle on the
canvas. This method lets you draw just part of an image. The source rectangle has
upper left corner at (sx,sy), width sw, and height sh.
The last four parameters specify the destination rectangle in a similar way.
It’s time for a couple of actual examples. First, an example that draws some text using
a variety of fonts.
The program draws multiple copies of the string “Hello JavaFX” using random fonts and
locations. The text is filled with random colors and stroked with a thin black stroke:

The program uses five fonts, which are created in the start() method using several
different static factory methods from the Font class:
font1 = Font.font("Times New Roman", FontWeight.BOLD, 20);
font2 = Font.font("Arial", FontWeight.BOLD, FontPosture.ITALIC, 28);
font3 = Font.font("Verdana", 32);
font4 = Font.font(40);
font5 = Font.font("Times New Roman",FontWeight.BOLD,FontPosture.ITALIC,60);
The program defines a draw() method that completely
redraws the content of a canvas. It is called when the canvas is first
created, and it is also called when the user clicks the “Redraw” button.
The method first fills the canvas with a white background, which erases
the previous contents of the canvas. It then fills and strokes 25 copies
of “Hello JavaFX”, using a random fill color, a random position for the
text, and a randomly selected font for each copy:
private void draw() {

    GraphicsContext g = canvas.getGraphicsContext2D();

    double width = canvas.getWidth();
    double height = canvas.getHeight();

    g.setFill( Color.WHITE );  // fill with white background
    g.fillRect(0, 0, width, height);

    for (int i = 0; i < 25; i++) {

        // Draw one string.  First, set the font to be one of the five
        // available fonts, at random.

        int fontNum = (int)(5*Math.random()) + 1;
        switch (fontNum) {
            case 1 -> g.setFont(font1);
            case 2 -> g.setFont(font2);
            case 3 -> g.setFont(font3);
            case 4 -> g.setFont(font4);
            case 5 -> g.setFont(font5);
        } // end switch

        // Set the color to a bright, saturated color, with random hue.

        double hue = 360*Math.random();
        g.setFill( Color.hsb(hue, 1.0, 1.0) );

        // Select the position of the string, at random.

        double x,y;
        x = -50 + Math.random()*(width+40);
        y = Math.random()*(height+20);

        // Draw the message.

        g.fillText("Hello JavaFX",x,y);

        // Also stroke the outline of the strings with black.

        g.setStroke(Color.BLACK);
        g.strokeText("Hello JavaFX",x,y);

    } // end for

} // end draw()
You can find the full source code for the program in RandomStrings.java.
The second sample program is similar, but instead of drawing random strings, it draws five
playing cards dealt at random from a deck:
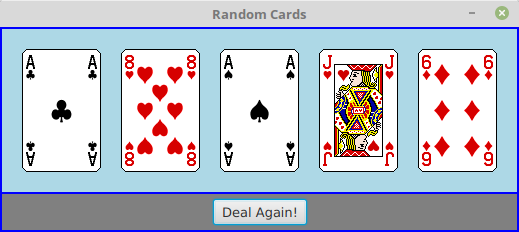
The deck and cards are represented using the
Deck and Card classes from
Section 5.4. The card images come from the file cards.png,
which is a resource file for the program. The file contains a single image that contains
images of all the cards, arranged in rows and columns. Here it is, shown at reduced size:
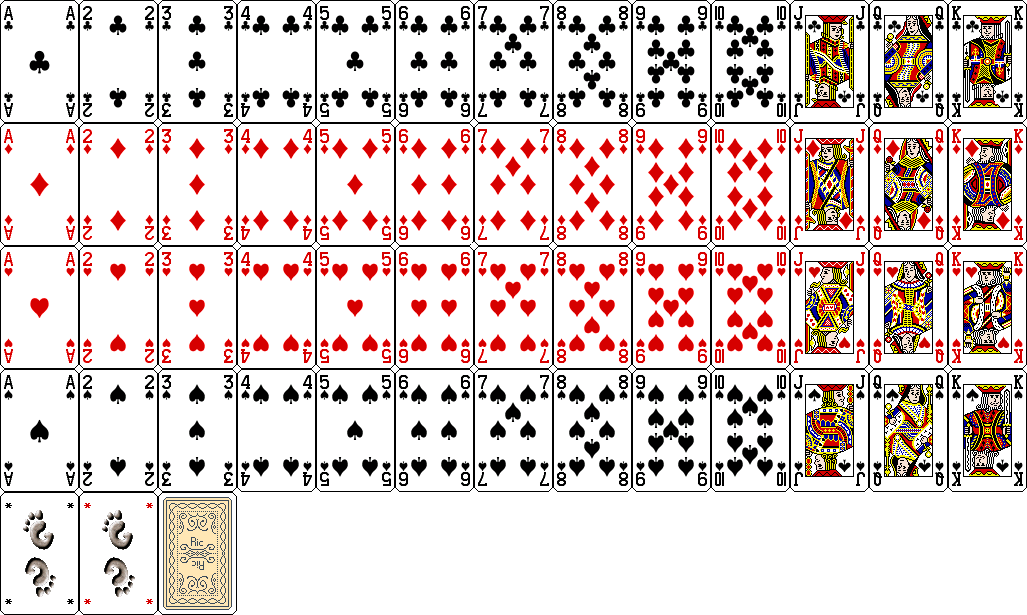
(This image is from the Gnome desktop project, http://www.gnome.org.)
The image file is loaded into the program in the start() method simply by saying
cardImages = new Image("cards.png");
where cardImages is an instance variable of type Image.
Suppose that we want to draw the card
from row number R and column number C in a GraphicsContext g
(where both rows and columns are numbered starting at zero).
Each card in the image is 79 pixels by 123 pixels, so the card that we want has its top
left corner at (79*C,123*R). If we want to place the card on the canvas with its
top left corner at (x,y), we can use the third drawImage() method given above,
which specifies a source rectangle in the image and a destination rectangle on the canvas:
g.drawImage( cardImages, 79*C,123*R,79,123, x,y,79,123 );
In the program, the card that we want to draw is given by a variable card
of type Card. The row and column in the image are determined by
the suit and value of the card, which are given by card.getSuit() and
card.getValue(). The values returned by these functions have to be
manipulated a little to get the correct row and column numbers, and the position of the
card on the canvas is calculated to leave a 20-pixel gap between one card and the next.
Here is the draw()
method from the program, which deals five random cards from a deck and draws them:
private void draw() {

    GraphicsContext g = canvas.getGraphicsContext2D();

    Deck deck = new Deck();
    deck.shuffle();

    double sx,sy;  // top left corner of source rect for card in cardImages
    double dx,dy;  // corner of destination rect for card in the canvas

    for (int i = 0; i < 5; i++) {
        Card card = deck.dealCard();
        System.out.println(card); // for testing
        sx = 79 * (card.getValue()-1);
        sy = 123 * (3 - card.getSuit());
        dx = 20 + (79+20) * i;
        dy = 20;
        g.drawImage( cardImages, sx,sy,79,123, dx,dy,79,123 );
    }

} // end draw()
For the complete program, see RandomCards.java.
6.2.5 A Bit of CSS
JavaFX makes it possible to control the style—that is, the visual
appearance—of components in a GUI using CSS (Cascading Style Sheets).
CSS is one of several languages that are used to make web pages. It can
control things like colors, fonts, and borders of elements of a web page.
It has been adapted to play a similar role in other contexts, such as
JavaFX. I do not intend to cover CSS in any detail, and anything that
can be done with CSS can also be done with Java code. However, there
are some things that are just easier to do with CSS; I will cover
a few of them in this short section and will use them in my programs.
For people who already know CSS, a guide to its use in JavaFX is
available as I write this at
https://openjfx.io/javadoc/17/javafx.graphics/javafx/scene/doc-files/cssref.html
A CSS style rule consists of a property and a value for that property.
For example, CSS can be used to place a border around many kinds of GUI components.
A border has properties with names such as -fx-border-color
and -fx-border-width. (All JavaFX CSS properties have names
that begin with “-fx-” to distinguish them from regular CSS properties.)
A value for -fx-border-color can be a color name such as
red or lightblue, among other formats.
One color format that I will use takes the form #RRGGBB,
where R, G, and B stand for hexadecimal digits. A two-digit hexadecimal
number can represent numbers from 0 to 255. The RR, GG, and BB in
#RRGGBB represent the red, green, and blue components of
a color, each in the range 0 to 255. For example, #FF0000
represents pure red, and #004444 represents a dark blue-green.
For the border width, the value can be a single size, such
as 3px or 0.2cm. The syntax is a number followed
by a unit of measure, with no space between them. Here, “px” stands for
“pixels,” and 3px means 3 pixels. When a width is given
by a single size, the size applies to all four sides of the border.
Alternatively, four sizes can be given, separated by spaces, specifying
the border width on the top, right, bottom, and left, in that order.
For example, a thick, blue border could be specified as
-fx-border-color: blue; -fx-border-width: 5px
and for a dark red border that is thicker on the top than
on the other sides, you can use
-fx-border-color: #550000; -fx-border-width: 3px 1px 1px 1px
When several CSS rules are used together, they should be separated
by semicolons.
The background color of a component can be set using
-fx-background-color as the property name. The value
is the same sort of color specification that would be used
with -fx-border-color.
And the CSS property -fx-padding
represents space that is left between the content of a component
and its edge (or border if there is one). Like border width,
padding can be specified as either a single size or a list of
four sizes. For example: -fx-padding: 8px.
You can apply a style to a component using its setStyle()
method, whose parameter is a String containing
one or more CSS style rules. For example, suppose message
is a Label. By default, labels have no
padding or border. They can be added with a command such as
message.setStyle(
   "-fx-padding: 5px; -fx-border-color: black; -fx-border-width: 1px" );
You can set the font for a component that displays text using the
-fx-font property. The value for this property
specifies the size and font family for the font, and can optionally
be modified by a weight (“bold”), or by a style (“italic”), or both.
Some examples:
-fx-font: 30pt "Times New Roman";
-fx-font: bold italic 18pt serif;
-fx-font: bold 42pt monospace;
Note that if the font family name contains spaces, it must be enclosed
in quotes. The font families in the last two examples, “serif” and
“monospace”, are so-called generic family names that specify a certain
style of font. Other generic names include “sans-serif”, “cursive”,
and “fantasy”. The characters in a serif font have short lines as decorations
such as at the top and bottom of an upper case “I”. A “sans-serif” font
lacks these decorations. The characters in a “monospace” font all have the
same width. Monospace fonts are good for drawing characters that are meant
to line up in columns.
Many other properties can be set using CSS, but I will not cover them
here. I will use CSS only for borders, padding, background colors, and fonts.
Setting the style for many components can be tedious. A CSS style sheet
can be used to apply style to all components of a given type as well as to individual components
and sets of components. A style sheet is a file, usually with a name ending with .css.
I will not discuss the syntax, but
here is a style sheet that will apply some style rules to all Labels
and Buttons:
Button {
   -fx-font: bold 16pt "Times New Roman";
   -fx-text-fill: darkblue;
}

Label {
   -fx-font: 15pt sans-serif;
   -fx-padding: 7px;
   -fx-border-color: darkred;
   -fx-border-width: 2px;
   -fx-text-fill: darkred;
   -fx-background-color: pink;
}
A style sheet file, just like an image file, can be a resource for a program. That is,
it can be stored in the same place as the .class files for the program. Suppose that
a style sheet named “mystyle.css” is in the program’s top-level directory. You can
then apply the style to all components in a scene with the statement
scene.getStylesheets().add("mystyle.css");
A Scene can have several style sheets, and style sheets
can also be added to individual containers.