
14 Special Senses Lab
"Just because a man doesn't have use of his eyes doesn't mean that he lacks vision." -Stevie Wonder
Gillian Backus; Heidi W. Wangerin; and Paula Rodgers
Objectives
The Eye:
1. Identify and describe the function of each of the structures, layers, cavities, and chambers of the eye on an image and on the eye model.
2. Trace the path of light through the eye to the retina.
3. Identify and label the structures of the retina from a microscope slide and an image.
4. Identify the structures (see starred structures* on the anatomical terminology checklist) on a dissected cow’s eye and describe the function of each.
5. Compare and contrast the structure and function of the cow eye with a human eye.
6. For each of the eye tests, explain 1) how to perform each test 2) the rationale for each test and 3) normal and abnormal results.
7. Given various eye tests, explain what an abnormal test tells you about vision.
The Ear:
8. Identify and state the functions of each of the structures of the ear (see the terminology checklist) on an image and on the ear model.
9. Trace and label the anatomical structures involved in the path of sound as it travels from the outer ear to the inner cochlea.
10. Define and differentiate between conductive deafness and sensorineural deafness.
11. For the Romberg test 1) describe how to perform the test, 2) the rationale for the test and 3) normal and abnormal results with respect to equilibrium and proprioception (3D awareness).
Terminology Checklist
Structures marked with * must also be identified on the mammalian (cow) eye
The Eye
|
Structures of the Retina
|
Eye Tests
|
The Ear
|
Balance and Equilibrium Test
|
Outline of Lab
PART I: The Eye Anatomy and Physiology
o Case Study: “The Painful Eye Puff”
o Activity 1: The Structure and Function of the Eye
o Activity 2: Dissection of a Mammalian Cow Eye
o Activity 3: Eye Tests
PART II: The Ear Anatomy and Physiology
o Case Study: “To Hear or not to Hear”
o Activity 4: The Anatomy and Physiology of the Ear
o Activity 5: Conduction vs. Sensorineural Deafness
o Activity 6: The Romberg Test
Putting It All Together
PART I: The Eye Anatomy and Physiology
Case Study: “The Painful Eye Puff”
Emran hasn’t been to the eye doctor in some time, but has noticed that now, at age 54, he can’t read the back of the medication bottle dosage instructions unless he finds bright light and a magnifying glass. He goes to get his eyes checked to see if he would benefit from glasses. At the eye doctor’s office, the nurse on duty asks Emran to place his chin in a tray and stare straight ahead. She moves a small machine close to his left eye and administers an unexpected puff of air into Emran’s eye. She does the same on the right side. Emran yelps in pain. “Oh, that’s painful?” asks the nurse. “I’ll ask the doctor to talk with you about that further”. She guides Emran to the examination room where Emran sits quietly, mulling over what might be going on. Why would his right eye hurt with a harmless puff of air? When Dr. Reddy arrives, she explains that first she will test his vision using the Snellen test and then she will administer atropine, a muscarinic receptor blocker, to cause pupil dilation so she can look into the back of the eye. “What about that puff test?” asks Emran. “Yes, we will discuss that, too,” replies the doctor, “I think we need more tests.”
Activity 1: The Structure and Function of the Eye
Materials:
- eye model
- microscope
- microscope slide of retina
- terminology labels
Background:
The eye is an incredible organ capable of exploiting the physics of light to focus an image precisely on the retina by adjusting its lens to accommodate different focal lengths. The iris and photoreceptors allow vision in varying light conditions (dim to bright). Light wavelengths are converted to electrical signals by the photoreceptors of the retina and the brain then processes the vast data. Having two eyes on the front of our face give us excellent binocular vision. Our peripheral vision allows us to “catch things with the corner of our eye” while we stare straight ahead. We have visual reflexes that allow us to duck when fast moving objects approach our head. The sense of vision itself is a combination of live input from the retina and memory of what we have seen before.
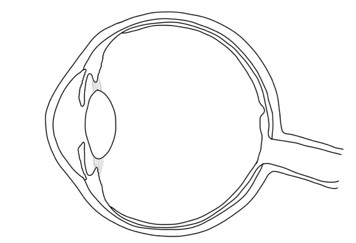
The eye is composed of three layers, or tunics. The outer tunic is a dense fibrous, avascular, connective tissue called the sclera, or white of the eye. This layer protects and provides support for the deeper layers. The orientation and density of the fibers in this outer tunic changes just anterior to the lens producing a translucent layer called the cornea which allows light to pass through the pupil (opening) and through the lens. The cornea is protected by saline tears that are constantly produced on the eye’s surface by the lacrimal gland (Figure 1).
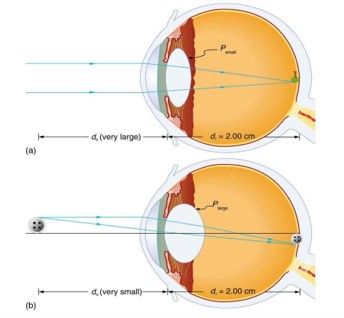
The layer just deep to the fibrous tunic is the highly vascularized choroid. The choroid thickens near the lens and becomes the ciliary muscle which is an attachment site for the suspensory ligaments. The suspensory ligaments attach the lens to the ciliary muscle. When the ciliary muscle relaxes, the suspensory ligaments pull on the lens causing it to change shape and reduce refraction (bending) of light by the lens. This optimizes the eyes for distance vision. When the ciliary muscle contracts, the suspensory ligaments reduce their pull on the lens and the lens thickens and refracts light more strongly which permits near vision (Figure 2). When you are reading for a long period of time, your eyes will feel tired from the contraction of the ciliary muscle. The ciliary body is also responsible for producing and secreting the aqueous humor, which is the clear watery fluid that circulates in the anterior cavity of the eye.
Figure 1: Anatomy of the eye.
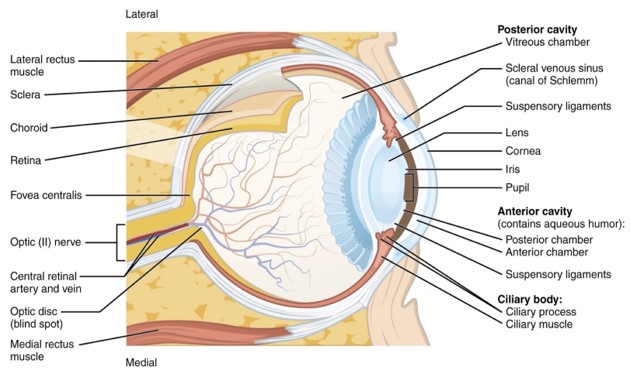
Light passes through many structures of different densities causing the final image that forms on the retina to be inverted and upside-down. Light first passes through the clear cornea into the anterior chamber filled with clear aqueous humor. The cornea refracts the incoming light slightly. The iris is the pigmented part of the eye and it surrounds a hole, the pupil, for light to pass into the posterior chamber, a space just in front of the lens. Together the anterior chamber and the posterior chamber make up the anterior cavity. The anterior cavity is separated from the posterior cavity by the lens. While the cornea bends light slightly, the lens can change shape and bend light more precisely. Light then passes through the vitreous humor, a clear gelatinous substance that fills most of the eyeball and provides structure to the eyeball, on its way to the light-sensing photoreceptor cells in the retina.
Figure 2: Suspensory ligaments and lens accommodation on focal length (a) far vision, and (b) near vision.
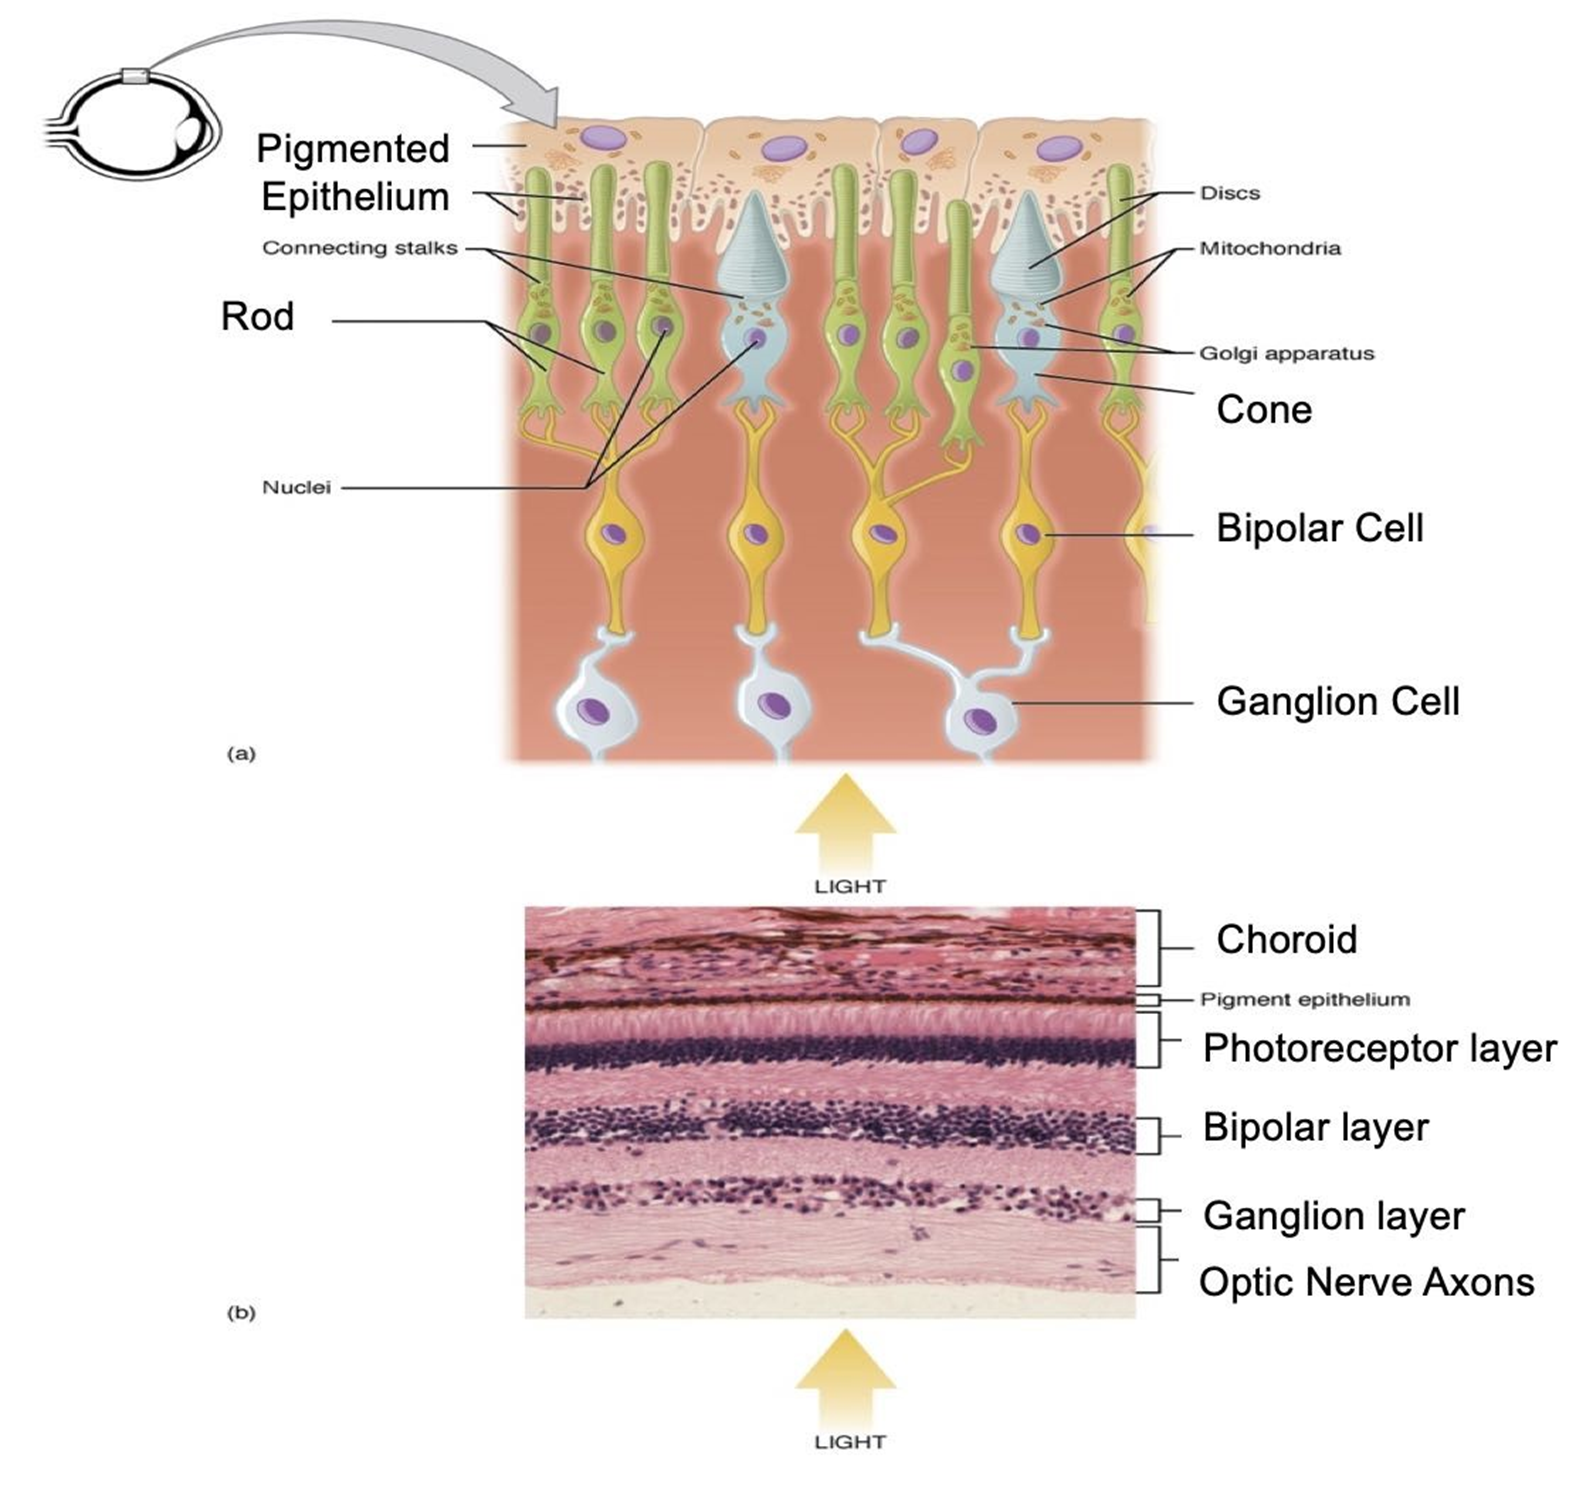
The inner layer of the eye, the retina, is a thin layer of nervous tissue that covers the posterior 2/3 of the eye. There are three (3) major neural cell types of the retina arranged in layers: the ganglion cells, the bipolar cells, and the photosensitive photoreceptor cells (Figure 3). The deepest layer of cells are the photoreceptors, most often known by their two types – rods and cones. Only these photoreceptor cells can convert light signals into neural signals. The rods detect lines and black and white, while the cones detect color. A region of the retina called the macula lutea, has the greatest density of photoreceptors of the retina and a tiny spot in the center of the macula lutea, called the fovea centralis, contains the greatest density of cones. Because of the large concentration of photoreceptors in this region, the fovea centralis provides the greatest visual acuity.
The photoreceptors are embedded in the pigmented epithelium of the retina. The dark granules that you will see in this epithelial layer absorb excess light. This is important so that light does not re-stimulate the photoreceptors (Figure 3). When stimulated by light, the rods and cones in the bottom photoreceptor layer transmit a signal to the bipolar cells which then synapse onto the ganglion cells. The axons of the ganglion cells merge to form the optic nerve which carries the signals to the visual centers of the brain.
Figure 3: The microanatomy of the retina. A diagram illustrating the location of retinal cells (top). A microscopic image illustrating the layered retina (bottom). Dark areas represent clusters of stained nuclei, whereas pink areas indicate axons.
Procedure:
1. Use the provided terminology labels to label the parts of an eye model. Have your instructor check your work:
Instructor’s initials for labeled eye model: ____________
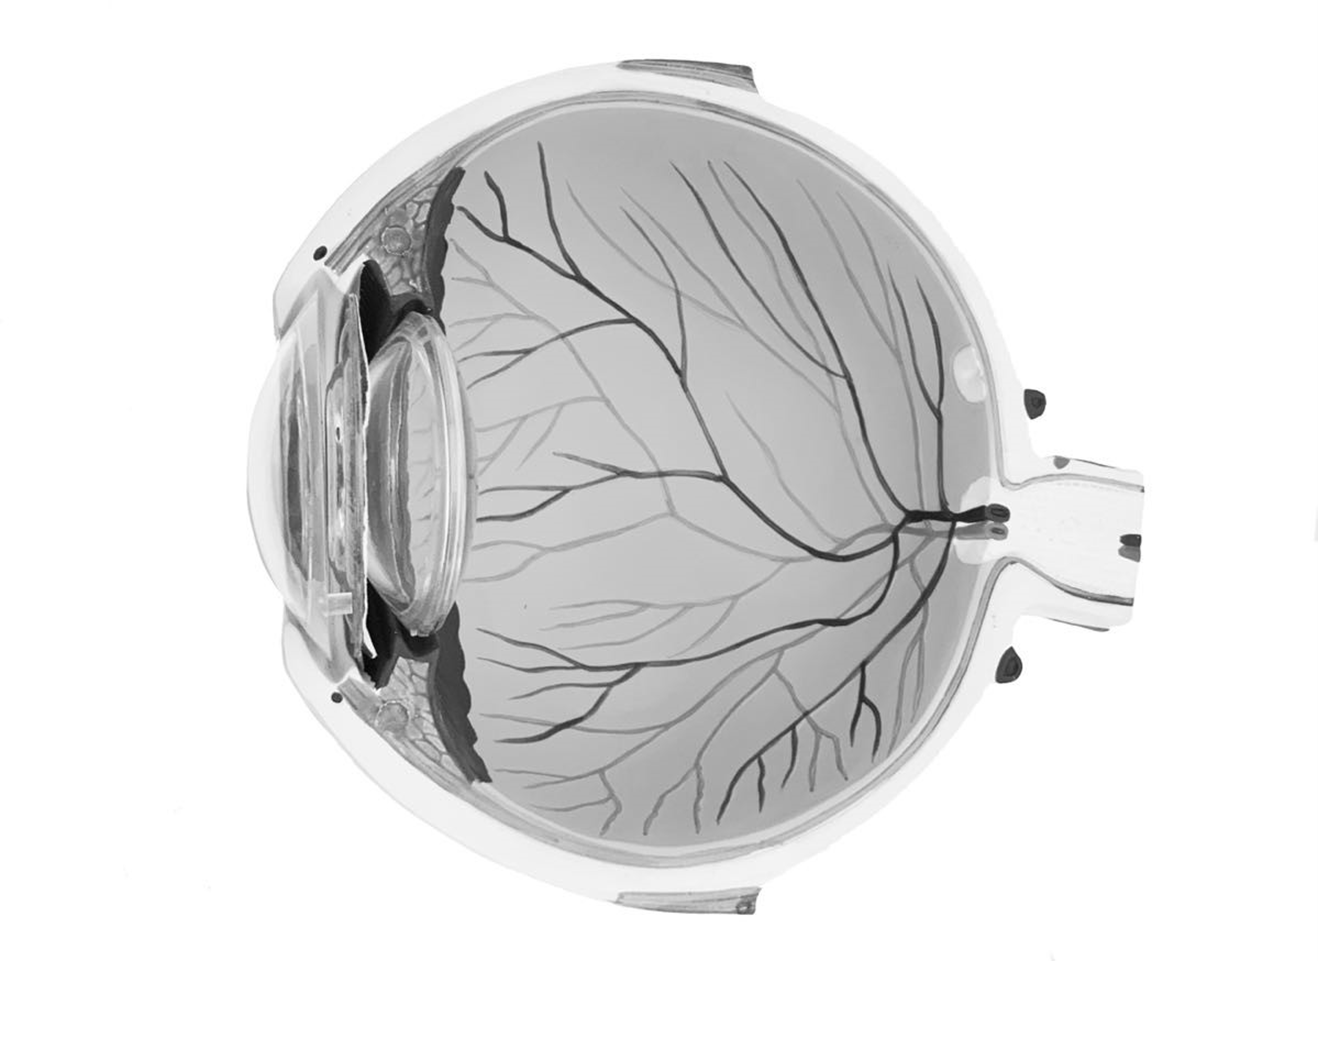
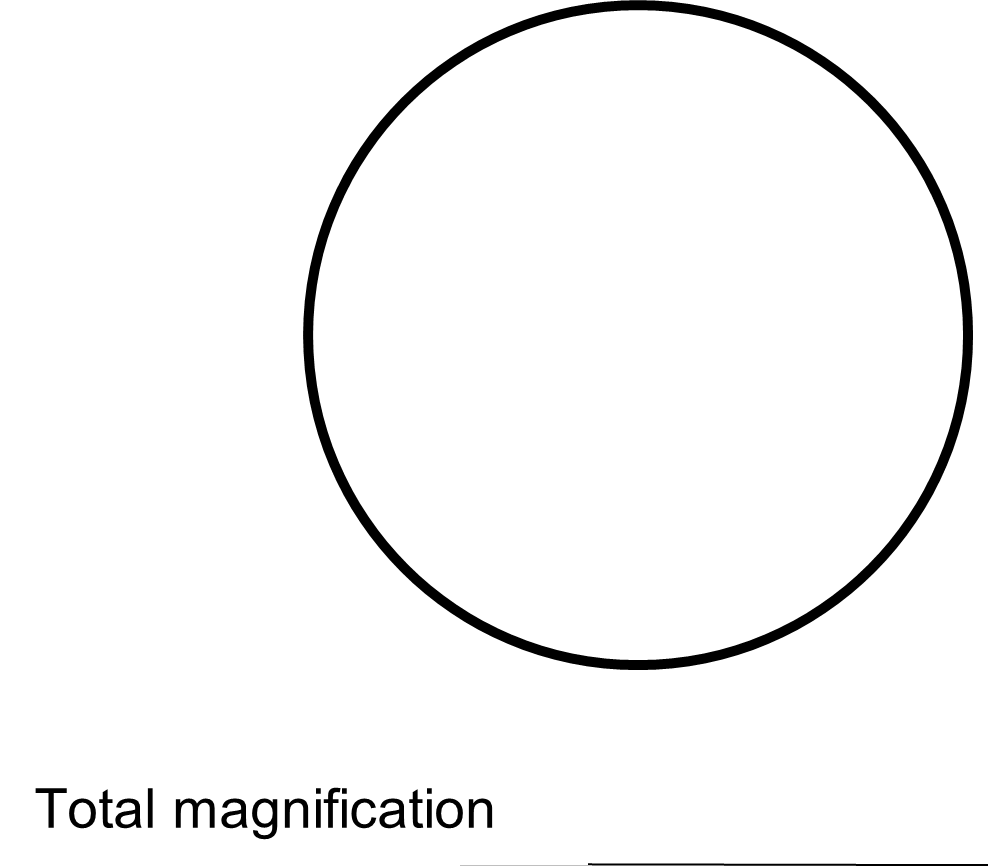
2. On the image below, label the following structure: cornea, lens, iris, fovea centralis, macula lutae and optic disc.
Eye Model to Label
3. On the image below color and label the following: anterior chamber, posterior chamber, and posterior cavity.
Chambers to Label
4. Take out your microscope and the prepared slide of the retina. Use Figure 3 as a reference.
5. Draw the retina under high power magnification, and the following terms: choroid, pigmented epithelium, photoreceptors, bipolar cells, and ganglion cells.
Activity 2: Dissection of a Mammalian Cow Eye
Materials:
- cow eye
- disposable gloves
- dissecting tray and tools (scissors, scalpel, forceps, blunt probe)
- lab apron
- safety goggles/glasses
Background:
Cow eyes are larger than human eyes and yet they have many of the same structures. You will notice the squarish pupil (as opposed to the round pupil typical of humans), and you will notice an iridescent lining (usually purple) located at the back of the eye. This is not the retina, but part of the choroid (Figure 4). This iridescent structure is called the tapetum lucidum and it allows the eye to reflect light, especially at night. This helps animals see in dim light. You may have seen the tapetum lucidum when you shine a light into the eyes of cows, cats, dogs, deer, and other nocturnal animals. In humans, the choroid is red, rather than iridescent. This is what gives the “red eye” effect when flash photography is used. In this activity, you will compare the cow eye to the human eye, paying close attention to what is similar and what is different.
Procedure:
**You must wear lab gloves, a lab apron and safety goggles for this dissection.
1. Obtain a dissecting tray, and dissecting tools, and an eye.
2. Examine the external structures of the eye and identify the cornea, sclera and the optic nerve.
3. Make a frontal section through the sclera using a scalpel. This will separate the eye into anterior half and posterior halves A gel-like fluid will leak out of the posterior half. This is the vitreous humor.
4. In the posterior half of the eye (Figure 4), locate the tan/brown colored retina. Use caution as layer easily peels away. Where it remains attached is the optic disc.
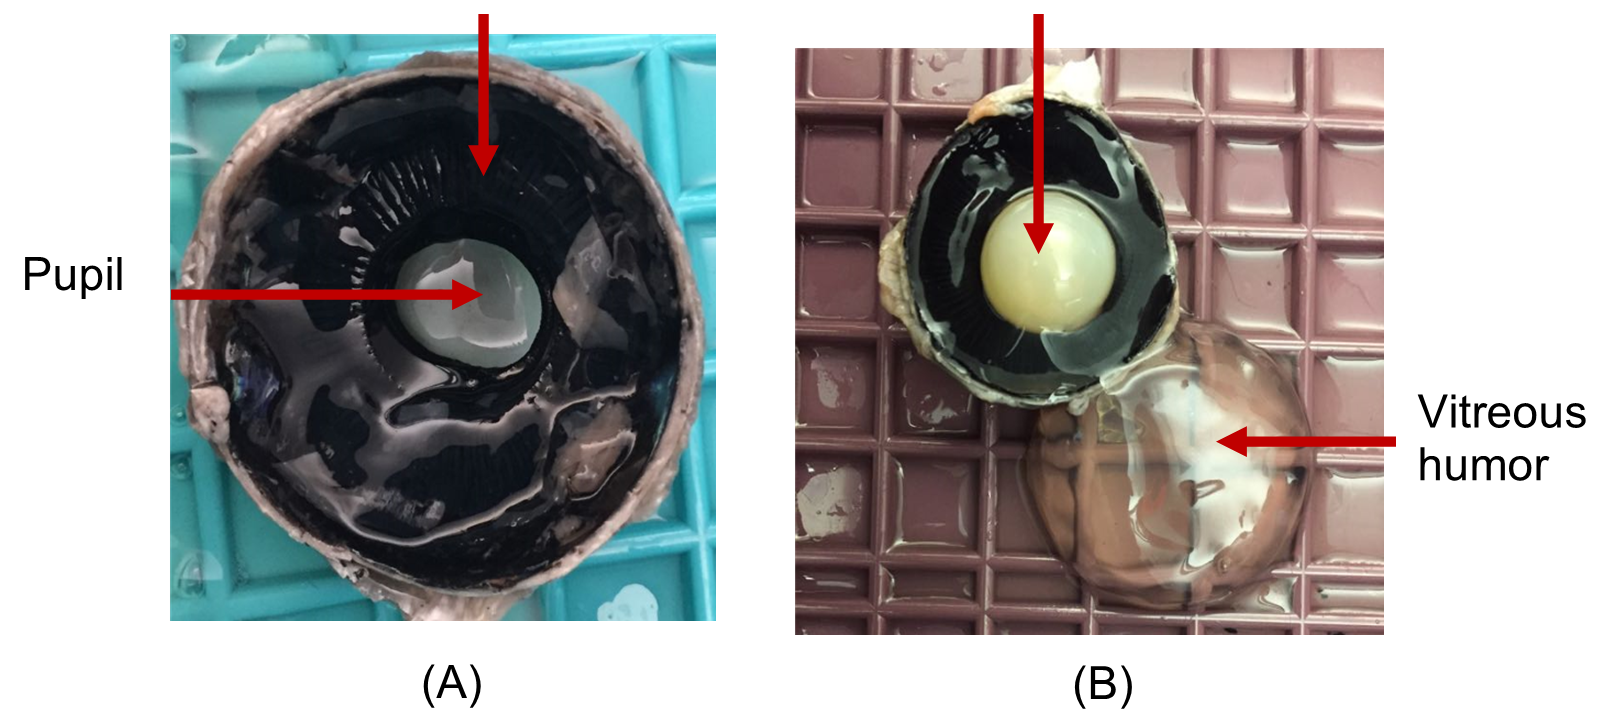
5. Locate the tapetum lucidum and the choroid which are both deep to the retina. Now identify the lens, iris, ciliary body and the pupil. (Figure 5).
6. Show the dissected eye to your instructor and point out the important anatomical structures you have learned.
Instructor initials for dissected cow eye: __________
Figure 4: Anatomy of posterior cavity of dissected cow eye.
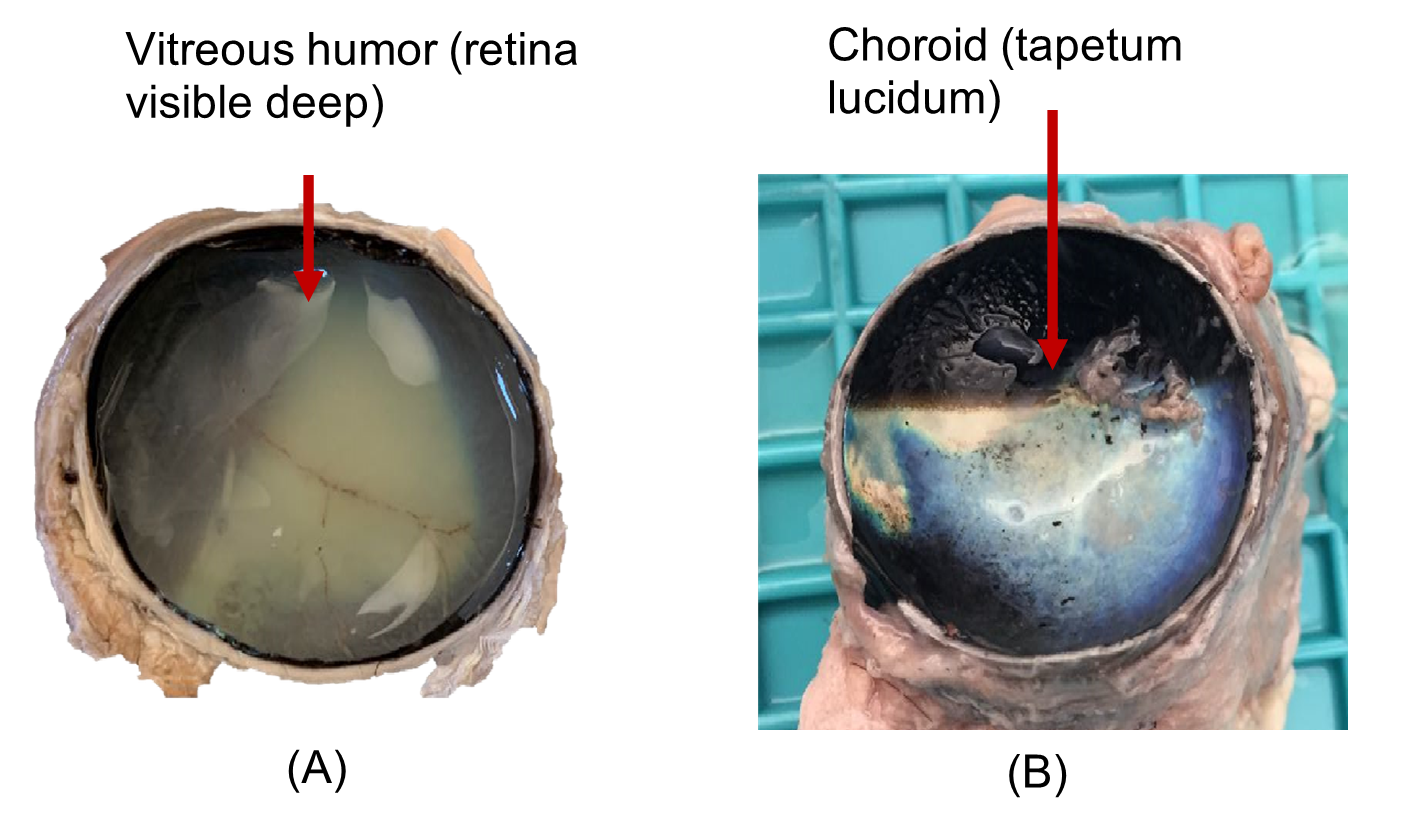
Figure 5: Anterior segment of cow’s eye with, (a) pupil visible and (b) lens in place and vitreous humor off to the side
7. To clean up
-
- Place the eye parts and the used paper towels in the bag labeled “dissection waste”. Your instructor will dispose of the bag in the trash at the end of lab.
- Remove and rinse the blue dissecting pad from the dissecting tray and place it in the drying rack. Rinse the dissecting tray separately and leave them unstacked by the sink.
- CAREFUL! Tools are sharp! Thoroughly clean your dissecting tools with soap and water. Dry them with paper towels and once dry, put them away neatly.
- Wipe down your lab bench with disinfectant.
8. Fill in the following table to help you summarize your findings. Use the column “eye structure” to name the structure indicated by the comment and use the column “answer” to answer the additional comment.
| Eye structure | Comment | Answer |
| ← Name the brown, loose membrane located at the posterior of the eye. What is the function of this structure? → | ||
| ← Name the Iridescent layer located in the posterior of the eye. What role does this layer play in vision? (Hint: humans do not have this structure) → | ||
| Choroid | How does the choroid of the human eye compare with that of the cow? | |
| Lens | What does the dissected lens feel like? Why? | |
| Vitreous humor | What does it feel like? | |
| Pupil | Describe the shape of the cow’s pupil. | |
| Ciliary bodies | What do these structures do and where are they located? |
Activity 3: Vision Tests
Materials:
- astigmatism visual of lines fanning outward
- centimeter ruler
- dissecting pin or paper clip
- Image of a “+” and a large dot
- Ishihara color plates
- Snellen eye chart
Background:
In this section of the lab, we will explore the different vision tests. Each test is described below.
A. The Snellen eye chart is the most common way to assess distance vision. For this activity, you will cover first one eye and then the other and be asked to read a chart with decreasing letter sizes from 20 feet away. From this we learn whether you are “normal” or nearsighted. We can then assess the extent of the curvature of concave lens required to correct your vision.
How to interpret the Snellen eye chart:
- 20/20: This indicates that the patient sees at 20 feet what
most people will see at the same distance - 20/40: This indicates that what the patient sees at 20 feet
most people will see at 40 ft. This is considered poor
distance vision. - 20/15: This indicates that the patient sees at 20 feet what
most people will see at 15 ft. This is considered better than
average distance vision.
B. The Ishihara color plates establish whether the color-sensing cones of your retina are active and working. Most people have three different color-detecting abilities within their cones: red, green, and blue. The color plates consist of a series of round circles of different sizes and shades. These colored circles form distinct patterns, usually numbers or paths for you to identify. Each plate tests the different color detecting cones to detect color vision deficiency.
C. Astigmatism is caused by an unusual curvature of the cornea or lens. This results in distortion of the image and blurry vision. Generally, corneal curvatures are inherited at birth. Luckily, corrective lenses can be used to account for the distortions, or Lasix surgery can correct the irregularities of the cornea itself.
D. The blind spot is the region of the optic disk that contains no photoreceptor cells. Even though the blind spot is technically part of the retina, it cannot detect light. Usually, when light hits the blind spot, the brain must “fill in the gaps”. Here you will have a chance to observe your own blind spot.
E. The near point of accommodation tests to see if the lens is elastic enough to bend the light onto a particular focal point on the retina. The near point of accommodation is the smallest (minimum) distance at which an object remains in focus. Generally, this changes with age. As the lens becomes less elastic, the eye can no longer focus light as readily on the retina, especially as objects get closer to the eye itself. This results in a condition called “presbyopia” (age-related farsightedness), and generally starts being noticeable around age 50.
F. Ocular tonometry is a test for detecting glaucoma, a condition of increased intraocular (inside the eye) pressure. In this test either a puff of air is blown onto the cornea, or a Tono-pen (probe) is directly applied to the cornea. These tests either indirectly or directly measure intraocular eye pressure. Typically, the increased pressure forms from accumulation of aqueous humor in the anterior cavity. The aqueous humor is a filtrate of blood which is produced by the ciliary body of the posterior chamber. From the posterior chamber it then flows into the anterior chamber via the pupil and then drains into the scleral venous sinus to be returned to the blood. A blockage or inefficient drainage of the aqueous humor leads to an increase in pressure in the anterior cavity. Increasing aqueous humor pressure may increase pressure on the lens, which will then press on the vitreous humor in a domino effect that can damage the retina. If the pressure in the eyeball is too great, then too much pressure will be placed on the retina, damaging the fragile photoreceptor cells, nerves and blood vessels of the eye. If left untreated, this can lead to progressive blindness. We will not be performing this test in lab.
Emran’s data
Dr. Reddy performs the near point of accommodation test on Emran. His results are given below.
Table 1: Emran’s near point of accommodation results.
| Near Point of Accommodation | |
| Right eye | 30 cm |
| Left eye | 33 cm |
The near point of accommodation is normal at 25 cm or closer. A person with hyperopia (farsightedness) or presbyopia (age-related farsightedness) has a near point of accommodation > 25 cm.
Dr. Reddy confirms that Emran, at age 54, has age-related farsightedness, called presbyopia (literally sight of old age). She explains to Emran that as people age, their lens loses the ability to accommodate (or bend) light because the lens itself becomes stiffer to bend and the ciliary muscles become weaker.
“But what about the air puff test?” asks Emran. Dr. Reddy explains that the pain in his right eye suggests that his intraocular pressure may be elevated. Remember that intraocular pressure is caused by a buildup of aqueous humor pressing on the back of the eye. Dr. Reddy suggests that he may have glaucoma in his right eye. She recommends further tests. Emran asks about intraocular pressure and glaucoma. Dr. Reddy assures Emran that there are medications that help to reduce the pressure in the eyeball that can lessen his chance of losing vision.
Procedure:
A. Visual acuity test (Snellen test)
1. Stand exactly 20 ft from the Snellen eye chart.
2. Have your lab mate stand at the Snellen chart to guide you as you take this test.
3. Take off your glasses if you have them. Close or cover one eye. With the open eye, read as far as you can down the chart. You are permitted one mistake. Once you make more than 1 mistake, stop. This is the level for your eyesight measurement.
4. Repeat the test by closing or covering the other eye and opening the one that was closed.
5. If you choose, repeat the test with your glasses on, being sure to keep one eye closed each time. With glasses, your eyesight should be 20/20.
6. After completing the Snellen eye test, write your results below.
-
-
- Left eye 20/____ Right eye 20/_____ (without glasses/lenses)
- Left eye 20/____ Right eye 20/_____ (with glasses/lenses, if applicable)
-
7. 20/20 is considered “perfect” vision. Describe how your vision in each eye compares to perfect vision.
8. The Snellen chart identifies nearsightedness (meaning you have trouble seeing from a distance). Based on your results, are you nearsighted?
B. Ishahara color plates
1. Use the Ishahara color plates provided in lab or, alternatively, visit https://www.color-blindness.com/ishiharas-test-for-colour-deficiency-38-plates-edition/ to determine whether you are colorblind or not see if you can detect what number is displayed in each plate. If you do not see a distinct number or pattern, report it as “random”. Write down your responses on the online form provided.
2. Report the results of your colorblindness test:
-
-
- No colorblindness _____ Colorblindness ____
-
3. Name the two types of photoreceptors found in the eye.
4. Which of these two types of photoreceptors detects color?
C. Astigmatism test
1. Using the image of lines fanning out from a single point, close the right eye and stare at the image. If any of the lines appear wavy, this indicates a curvature of the cornea called astigmatism. If the lines all appear straight, then no astigmatism is present. Repeat the test with the left eye closed and the right eye open.
-
-
- Left eye: ________
- Right eye: _______
-
2. Based on the astigmatism test, do you have astigmatism?
D. Blind spot
1. Hold the figure of the “plus” and a “dot” 45 cm from your eyes. (Have your lab mate help you measure this distance with a metric ruler).
2. Close or cover your left eye. Use your right eye to stare at the “plus”. You will see the “dot” in your peripheral vision. Focus only on the “plus”, and gradually bring the image closer and closer to your face until the “dot” disappears, then stop. This is your blind spot.
3. Have your partner measure this distance with a centimeter ruler. Repeat the procedure using the other eye. This time, use your left eye to stare at the “dot”, and you will see the “plus” in your peripheral vision. Move the image closer and closer until the “plus” disappears, then stop. Have your partner measure the distance. This is your blind spot.
4. Did you find your blind spot in each eye (Yes/No)?
-
-
- Left eye: ________
- Right eye: _______
-
5. Why do you have a detectable blind spot at all (or, what is the anatomical reason for a blind spot in your eye)?
E. Test for Near Point of Accommodation
1. Hold a dissecting pin or unfolded paper clip at arm’s length in front of one of your eyes while keeping the other eye closed or covered.
2. Slowly bring the dissecting pin or paper clip closer to your open eye until it just starts to become blurry. Stop and have your lab partner measure the distance from your eye to the pin with a metric ruler in cm. This is your near point of accommodation. It reflects the point beyond which your lens cannot bend any further to focus light on your retina.
3. Repeat the procedure using the other eye, being sure to have your lab partner measure the distance (in cm) from the pin to your eye. Report your near point of accommodation results:
-
-
- Right eye ________ cm
- Left eye _________ cm
-
4. The near point of accommodation is normal at 25 cm or closer. A person with hyperopia (farsightedness) or presbyopia (age-related farsightedness) has a near point of accommodation > 25 cm. Based on the results of your near point of accommodation test, do you have normal eyes or hyperopia?
PART II: Ear Anatomy and Physiology
Case Study: “To hear or not to hear?”
You are a nurse working in an audiologist’s office. This morning, your patient is a 2-year-old girl, named Anne. Her mother complains that her daughter doesn’t respond to sound, even loud sounds, and she is worried that her daughter’s stubborn behavior is more than just the terrible twos, but an inability to hear. Her mother also reports that her speech development is delayed, noting that her vocabulary seems stunted compared to other children in her day care room, and that she seems to have trouble forming some of her letters. In all other ways, the little girl is alert and oriented, responds well to attention and has normal vital signs. First you examine the anatomical structures of her ear using an otoscope and then proceed to administering several hearing tests.
Activity 4: The Anatomy and Physiology of the Ear
Materials:
- ear model
- ear terminology labels with sticky tack
Background:
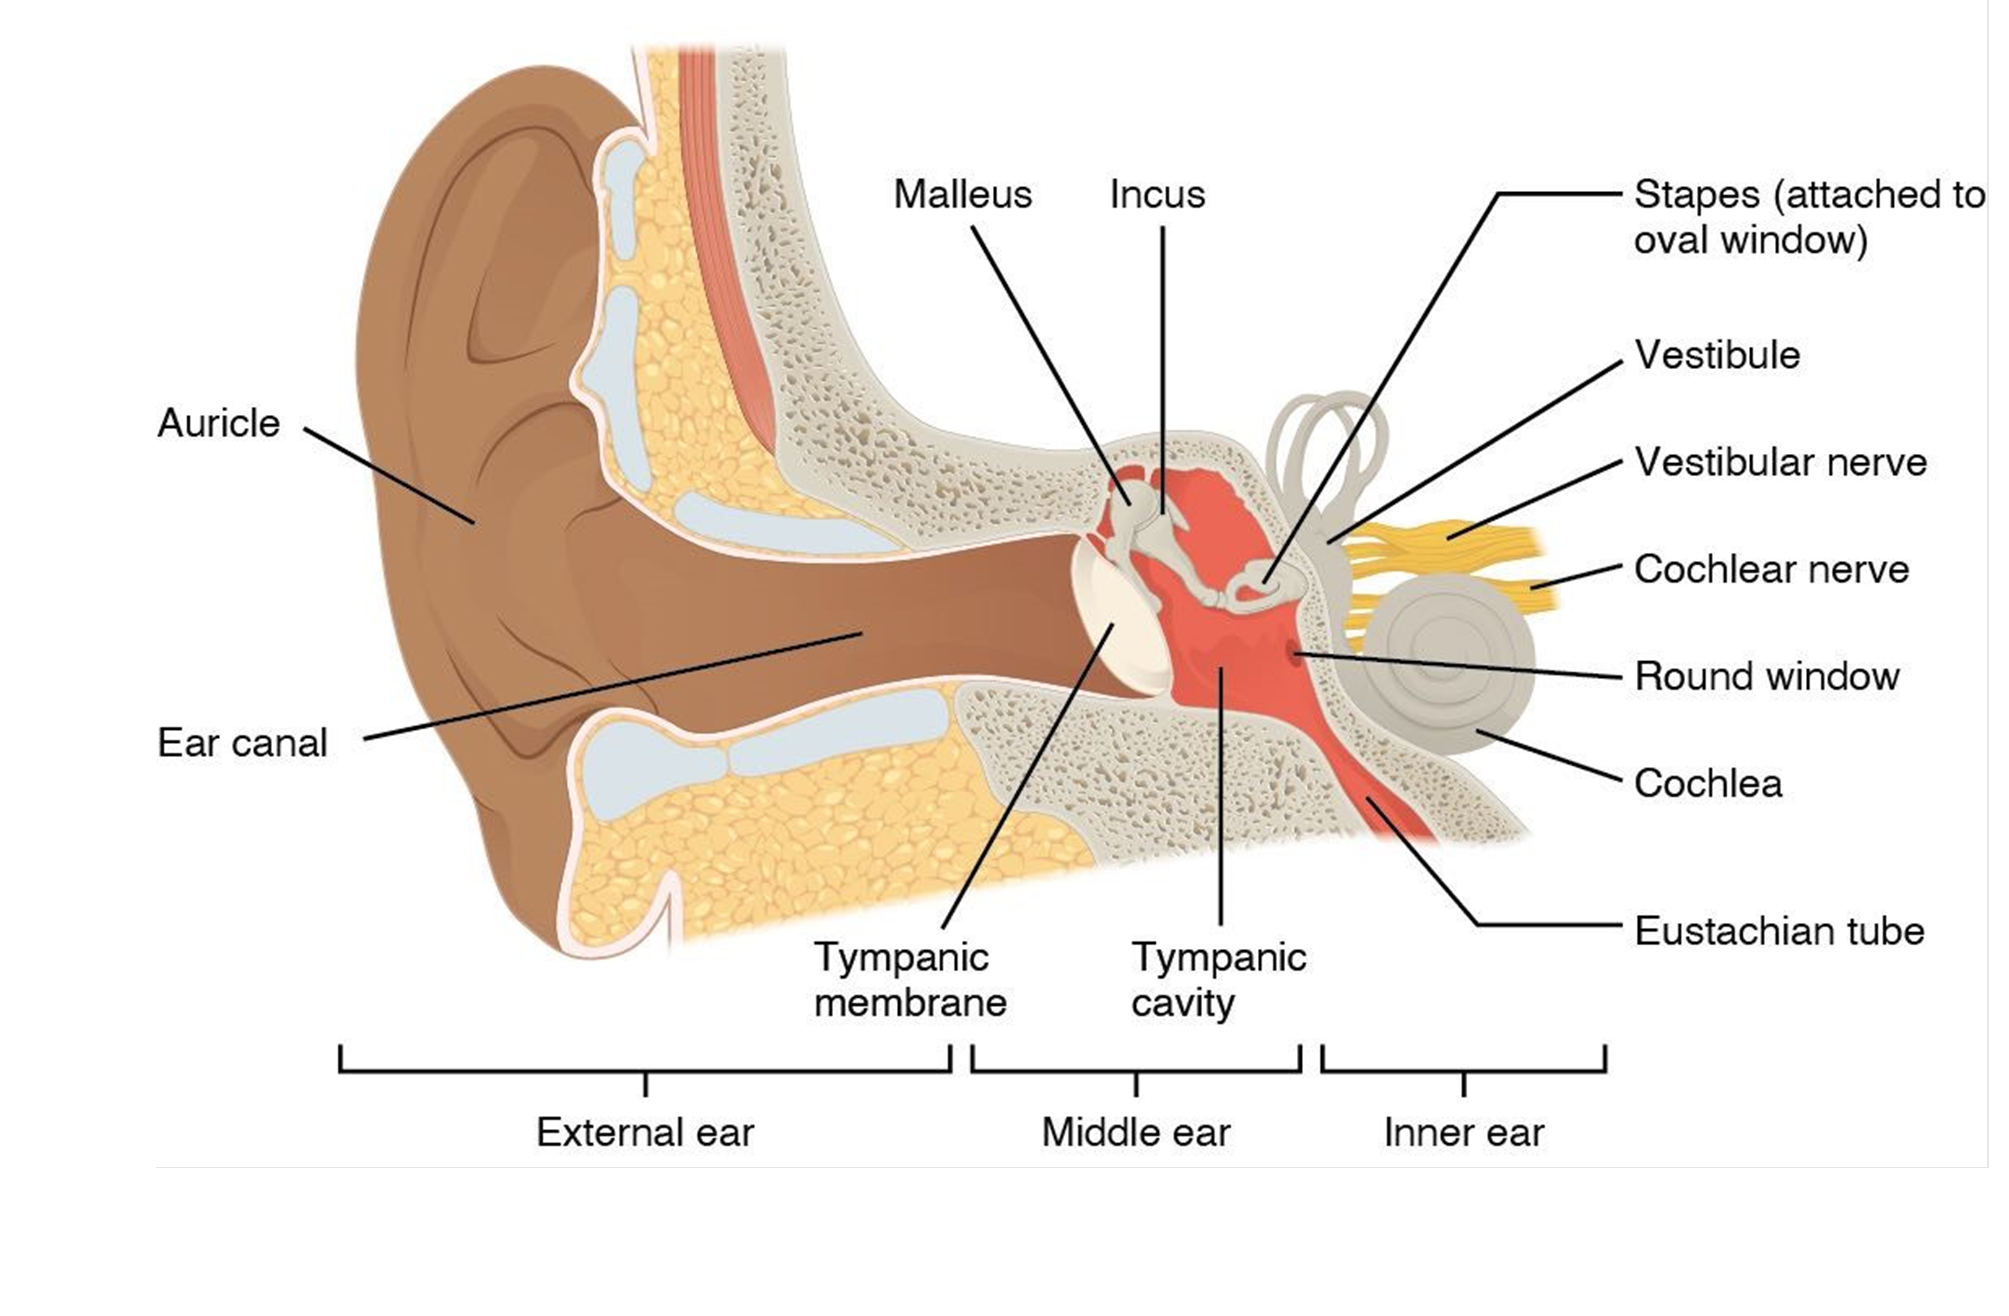
When examining a patient for possible hearing loss, it is important to first look at the anatomical structures of the ear. The ear is divided into 3 regions: outer, middle, and inner ear. The outer ear includes all parts that are external to the tympanic membrane and can be readily observed by simple gross observation. The middle ear includes the tiny ossicles located between the tympanic membrane and the oval window. The ossicles are better known by their individual names: the malleus (hammer), the incus (anvil) and the stapes (stirrup), so named because of their unique shapes. The middle ear is bounded on two sides by a membrane and has a pressure relief valve, the pharyngotympanic tube, which connects the middle ear to the pharynx. This allows for pressure to be equalized between the external ear and the middle ear. Anyone who has noticed that their ears “pop” has experienced equalization of pressure in the ear via this tube. This tube does not conduct sound.
An otoscope is used to visualize the auditory canal and the surface of the tympanic membrane (or eardrum). The middle ear is located between the tympanic membrane and the oval window and is not observable with an otoscope. Specifically, the tympanic membrane articulates with the malleus, which articulates with the incus, and then with the stapes, which touches the oval window. The vibration of the stapes vibrates the oval window, thus creating waves in the fluid of the inner ear. The inner ear is encased entirely within the temporal bone of the skull and houses the vestibule, the semi-circular canals, and the cochlea, all of which contain fluid. The round window is located below the oval window and reverberates when the cochlear fluid presses against it. The inner ear is not observable by a normal exam and would require additional imaging (Figure 6).
Figure 6: Structures of the ear.
Procedure:
1. Locate each of the structures on your terminology sheet. Label the ear model using provided labels or labeling tape and have your instructor initial when you complete this activity.
Instructor Initials of labeled ear model: ________
2. Fill in the chart to help you summarize the information you learned.
| STRUCTURE | QUESTION | ANSWER |
| Names the three tiny ossicles in the middle ear.
What purpose do these tiny ossicles serve? |
||
| PHARYNGOTYMPANIC TUBE |
What is the purpose of this tube? | |
| ROUND WINDOW and OVAL WINDOW |
Compare the location of the round and oval window.
What is the difference in function between these two structures? |
3. Using correct terminology, label the ear below and number the pathway of sound from the external pinna (1) to the cochlea (last number).
Pathway of Sound
Activity 5: Conduction vs. Sensorineural Deafness
Materials:
- none
Background:
The initial exam of Anne’s ear revealed no anatomical explanation for why she is experiencing hearing loss symptoms. As sound waves enter the ear they are funneled toward the tympanic membrane. The rest of the ear serves to convert those sound waves first into mechanical vibrations in the middle ear, and then into fluid vibrations in the inner ear that then trigger tiny hair cells within the cochlea to form action potentials sent to the brain. To test the transmission of the soundwaves both via vibration and fluid to their transformation into electrical signals sent to the brain, a variety of hearing tests must be performed.
Hearing loss is generally classified as either conduction or sensorineural deafness. Audiologists use hearing tests to determine which type of deafness a patient has. These tests help localize possible areas of pathology and can help determine treatments such as a cochlear implant.
Conduction deafness generally occurs when sound is prevented from reaching a functional cochlea. Anything that can block the sound from reaching the cochlea is categorized as conduction deafness. Impounded (compacted) earwax in the external ear can impede sound waves, for example. A ruptured eardrum may reduce the vibrations that are sent to the cochlea. When the ossicles no longer vibrate due to excessive fluid in the middle ear or excessive scarring of the bones themselves or of the ligaments from which the bones are suspended, conduction deafness occurs. Interestingly, conduction deafness only impedes the air vibrations, but sound vibrations can move through bone as well. This is called bone conduction. Someone with conductive hearing loss can still hear via bone conduction. To assess bone conduction, a vibrating tuning fork is placed against the skull bones themselves. If a person hears the tone when it is touching bone, but not when the tuning fork is vibrating through the air, then a diagnostician may suspect conductive hearing loss, particularly if the sound is LOUDER when the tuning fork is against bone than when it is allowed to vibrate through air. The sound is said to be louder on the affected side versus the normal side because the nerve on the affected side becomes more sensitive to sound. The nerve is acting the same way if you were talking to someone on the phone and needed to turn up the volume to hear them.
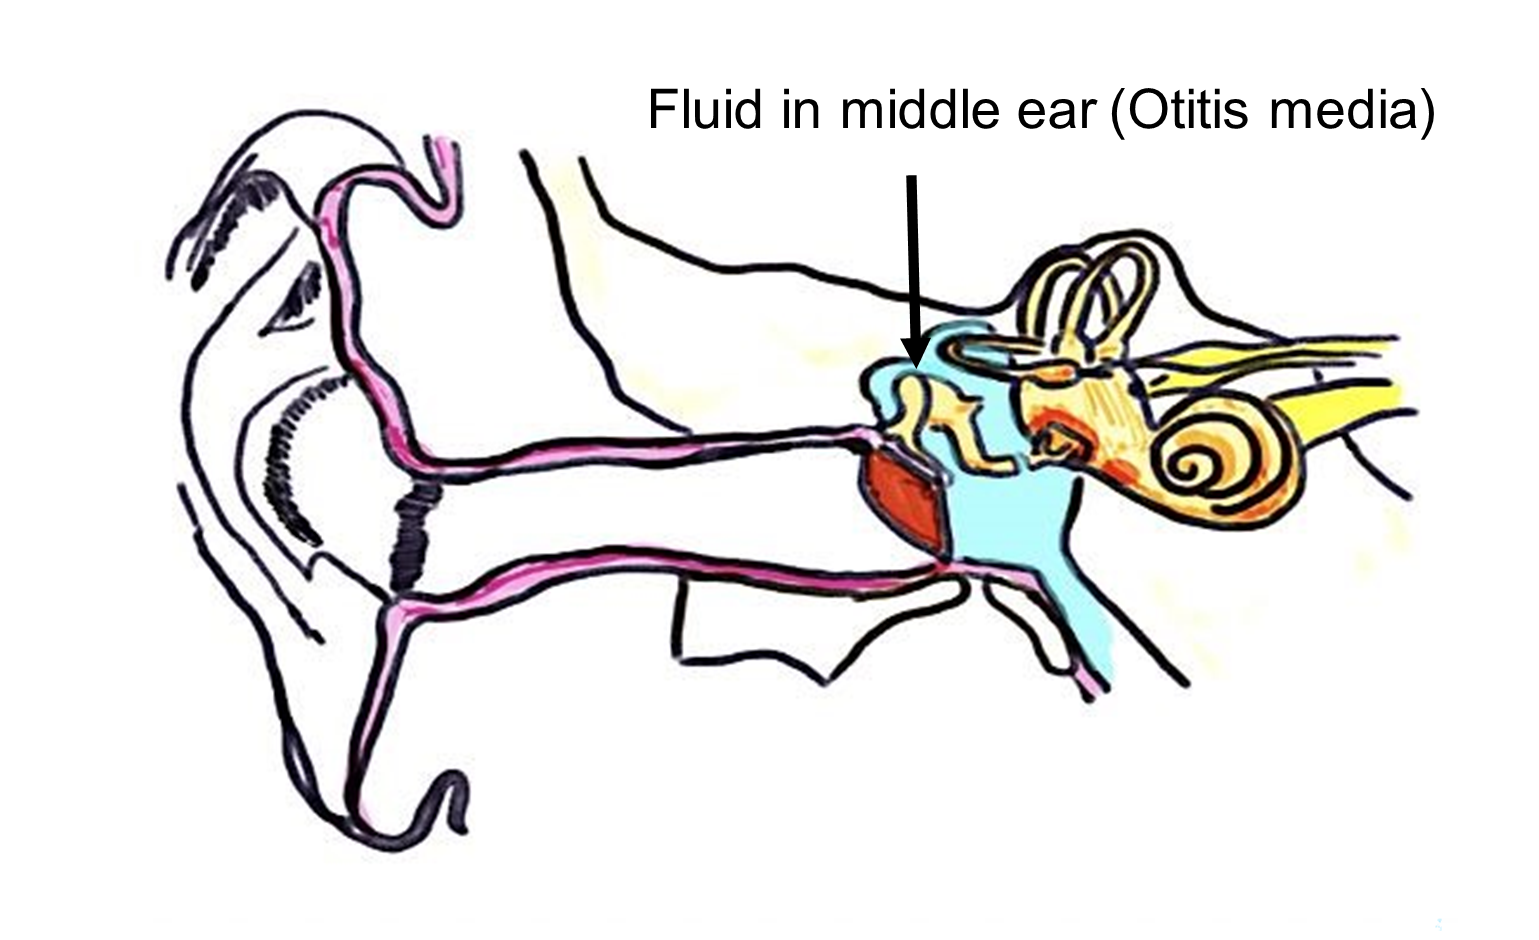
Note the colored section (blue) of the middle ear (Figure 7). Let’s say that the right middle ear is filled with fluid, a condition called otitis media. When this happens, the excess fluid prevents the tiny ossicles from vibrating against each other, and sound conduction is impeded. Because sound vibration is blocked, the patient would be diagnosed with conduction deafness.
Figure 7: Image of human ear with otitis media (fluid in the middle ear), colored in blue.
Sensorineural deafness results when the cochlea is non-functional. Tiny hair cells along the basilar membrane inside the cochlea must be triggered by sound waves, converted into fluid waves located in the perilymph and endolymph, the fluids of the inner ear. Wave-detecting mechanoreceptors, really tiny hairs called microvilli, located on hair cells, are found within the cochlea. When the tiny hairs on the hair cells of the cochlea mechanically bend due to the fluid vibrations of the cochlear fluid, action potentials are generated along the cells to the vestibulocochlear nerve to the brain to detect sound. If these hair cells are damaged, they cannot trigger an action potential to carry the signal to the vestibulocochlear nerve and from there to the brain. Damaged cochlear hair cells will result in sensorineural deafness. A person with sensorineural deafness will not hear out of that ear regardless of whether the sound is generated via bone conduction or air conduction.
In Anne’s case, hearing tests were able to rule out conduction deafness. While she responded appropriately to hearing out of the right ear, her accuracy at hearing tones in the left ear was poor. She suffers from damage to the cochlea on the left side and has been diagnosed with sensorineural deafness on the left side. This will impede her ability to detect stereophonic sound.
Procedure:
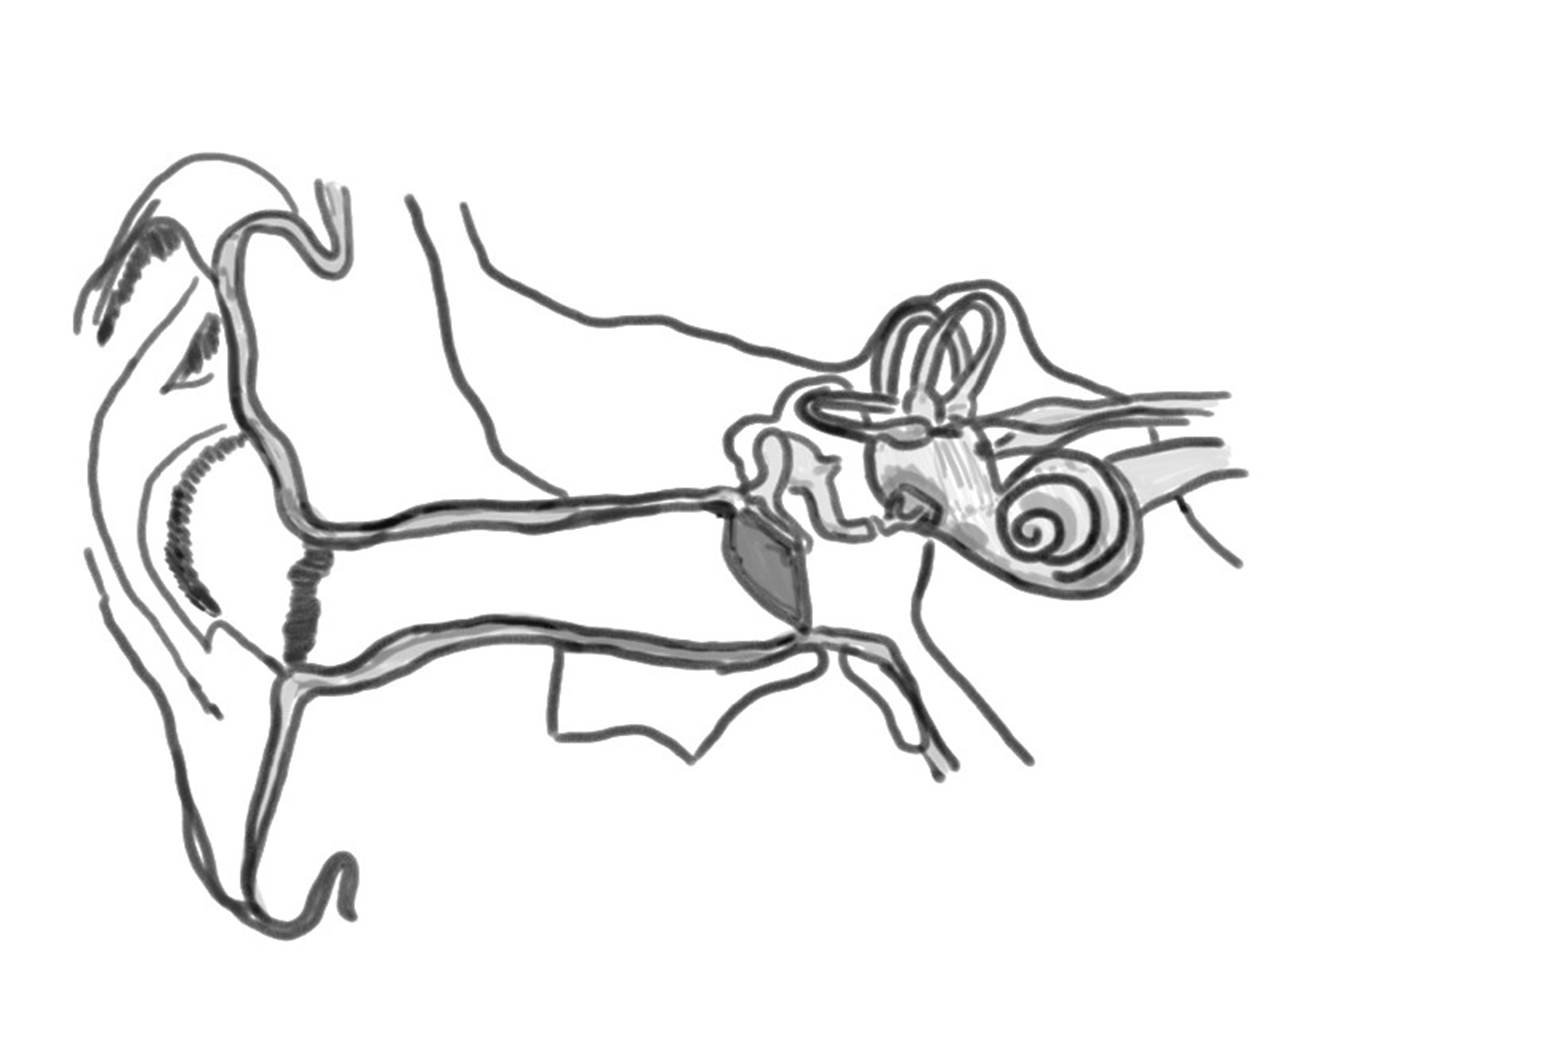
1. On the diagram below, color the parts of the ear that might lead to conduction deafness RED. Color the parts of the ear that might lead to sensorineural deafness GREEN.
Anatomy of Ear to Color
2. Have your instructor initial your colored diagram from question 1 when you finish.
Instructor’s Initials of colored diagram: __________
3. A patient has an ear infection in which excess fluid builds up in the middle ear. The excess fluid prevents the tiny ossicles from vibrating against each other, and sound conduction is impeded. Is this considered sensorineural deafness or conduction deafness? See Figure 7. Explain your choice.
4. Anne has been diagnosed with sensorineural deafness in the left ear. Describe the probable location of the problem in Anne’s ear and justify your response.
5. Activate the provided tuning fork by striking it against the rubber triangular activator. While it vibrates, put it close to your ear. Do you hear the diminishing vibrations? Make sure you try both ears!
6. Now strike the tuning fork a second time. This time, place the base of the tuning fork against your skull, right at the mastoid process, inferior to your ear. Do you hear the vibrations? You may be able to hear them for longer than you could with air conduction. This is due to bone conduction. Your skull bones are sending vibrations to your cochlea which is picking up the sounds!
7. How good is your hearing? Let’s find out! Normally, humans can hear frequencies from 20 Hz to 20,000 Hz (or 20 KHz). As you age, your ability to detect the higher frequencies deteriorates. People who cannot hear higher than 8,000 Hz (8 KHz) have high frequency hearing loss. Your instructor will use a tone generator to determine your hearing range. https://www.szynalski.com/tone-generator/.
-
- At what hertz did you first hear the tone? _______
8. Discus the results of the test with your lab mates and brainstorm a possible cause or causes for these differences.
Activity 6: The Romberg Test
Materials:
- blackboard or chalkboard
- dry erase marker or chalk
Background:
When you have a common cold, you may have noticed that your ability to taste and smell is lessened. You may find that your ears feel stuffy and you can’t hear as well. You might even feel dizzy. What explains these symptoms? The culprit is related to excess fluid in the ear, nose, and throat. Generally, the excess fluid results from inflammation, one of the hallmarks of infection. Inflammation triggers blood vessels to become more permeable, allowing body fluid to leak into body cavities like the nasal cavity and the pharynx. This can lead to horrible stuffy nose, post-nasal drip, and scratchy throat. The extra fluid blocks the chemoreceptors in your nose that allow you to smell. Smell and taste are closely tied together. The chemoreceptors on your tongue that sense taste are also blunted. Thus, your sense of taste and smell is reduced.
When excess fluid backs up into the pharynx, it can clog or even rise into the pharyngotympanic tube, leading to the middle ear. If the middle ear becomes clogged with fluid or, if the pharyngotympanic tube cannot equalize the pressure across the tympanic membrane, then the ossicles of the middle ear cannot vibrate as readily, dampening the sound. The fluid in the middle ear acts to prohibit air conduction. This is why sometimes hearing seems muffled. To an extent, you have temporary conductive hearing loss.
But what about dizziness? Remember that the brain is simultaneously receiving information from many parts of the body at once. Information is being sent to the brain from the eyes as well as from the tension and pressure of stretch receptors in muscle. These differing sensations provide a nearly complete picture of where you are in three-dimensional space, a sensation called proprioception. To complete the picture, your brain relies on additional information from your ears. If your eyes and other body receptors are sending signals that you are not moving but your ears are sending signals that you are moving, this mismatch results in dizziness.
Your ears send critical information for perceiving where you are in three-dimensional space. The three semi-circular canals located in the inner ear are hollow tubes oriented at right angles to one another. One canal is oriented in the “X” (horizontal) axis, one in the “Y” (vertical) axis, and one in the “Z”(forward/backward) axis. Inside these three canals is a fluid called perilymph, which, when the head moves along a specific plane, “sloshes” around in the canal. This is turn causes tiny mineral deposits called otoliths to toss and turn, like grains of sand tossed in a wave as it rolls into shore. The tiny otoliths (literally ear rocks) roll across a thick membrane and trigger tiny hair cells, similar to the ones in the cochlea, to depolarize. These action potentials are sent along the vestibulocochlear nerve to the cerebellar portion of the brain to detect balance. Since the hair cells only send action potentials when the rolling otoliths activate them, the brain is sent very specific information about the location of the body in three-dimensions as it gets information from all three semi-circular canals. Thus, the semi-circular canals are considered the primary sensation for proprioception.
However, since the fluid continues to “slosh” even after movement has ended, the brain can receive inaccurate information about where you are in space and you feel “dizzy”. For example, consider the sensation you have after exiting a particularly whirly ride at an amusement park. The world has stopped spinning, according to your eyes and the stretch receptors located in your muscles, but your brain continues to receive information from your semi-circular canals that you are moving since the perilymph and otoliths continue to “slosh” around. You feel dizzy.
What about dizziness caused by sickness rather than a rapidly spinning body? That dizziness probably stems from the ears sending conflicting information due to excessive inflammation in the ear. Excess fluid can disrupt the normal waves of the inner ear. Here we will test the semi-circular canals with the Romberg test.
Procedure:
The Romberg Test (balance)
1. Stand erect against the blackboard or dry erase board. Fold your arms. Place your feet as close together as possible, with your medial malleolus’ (ankle bones) touching. Alternatively, place one foot directly in front of the other foot.
2. Have a partner mark the midline of your torso on the blackboard or piece of paper behind them with a long vertical line.
3. For one minute, stand against the blackboard, staring straight ahead. Make sure that you are not leaning up against the board. Have your partner note how much you swayed from side to side and notate the results in the table below.
4. For the second minute, stand against the blackboard, feet close together or one in front of the other, staring straight ahead, arms folded, but this time close your eyes. Have a partner note whether you moved or swayed more or less with your eyes open compared to closed. Record your results of the Romberg test.
| Did you sway at all, slightly, a lot, or significantly? (0, +, ++, +++) |
|
| Eyes open | |
| Eyes closed |
5. What part of the ear is responsible for balance?
6. Do you think vision plays a role in balance? Justify your response, based on the results of the Romberg test.
Putting It All Together
Emran, our 54-year-old patient suffers from age-related presbyopia. Glasses should help him see more clearly. He has also been referred for more tests to assess for glaucoma, the build-up of pressure in the eyeball, due to the pain he experienced during the eye-puff test. Because we cannot actively drain the vitreous humor of the posterior cavity or the aqueous humor of the anterior cavity, it is important to monitor Emran’s eye pressure regularly. Glaucoma may lead to blindness if the retina is damaged. He can be given medication to help lower his blood pressure which will also reduce the formation of excess fluid in the aqueous chamber.
Our pediatric patient, Anne, has experienced hearing loss. Hearing tests confirmed that Anne suffers from sensorineural deafness in her left ear, rather than conduction deafness. This makes her a candidate for hearing aids or a cochlear implant, depending on the extent of sensorineural deafness.
Creative Commons Citations:
- Special Senses Lab a Case-Study Based OER Lab Manual for A&P I © 2022 by G. Backus, H. Wangerin, P. Rodgers is licensed under CC BY-NC-SA 4.0.
- Figures 1, 2, 3 and 6 © 2023 OpenStax Anatomy and Physiology 2e is licensed under CC BY 4.0.
- Figures 4 and 5, Eye Model to Label, and Chambers to Label © 2022 by H. Wangerin is licensed under CC BY-NC-SA 4.0.
- Figure 7, Pathway of Sound, and Anatomy of Ear to Color, Neuromuscular Junction Image © 2022 by G. Backus is licensed under CC BY-NC-SA 4.0.
