
4 Anatomical Terminology and Organ Systems Lab
"Anatomy is to physiology as geography is to history; it describes the theater of events." - Jean Fernel
Gillian Backus; Heidi W. Wangerin; and Paula Rodgers
Objectives
- Describe the function(s) of each of the 11 organ systems.
- Identify the major organs of each organ system and explain their function(s).
- Display and describe standard anatomical position.
- Name the regions of the body using proper surface anatomy terms.
- Define each directional term and use them to describe the relationship between two structures on a body.
- Describe the three different body planes using directional terms to divide the body into sections.
- Given a body image, determine the body plane that is represented.
- Name and identify the location of the cavities in the body and list the major organs in each cavity.
- Identify and name the serous membranes for the pleural, pericardial, and abdominal cavities.
- Identify the 4 quadrants and the 9 regions of the abdomen. Identify the main organs in each region.
- Apply your knowledge to a medical scenario by describing the surface location, serous membranes penetrated, relative position, plane of section, and abdominal region (if applicable) of an injury on a patient.
Terminology Checklist
Surface Anatomy
|
Trunk
|
Upper Limb
|
Body Cavities
|
Lower Limb
|
9 Abdominopelvic Regions
|
Directional Terms
|
4 Abdominopelvic Quadrants
|
Body Planes of Section
|
Serous Membranes
|
Organ Systems
|
Major Organs
|
Outline of Lab
Case Study: “Assisting the Surgeon”
Activity 1: Organ Systems and Functions
Activity 2: Anatomical Terminology
Activity 3: Directional Terms
Activity 4: Body Planes and Sections
Activity 5: Body Cavities and Membrane Linings
Activity 6: Abdominal Regions and Quadrants
Case Study: “Assisting the Surgeon”
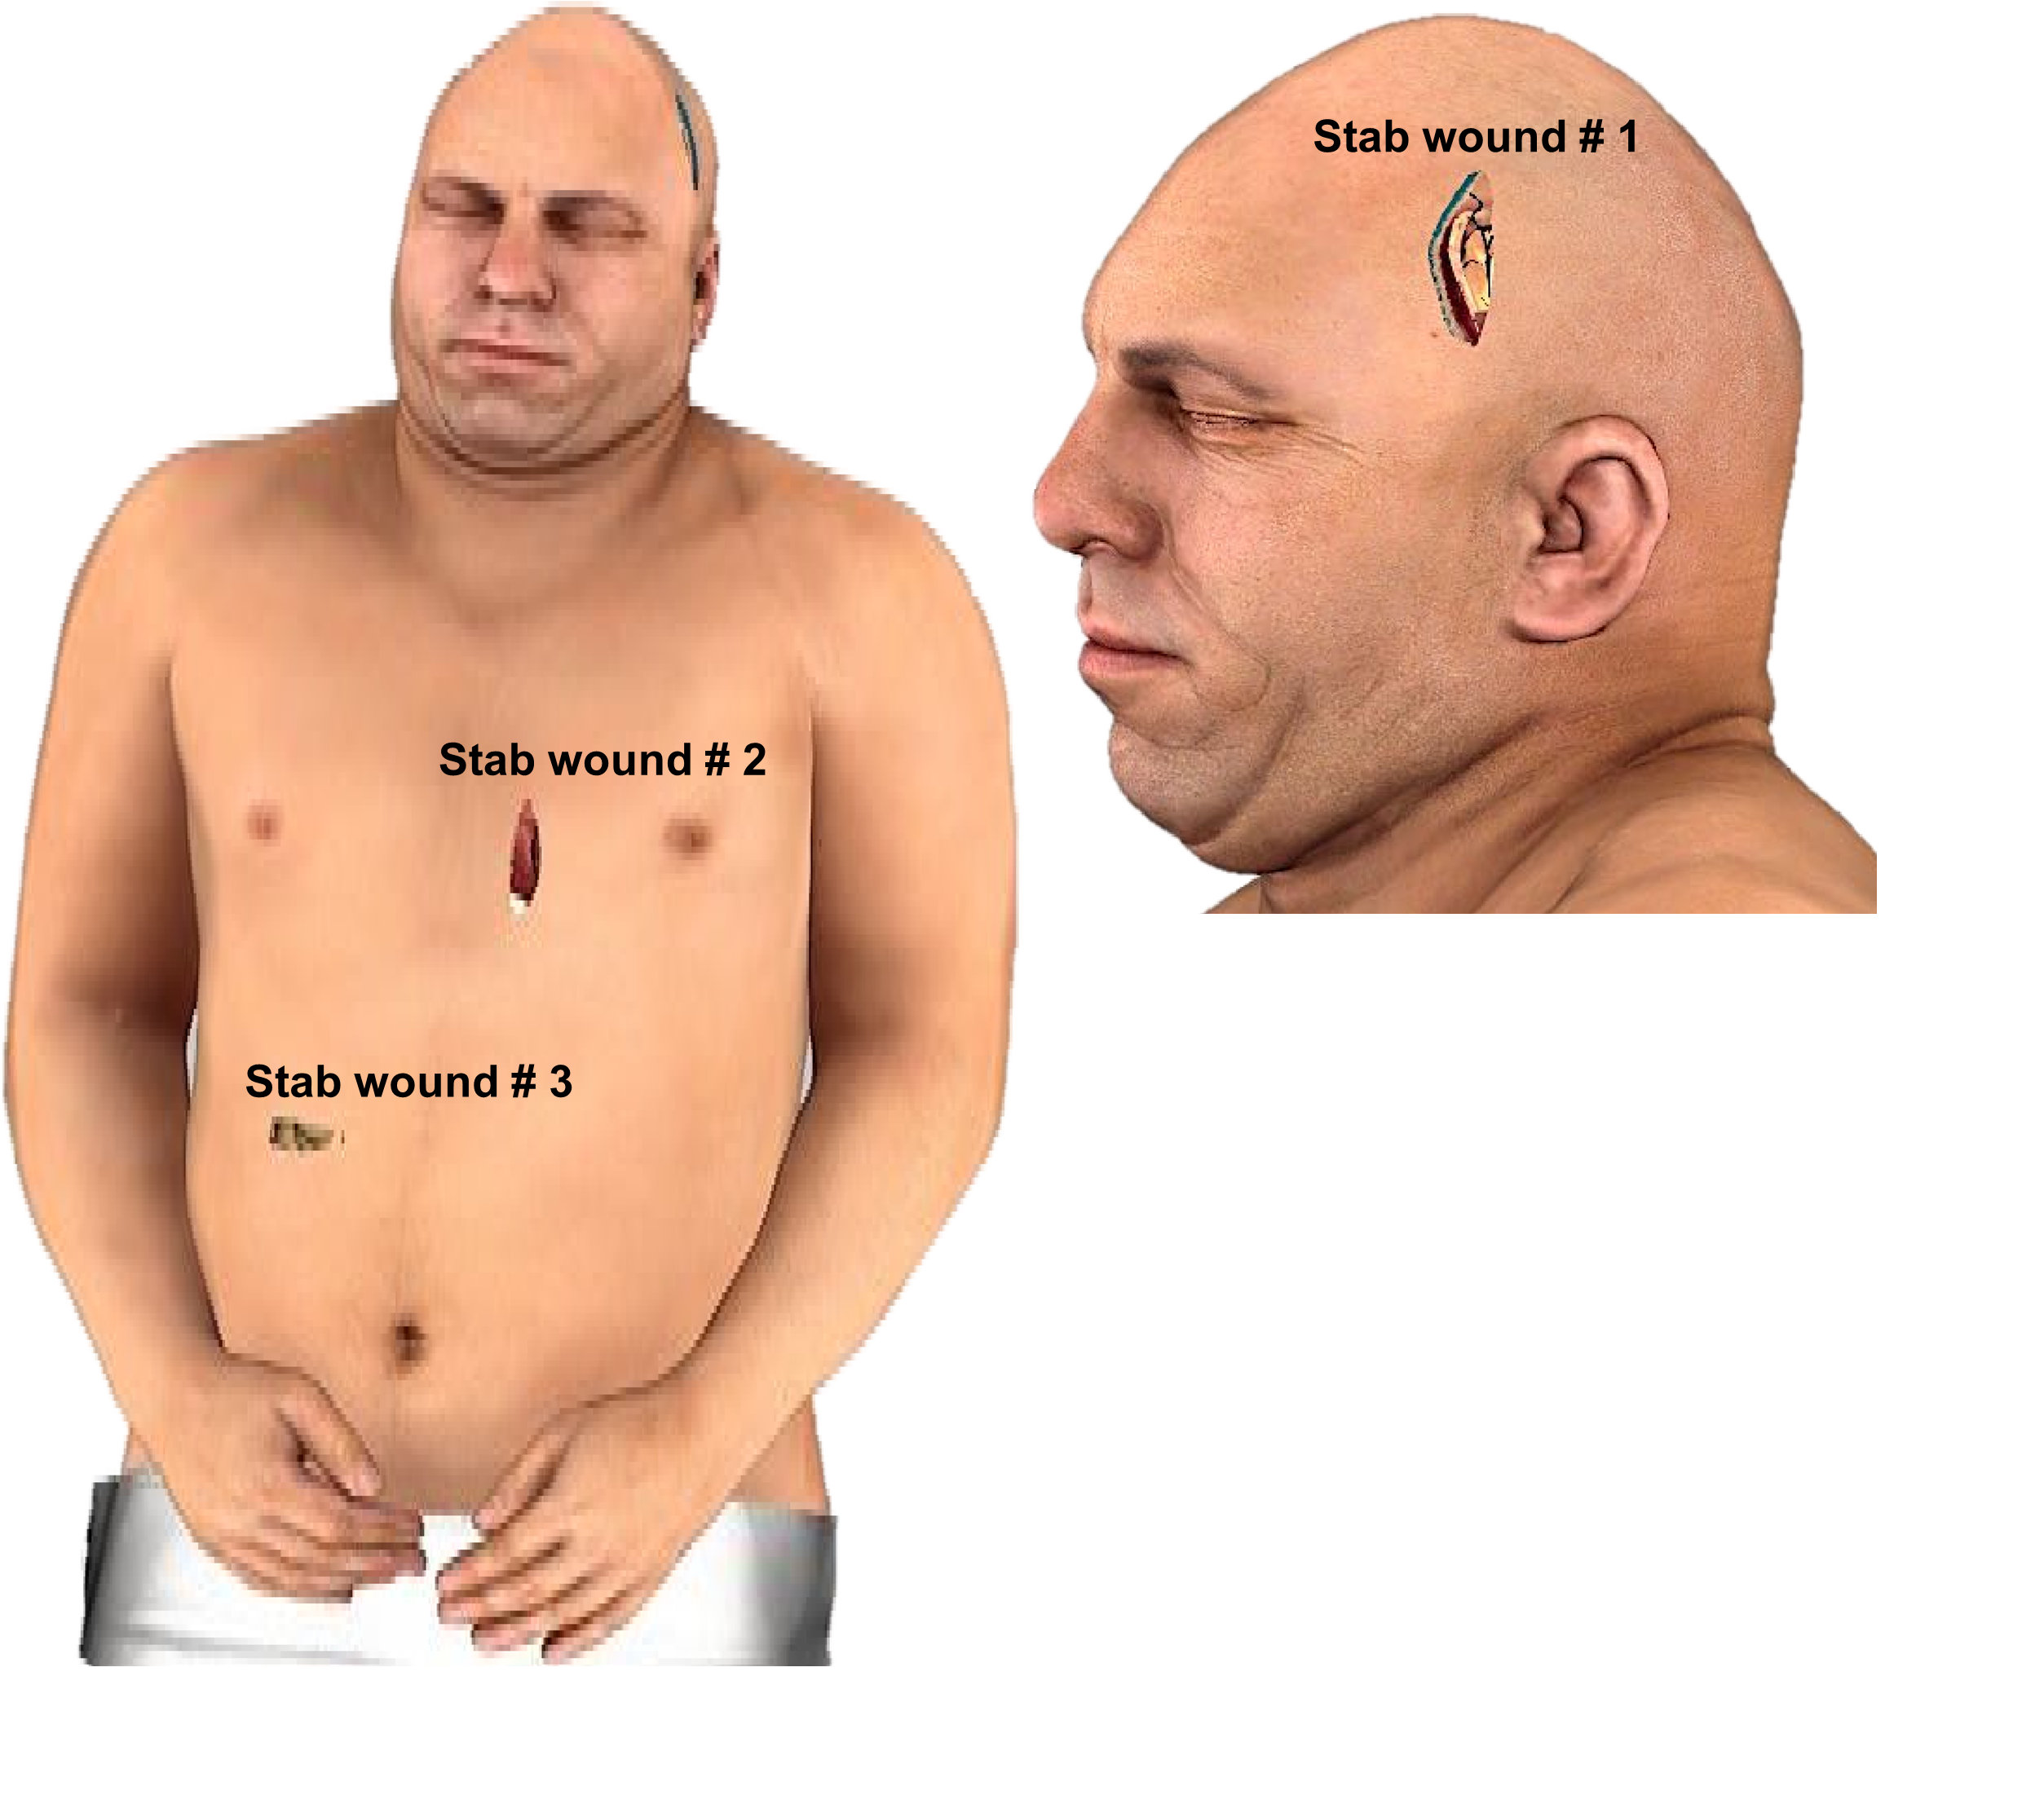
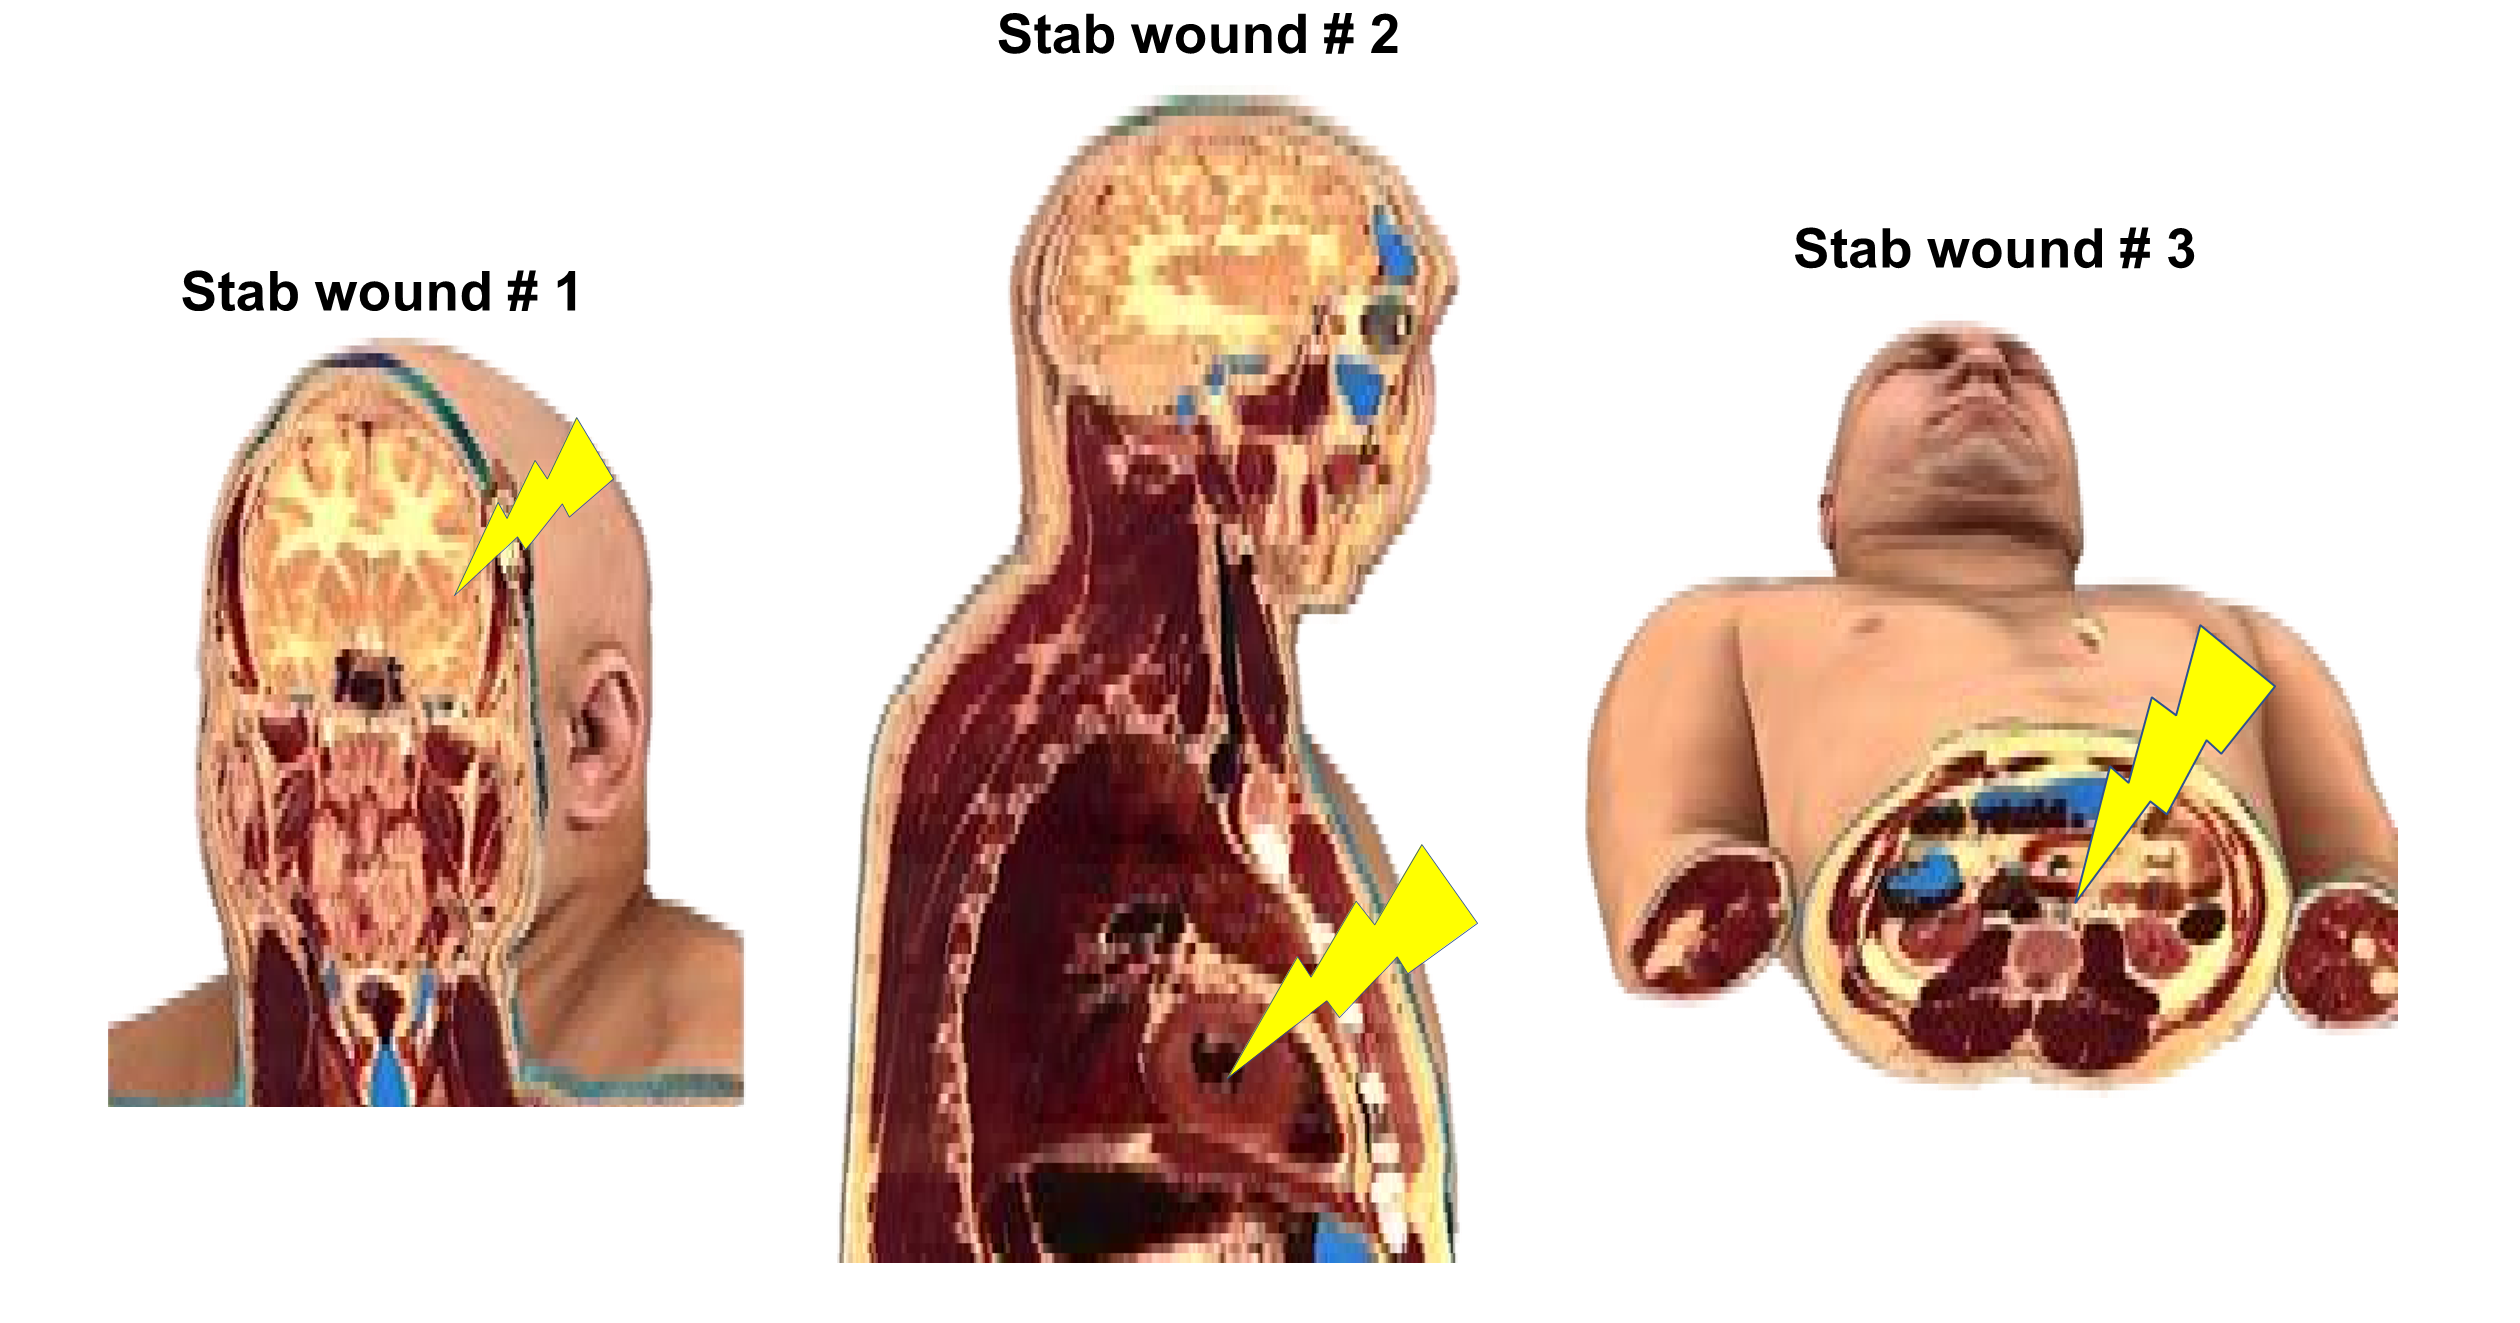
You are a physician’s assistant working in the ER. Paramedics rush in a male patient with multiple stab wounds. He is unresponsive and has difficulty breathing. The paramedics provide you with his vitals: heart rate 150 beats/minute (normal = 50-75 beats/minute), blood pressure 80/60 (normal is 120/80), blood oxygen saturation of 90% (normal is 99%). He is immediately placed on oxygen and his injuries imaged to evaluate their extent for the surgical team. Your job is to assess the injuries, describe their location and relative position on the body. It is critical that you record this information accurately for the attending surgeon to operate properly. Below is a full body picture showing the location of the three injuries sustained by the patient (Figure 1).
Figure 1: Images showing three wounds on the patient (head, thorax, and abdomen).
Activity 1: Organ Systems and Functions
Materials:
|
Background:
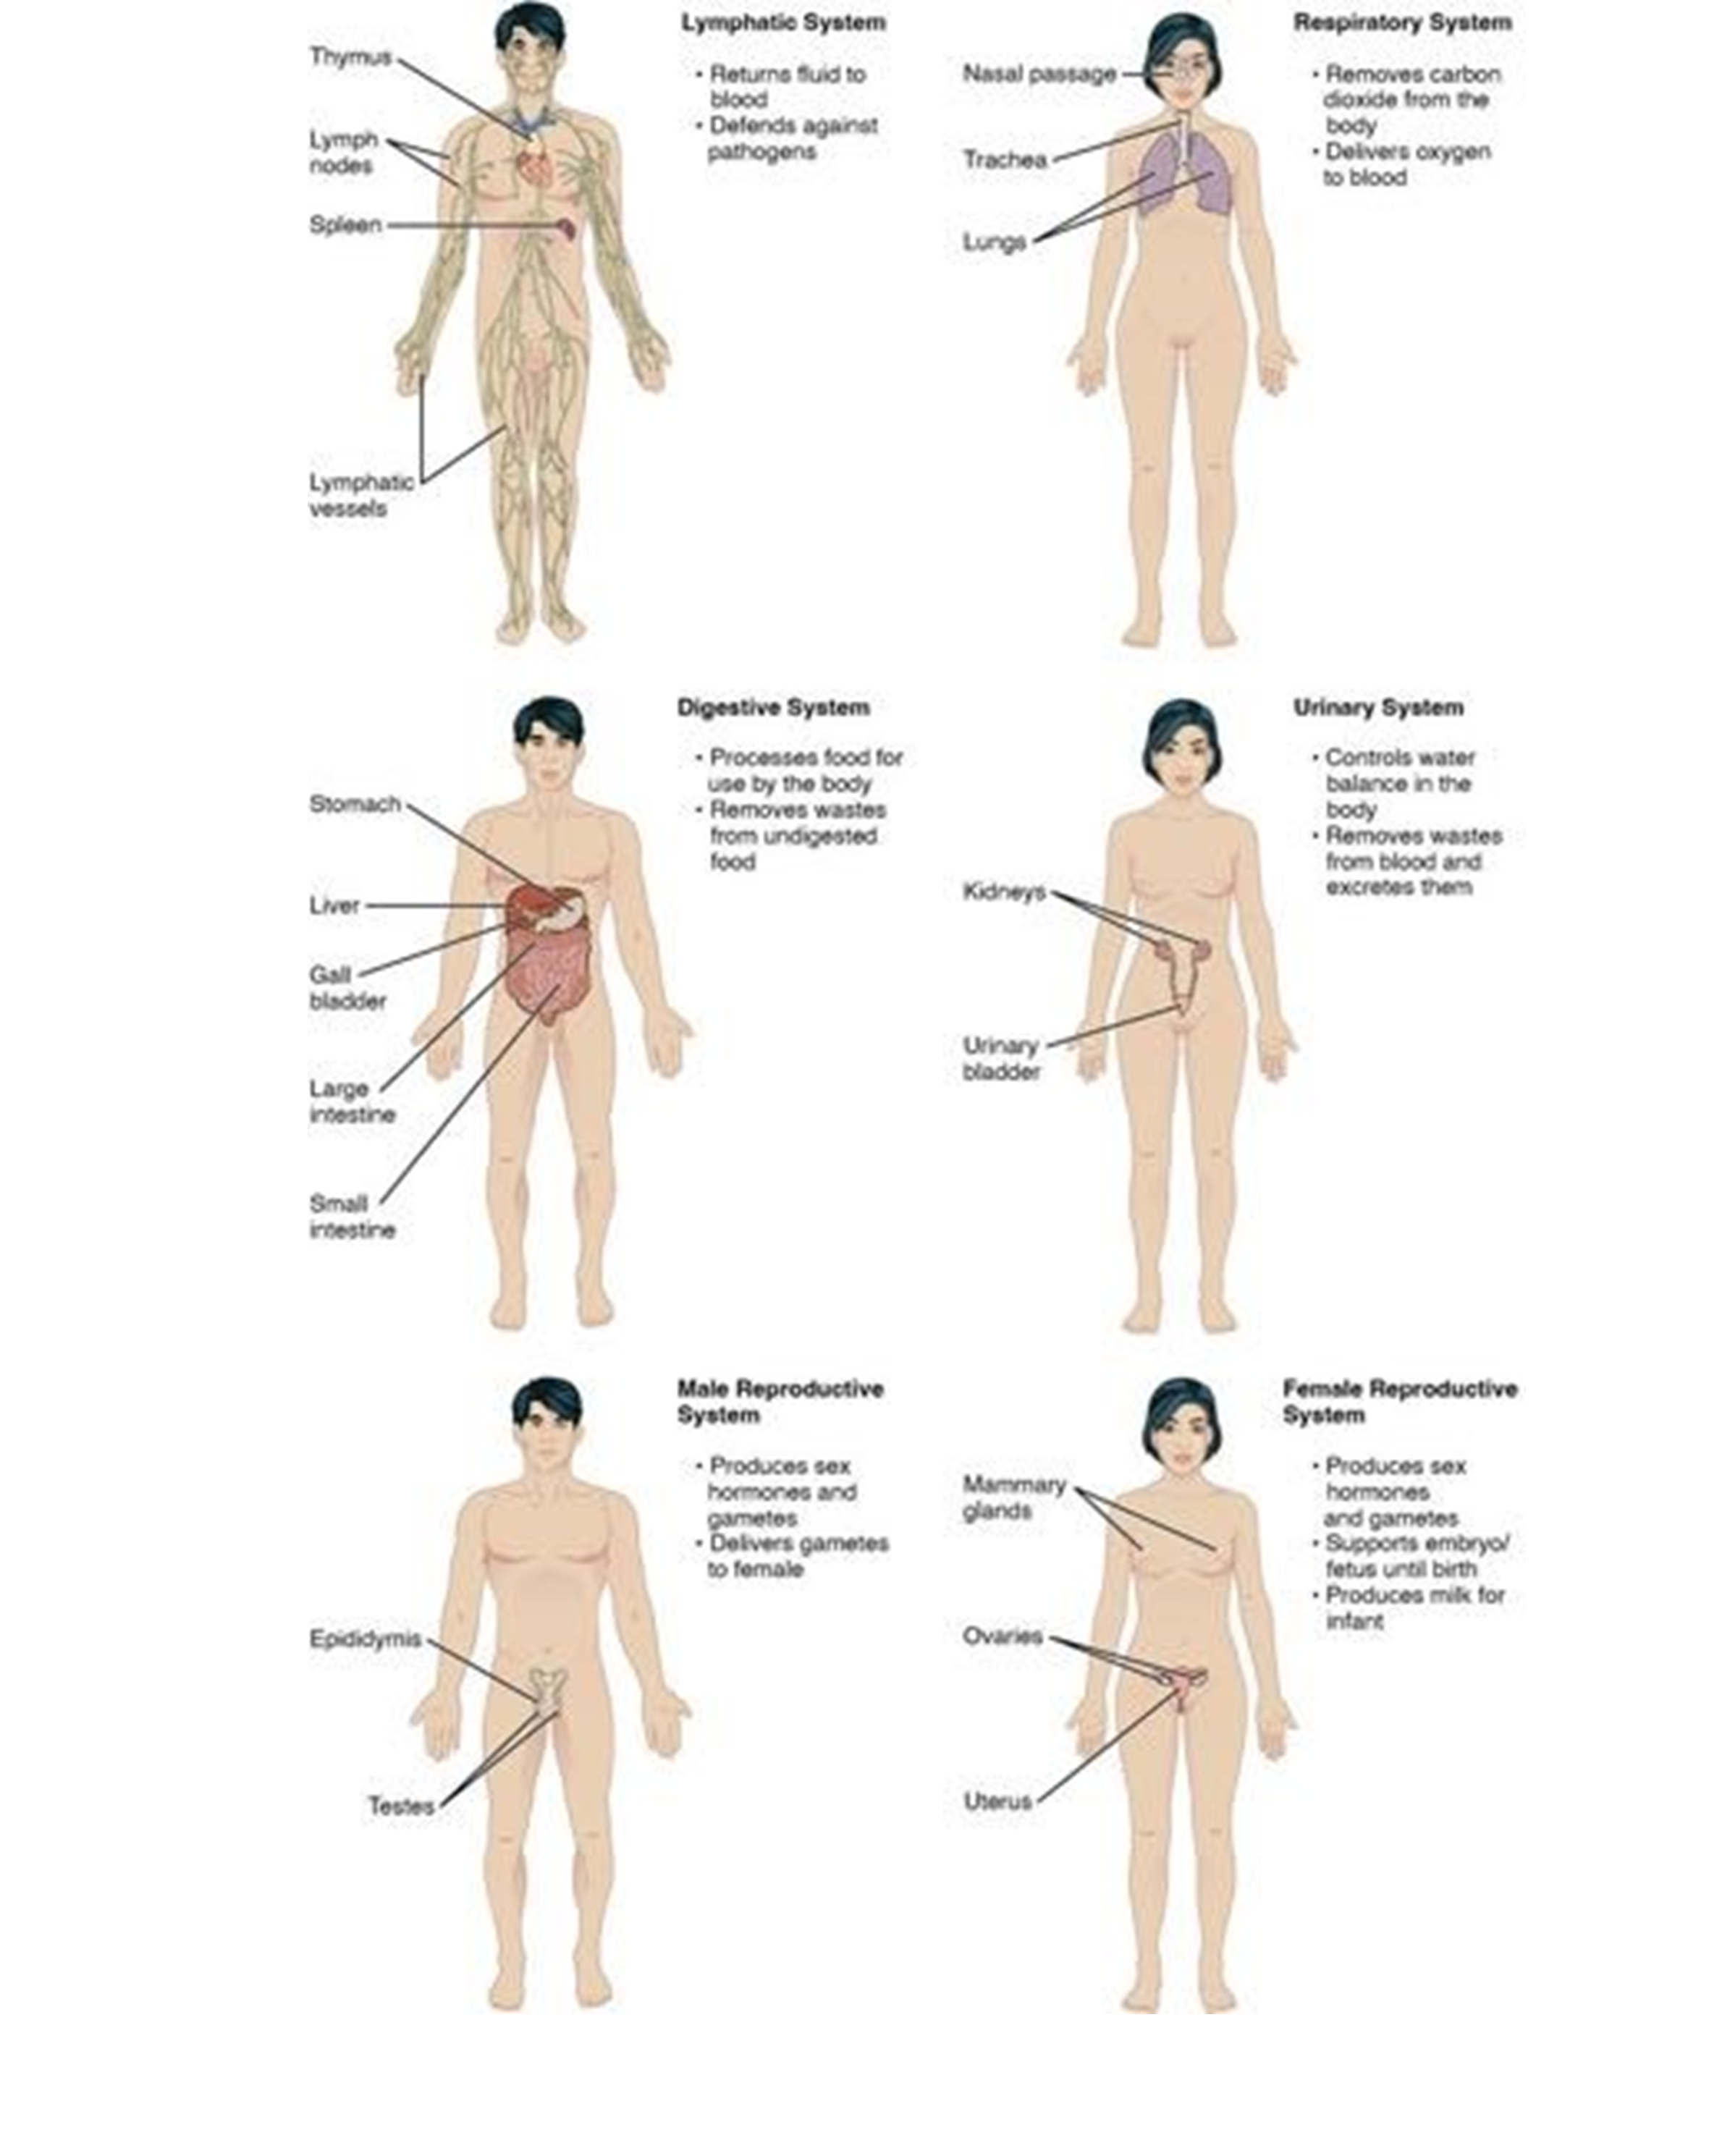
Our patient is in critical condition. The human body carries out numerous functions every day. Thinking, moving, digesting, urinating, fighting infection, and reproducing are just some of the many functions the healthy body performs. Specific organs work together in groups, or systems, to carry out these functions. These systems are compartmentalized for greater efficiency, but they also interact with each other. For example, the brain and spinal cord make up the nervous system, but the nerves travel and innervate every organ in the body from skin, to bones, to muscles, to the stomach, liver, and uterus. In addition, an organ can belong to more than one organ system and serve more than one function in the body. For example, the pancreas is part of both the digestive system and the endocrine system. Ovaries and testes are considered part of both the reproductive system and the endocrine system.
Figure 2: Organs and organ systems of the human body.
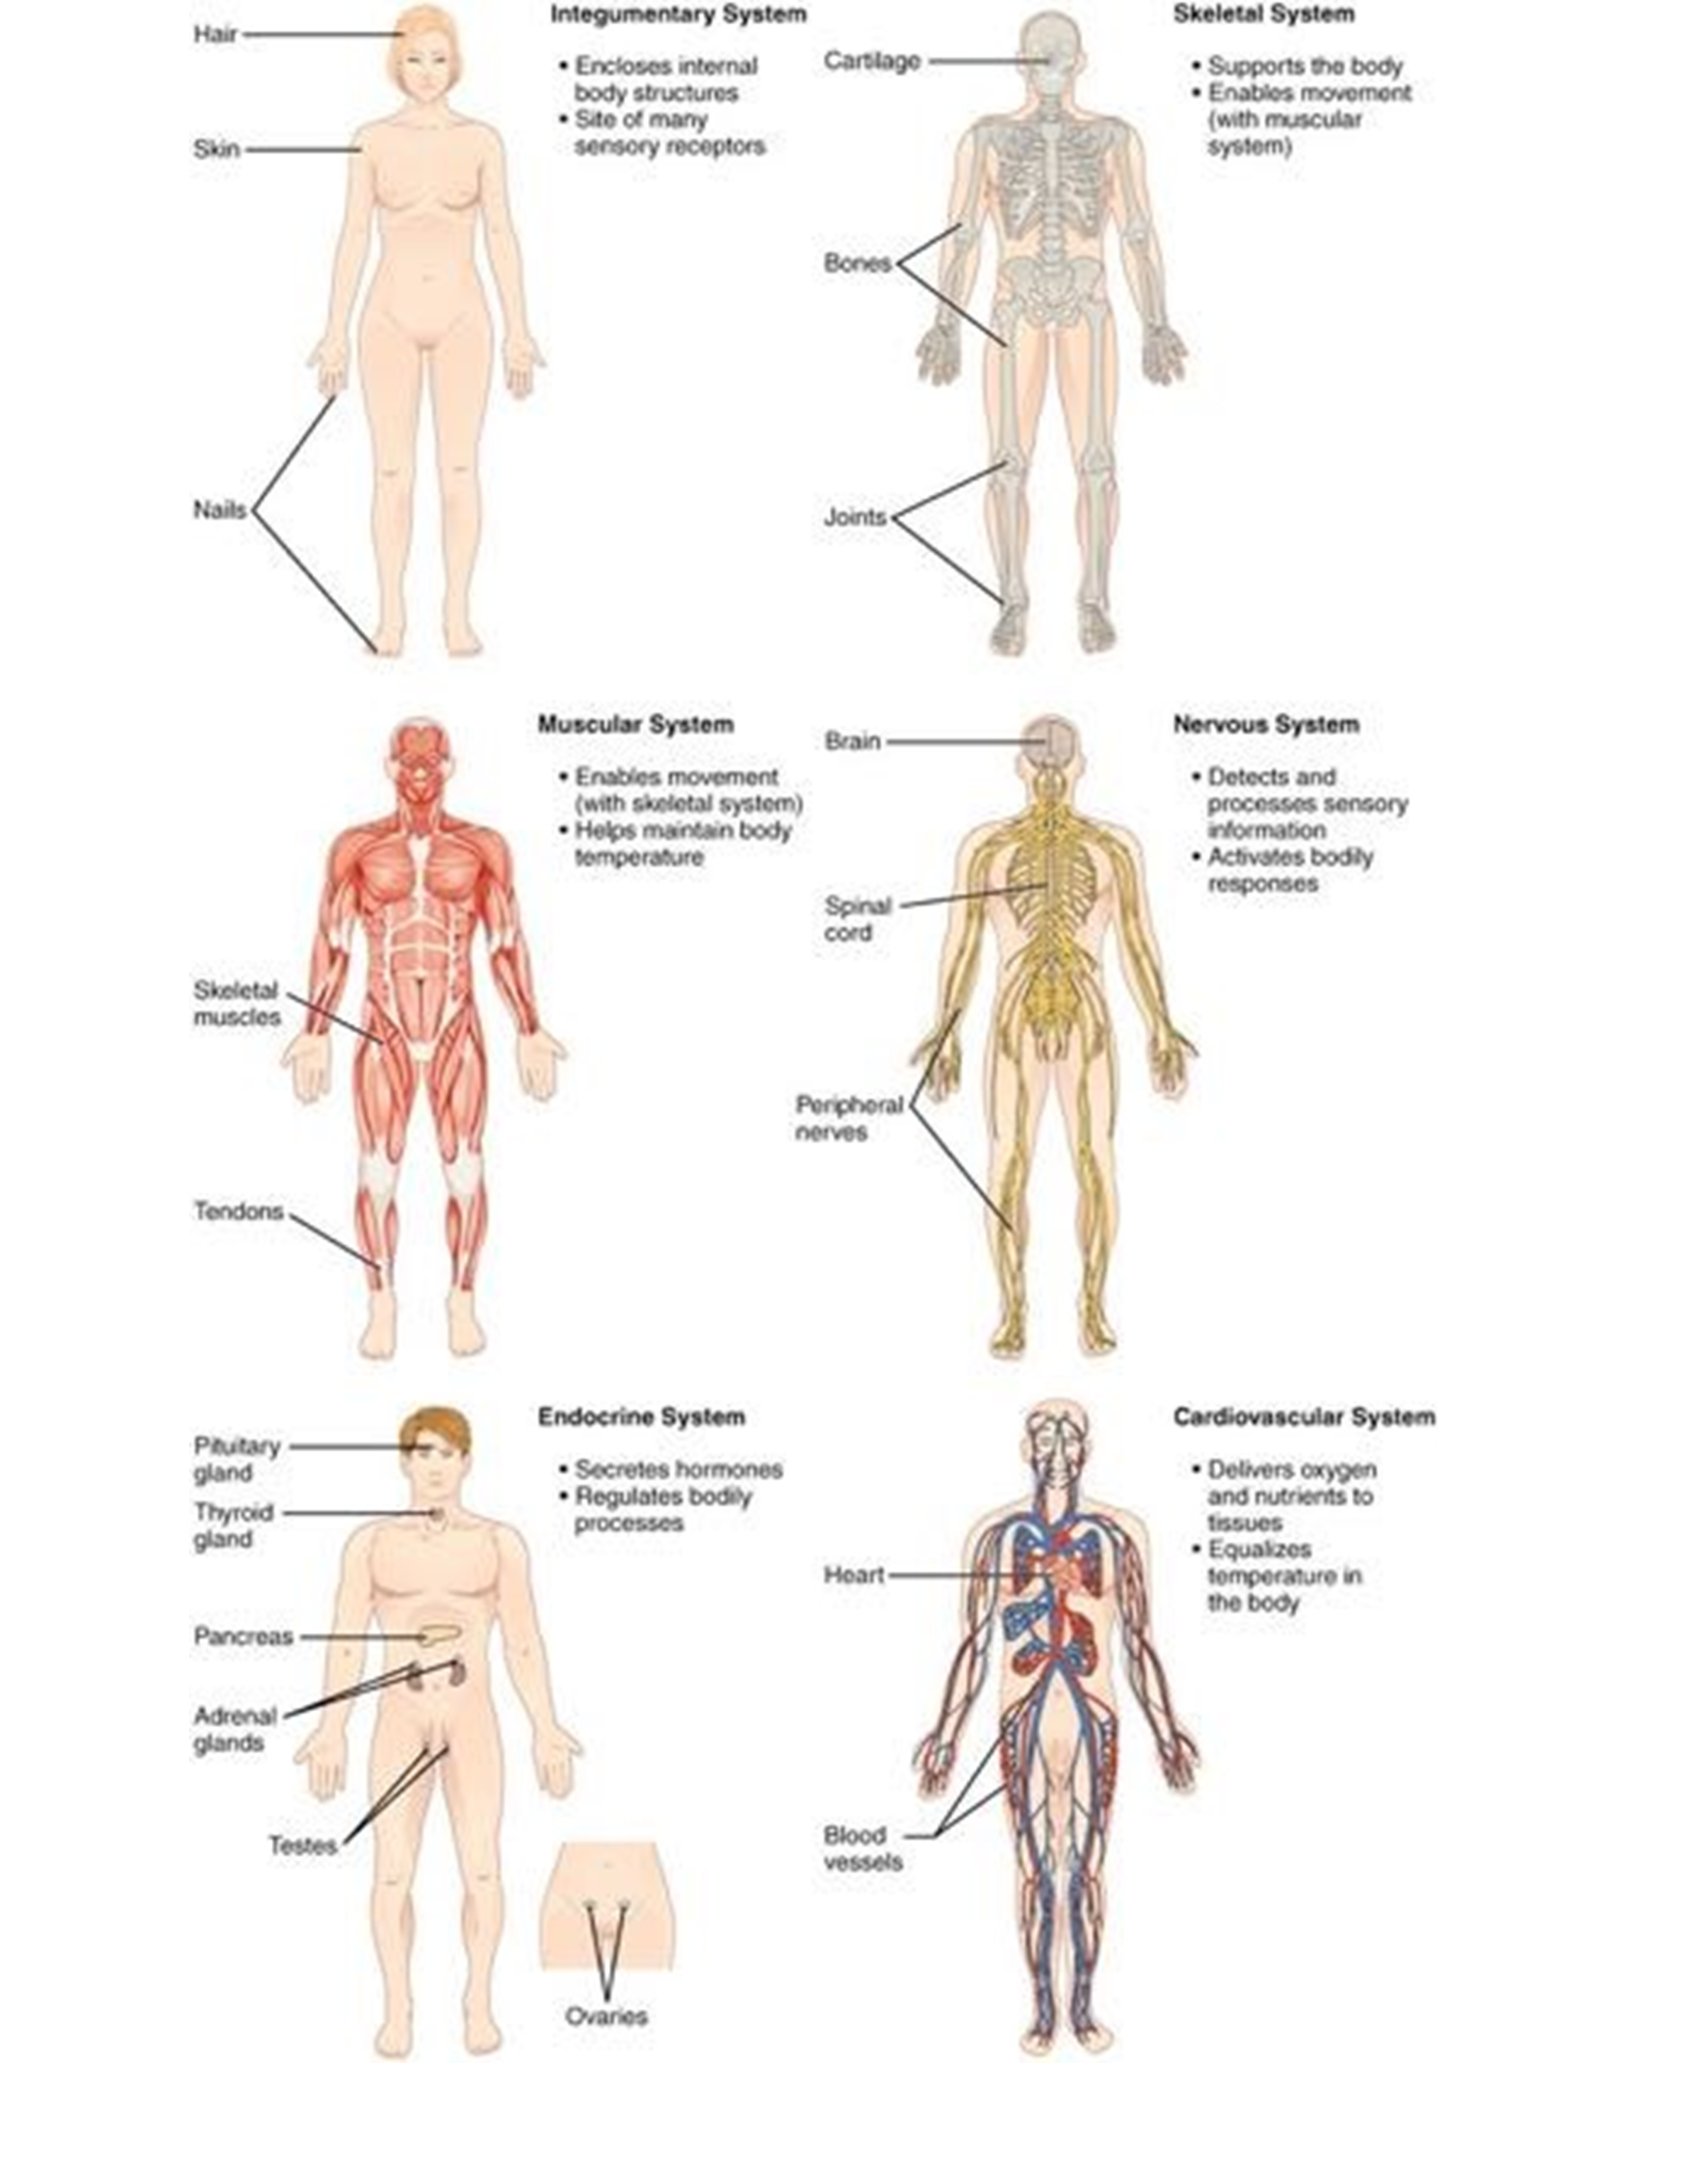
Figure 3: Organs and organ systems of the human body.
Procedure:
1. Fill in the following chart.
| Organ | Organ System(s) |
| adrenal glands | |
| blood vessels | |
| bone | |
| brain | |
| gallbladder | |
| kidneys | |
| liver | |
| pancreas | |
| skeletal muscle | |
| skin | |
| small intestine | |
| spleen | |
| testes / ovaries | |
| thyroid gland | |
| trachea |
2. Using a torso model, label the organs using the sticky labels in the binder. Leave the labels on your model until the end of the lab.
3. Return to your patient from the case study. Use Figure 1 and your labeled model to help identify which organs might be damaged from the stab wounds.
Stab wound 1: ________________________
Stab wound 2: ________________________
Stab wound 3: ________________________
Activity 2: Anatomical Terminology
Materials:
|
Background:
To properly describe the location of the wounds on our patient, you need a reference point. Anatomical position is the universal starting reference point for all clinicians. A person in anatomical position is agreed to be facing forward, standing upright, with palms facing forward, feet shoulder width apart, and toes pointing forward. When describing a patient, the terms left and right always refer to the patient and not yourself.
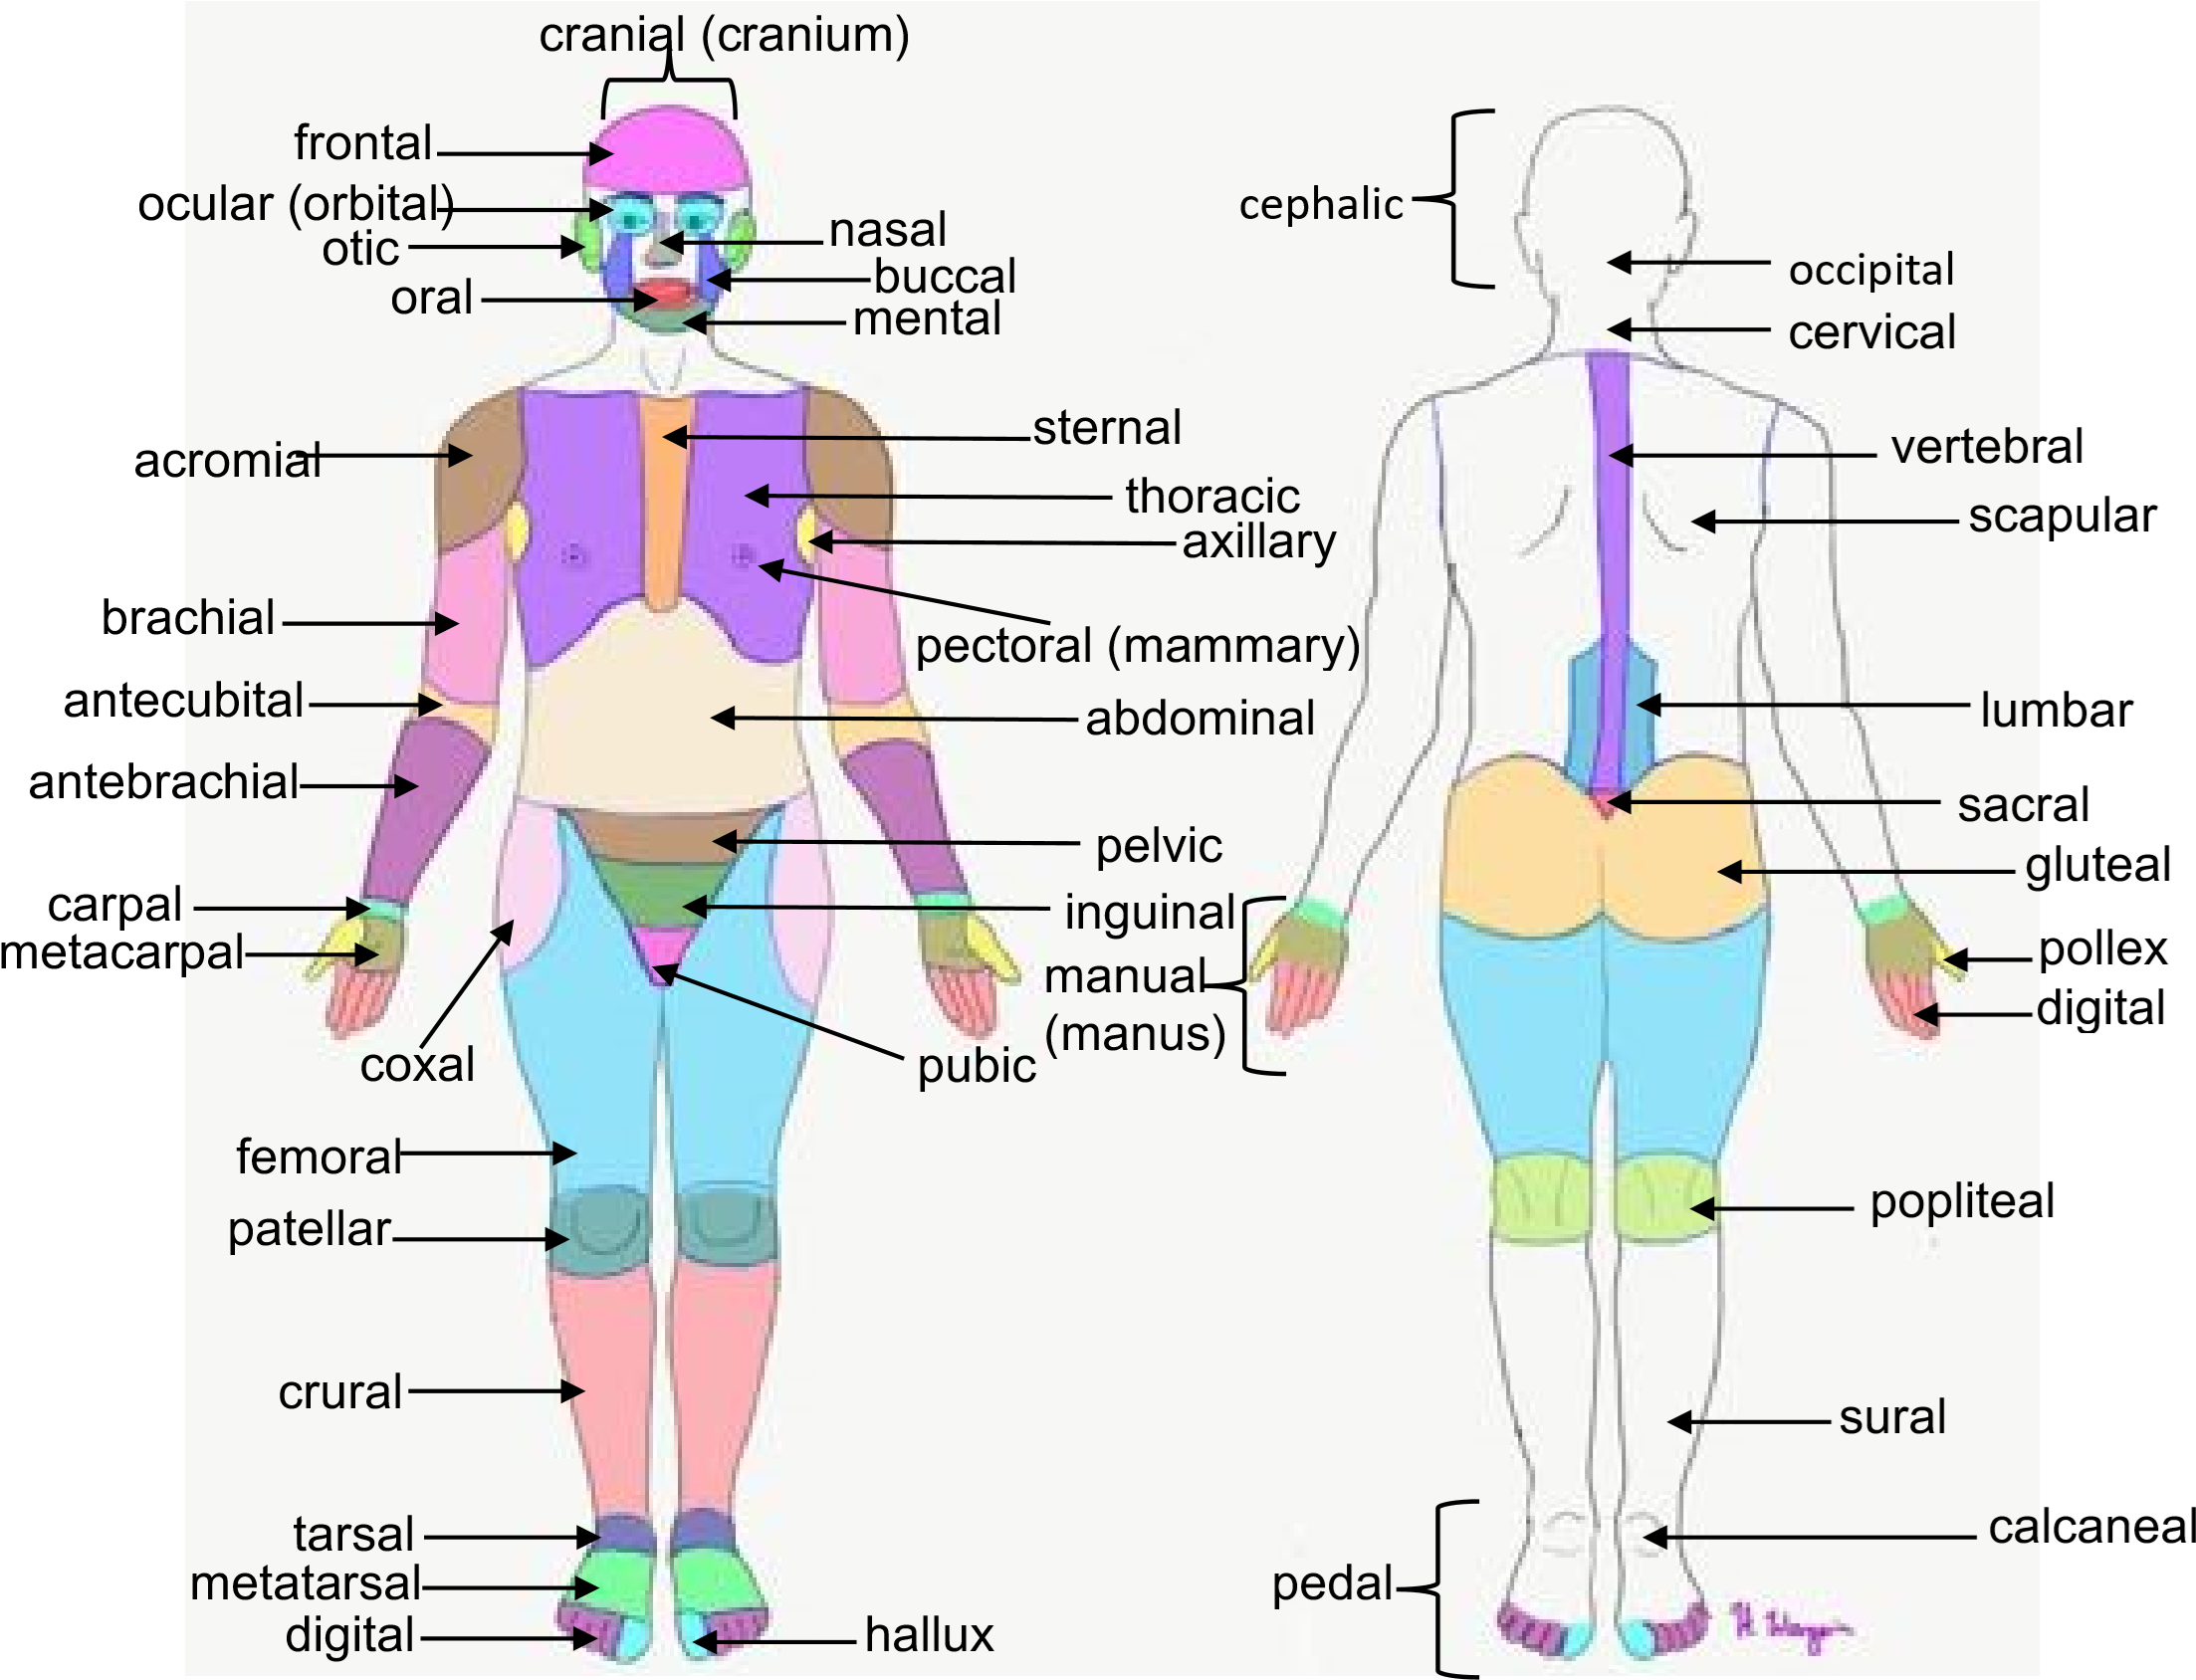
Terms such as “arm” or “head” are not very specific anatomically; clinicians use surface
anatomy terms that are specific for regions on the body. Using the proper anatomical
terminology helps to standardize the language of medicine, ensuring that any clinician
can accurately describe and visualize the patient’s problem. (Figure 4).
Figure 4: Surface anatomy terms on the anterior and posterior sides of the body.
Procedure:
- Using the anatomical terminology surface labels and sticky tack to label the surface terms on the muscle model.
- Return to your patient from the case study and use Figure 1 and the anatomical terminology to help you describe the region of each injury on the patient’s body. Don’t forget to use left and right when applicable.
- Check your labeled model with your instructor and have them sign below. Once your model has been checked, remove the labels, and return them to the sheet
Instructor initials for Activity 2: _______
Activity 3: Directional Terms
Materials:
|
Background:
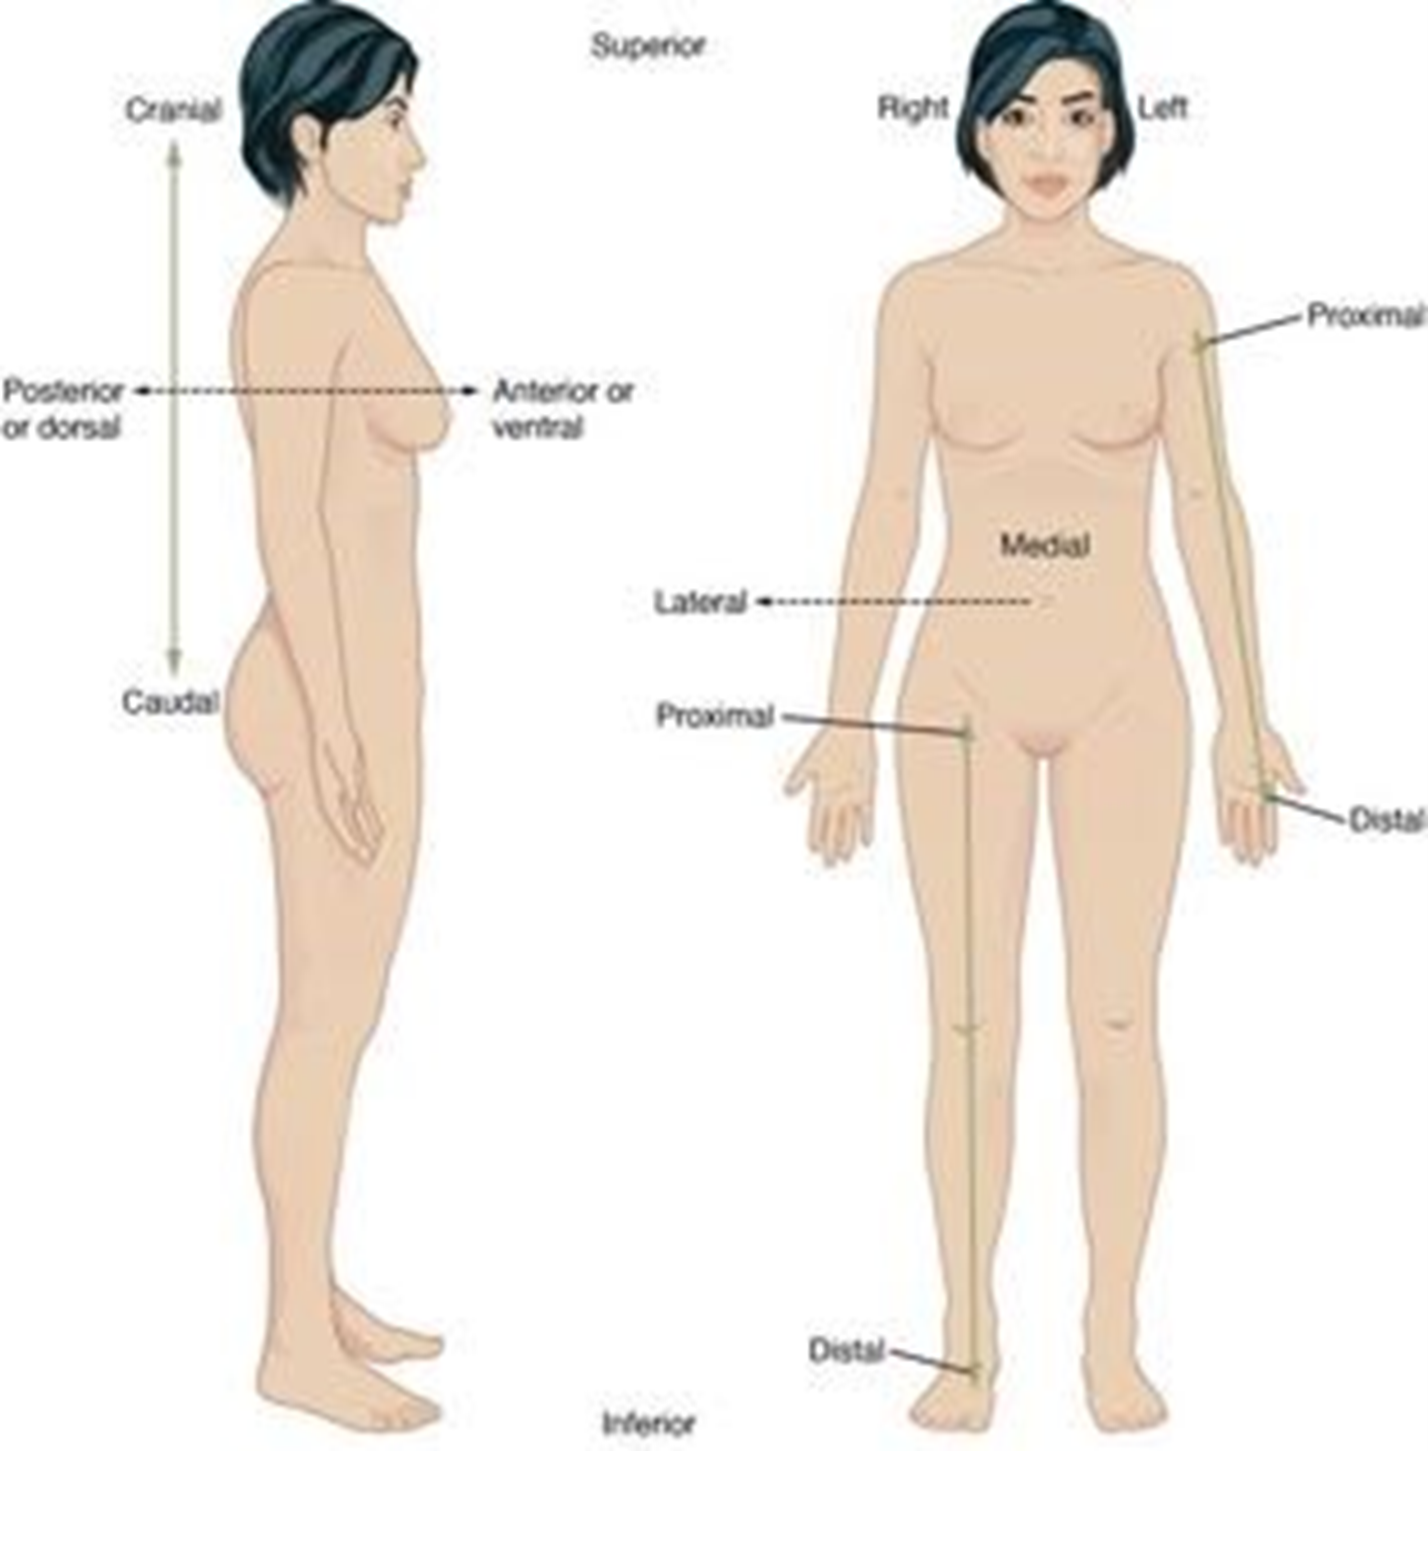
Medical records are detailed snapshots of a patient at a particular time and are important when pictures of injuries are not possible. To create an accurate description, clinicians use relative terms to indicate that the lesion is close to something else to serve as a point of reference. Clinicians use specific directional terms to describe the locations of body structures relative to other structures (Figure 5). For example, the stomach is above the spleen; clinicians would say that the stomach is superior to the spleen and the spleen is inferior to the stomach. Superior and inferior are only used in reference to the trunk and abdomen. The terms proximal and distal are frequently misconstrued as superior and inferior. The terms proximal and distal are only to be used in reference to structures of the arms and legs (limbs) in reference to their proximity to the trunk (torso). For example: the elbow is distal to the shoulder, or the shoulder is proximal to the elbow. Medial and lateral refer to structures that are toward, or away from the midline of the body. For example, the lungs are lateral to the heart and the heart is medial to the lungs. A structure that is more interior to another is called deep. For example, the heart is deep to the ribcage and the rib cage is superficial to the heart. A structure that is anterior is toward the belly-side of the body and a posterior structure is toward the back. Now you will practice using these terms.
Figure 5: Directional terms.
Procedure:
1. Describe the location of the organs to one another. Use your labeled model to identify the location of the regions. i.e., The eyes are lateral to the nose.
- The mental region is ___________________________ to the oral region.
- The sternal region is ___________________________ to the pubic region.
- The popliteal region is ___________________________ to the hallux.
- The nasal region is ___________________________ to the occipital region.
- The carpal region is ___________________________ to the antecubital region.
- The nasal region is ___________________________ to the otic region.
- The acromial region is ___________________________ to the vertebral region.
- The sural region is ___________________________ to the crural region.
2. Return to your patient from the case study and use Figure 1 and the directional terminology to help you describe the relative location of each injury on his body (Figure 1). Use two directional terms for each wound.
Stab wound 1: ________________________
Stab wound 2: ________________________
Stab wound 3: ________________________
Activity 4: Body Planes and Sections
Materials:
|
Background:
While surface anatomy terms describe the external anatomy of the body, clinicians also need to localize the extent of injury internally. To do this, the body must be cut into planes and sections. Diagnostic imaging is used to view internal structures by noninvasive techniques such as CT scans, X-rays, and MRI imaging. Planes and sections terms are also used to describe how incisions should be made during surgery or when describing the plane of section in a histology sample.
The most common types of planes include: the sagittal plane, the frontal plane, and the transverse plane (Figure 6). The sagittal plane is created when a longitudinal cut divides the body into left and right sections. Indeed, if the sagittal plane cuts the body perfectly into left and right halves, we say it is a midsagittal section. If, however, the sagittal plane is not perfectly in the middle, we call it a parasagittal section. A frontal section divides the body into anterior and posterior sections. When a frontal section is performed in the skull, it is called a coronal section. A transverse section is a cut that divides the body into upper and lower parts. As such, it cuts across the body. Note that there is no mid-frontal section or mid-transverse section.
Procedure:
1. Divide the clay into four equal balls and give one ball to each member of the lab table. Use a stick or pencil to etch eyes, nose and mouth into the spherical ball of clay. You could also fashion a mini human out of clay.
2. Assign each person a cut to do with their clay figure: midsagittal, sagittal, transverse, or frontal (coronal). Make the assigned cut on your figure using the plastic knife. Keep these models.
3. The radiology team has quickly generated CT scans of the patient. These images have been reconstructed with computers to show more color and detail (Figure 7). Write the plane of section seen below each image.
Figure 7: Reconstruction images to mimic CT scans of your patient’s head, thorax, and abdomen.
Stab wound 1: ________________________
Stab wound 2: ________________________
Stab wound 3: ________________________
4. Show your instructor your table’s four clay models and have them initial below.
Instructor initials for Activity 4: _________
5. Clean-up the modelling clay and remaining supplies and return them to the tray.
Activity 5: Body Cavities and Serous Membranes
Materials:
|
Background:
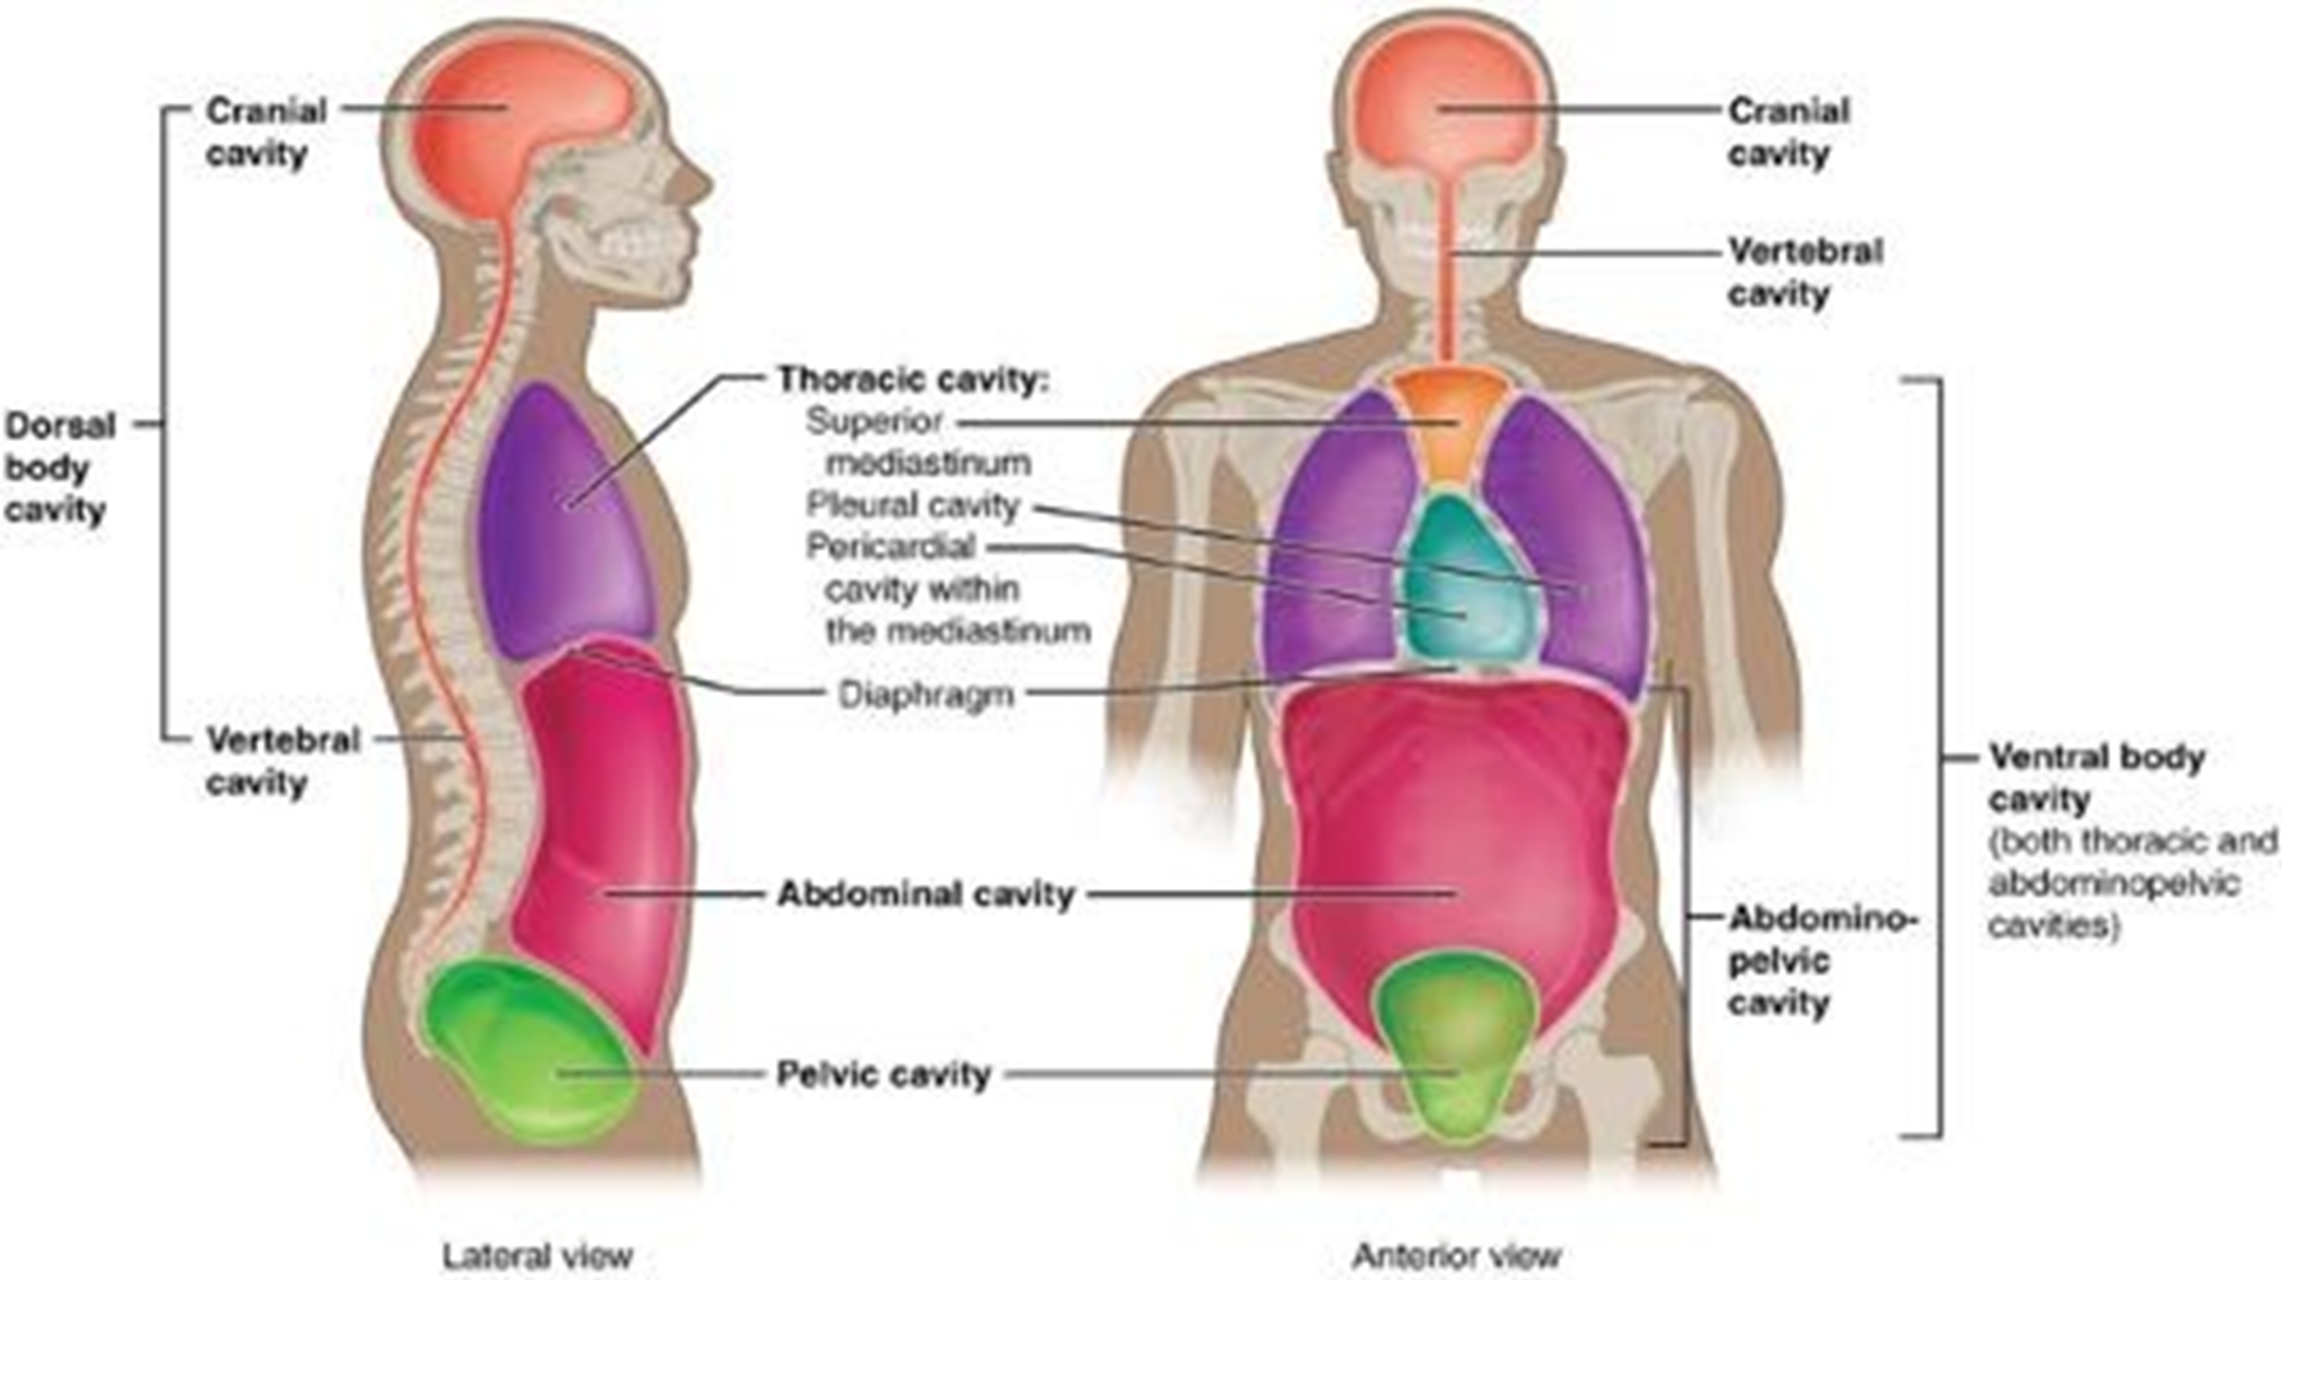
Our patient is in respiratory distress. The location of the wound and the patient’s low blood oxygen levels leads you to determine that the thoracic cavity has been penetrated. Now that you have learned the surface terminology, you need to learn what lies beneath the skin. Inside the human body are hollowed out areas, or cavities, where the organs reside. These cavities are often filled with fluid that surrounds, protects and lubricates the organs. These cavities also help to compartmentalize the various organs (Figure 8). The body is divided into two major cavities, the dorsal cavity and the ventral cavity. The dorsal cavity is on the posterior side of the body and contains the cranial cavity, which houses the brain, and the vertebral cavity which houses the spinal cord. The ventral cavity is on the anterior side of the body and is divided into the thoracic and abdominopelvic cavities. The thoracic cavity is divided into two smaller cavities, the mediastinum which contains the heart within a smaller sub cavity called the pericardial cavity, and the pleural cavities (house the lungs). contains the heart and lungs which are found in smaller cavities called the pericardial cavity and pleural cavity, respectively. Below the diaphragm is the abdominopelvic cavity which is subdivided into a superior abdominal cavity and an inferior pelvic cavity. There is no membrane or wall dividing these two regions.
Figure 8: Body cavities in the lateral and anterior view.
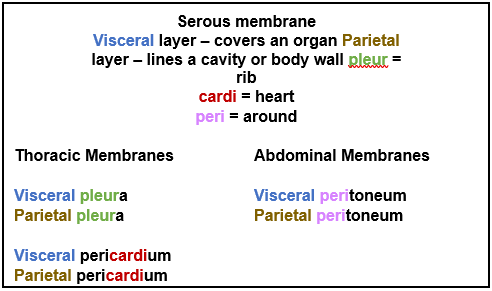
The anterior cavities are lined with thin, clear, slippery membranes, called serous membranes, that serves to lubricate and prevent friction between organs as they move. Serous membranes are often double-layered, sort of like an envelope – it has two sides but is continuous. The internal side of the membrane is called the visceral layer (from Latin meaning “internal”) and the external side of the membrane is called the parietal layer (or outside of, as in the word “periphery”). In between the two sides of the membrane is a space filled with a watery, thin serous fluid.
Figure 9: The visceral and parietal layers of the pericardium (serous membranes of the heart).
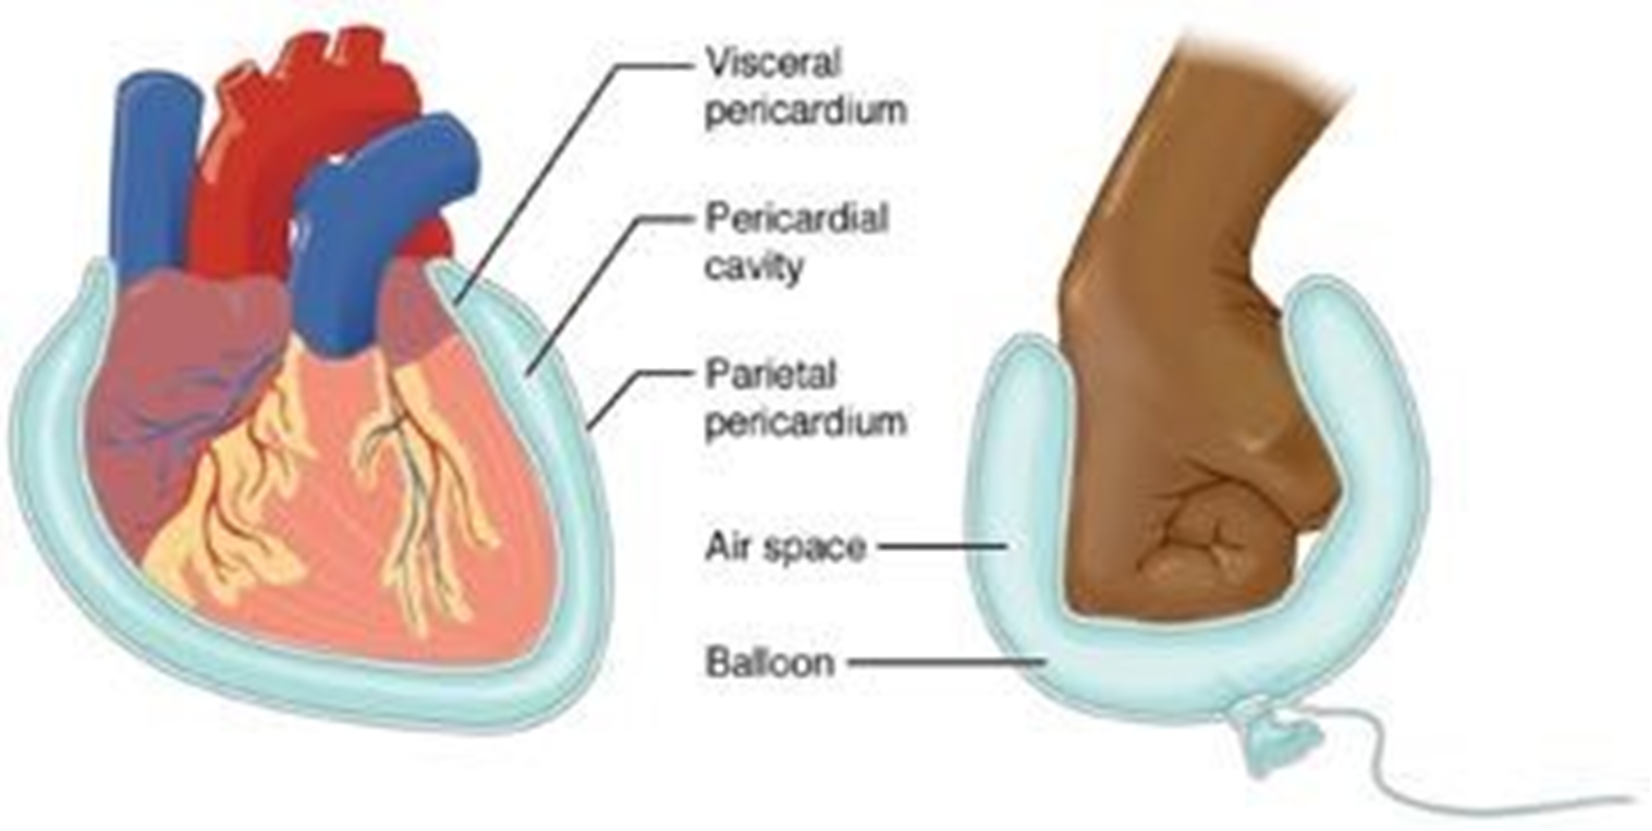
The most obvious display of this membrane type is the pericardial sac that surrounds the heart. The pericardium is a serous membrane with a visceral layer that lies on top of the heart, a layer of serous fluid (called pericardial fluid) in the middle, and then a parietal layer forming the outside of the sac (Figure 9). Similarly, the lungs are contained within a serous membrane, called the pleura, and the abdominopelvic cavity is lined with a serous membrane called the peritoneum. Some organs, such as the kidneys, are located behind the peritoneum, and are therefore referred to as retroperitoneal. The brain, too, is surrounded by a series of membranes called meninges. Between the meningeal layers is a fluid known as cerebrospinal fluid. Use the chart below to help organize the terms of the serous membranes.
Procedure:
1. Complete the table below by naming the cavity where the following organs are found in the body cavity.
| Organ | Body Cavity |
| brain | |
| bladder | |
| liver | |
| spinal cord | |
| lungs | |
| heart |
2. To demonstrate serous membranes, use the resealable Ziplock bags filled with water.
3. Rub the bag between two fingers. Feel how slippery it is.
4. Remove the heart from a torso model.
5. Without opening the bag, wrap the bag around the heart. The portion of the bag that is touching the heart is called the _________________ layer and the portion of the bag that is on the outside touching your hand is called the _________________ layer. The fluid-filled area in the middle is called the serous fluid.
6. Complete the table below by naming the specific name of the serous membrane that surrounds the organ.
| Name of organ | Name of the inner serous membrane in contact with the organ | Name of the outer serous membrane |
| intestines | i.e. visceral peritoneum | parietal peritoneum |
| heart | ________________ pericardium | parietal ________________ |
| lungs | visceral ___________________ | _______________ pleural |
| stomach | __________________________ | __________________________ |
7. Return to your patient from the case study and use Figure 1 to help answer the following questions.
- Stab wound 1: ________________________
- Which organ do you think is involved?
- This organ is found in which cavity?
- Stab wound 2: ________________________
- Which organ do you think is involved?
- This organ is found in which cavity?
- Name the serous membranes surrounding this organ.
- Stab wound 3: ________________________
- Which organ do you think is involved?
- This organ is found in which cavity?
- Name the serous membranes surrounding this organ.
Activity 6: Abdominal Regions and Quadrants
Materials:
|
Background:
Let’s look more specifically at the abdominopelvic cavity. The abdominopelvic cavity extends from just inferior to the diaphragm to the iliac region on the pelvic floor. This cavity contains the organs of the digestive, excretory, and reproductive systems, and holds parts of the endocrine and circulatory systems. Many times, a patient complains of non-specific abdominal pain. The standard way of dividing the abdomen is to use the umbilicus as a point of reference. Using the midsagittal and transverse planes through the umbilicus, we divide the abdominopelvic region into four equal parts, called quadrants. There is a Right Upper Quadrant (RUQ), a Left Upper Quadrant (LUQ), a Right Lower Quadrant (RLQ), and a Left Lower Quadrant (LLQ) (Figure 10). Patients are often not very good at describing the exact location of abdominal pain but can localize it to a quadrant. Sometimes an organ is located exclusively in one quadrant, and other times parts of the organ can be found across different quadrants. For example, the stomach is found mostly in the Left Upper Quadrant but also has a small portion that is in the Right Upper Quadrant.
Figure 10: Abdominal regions divided into the 9 abdominal regions (left) and quadrants (right).
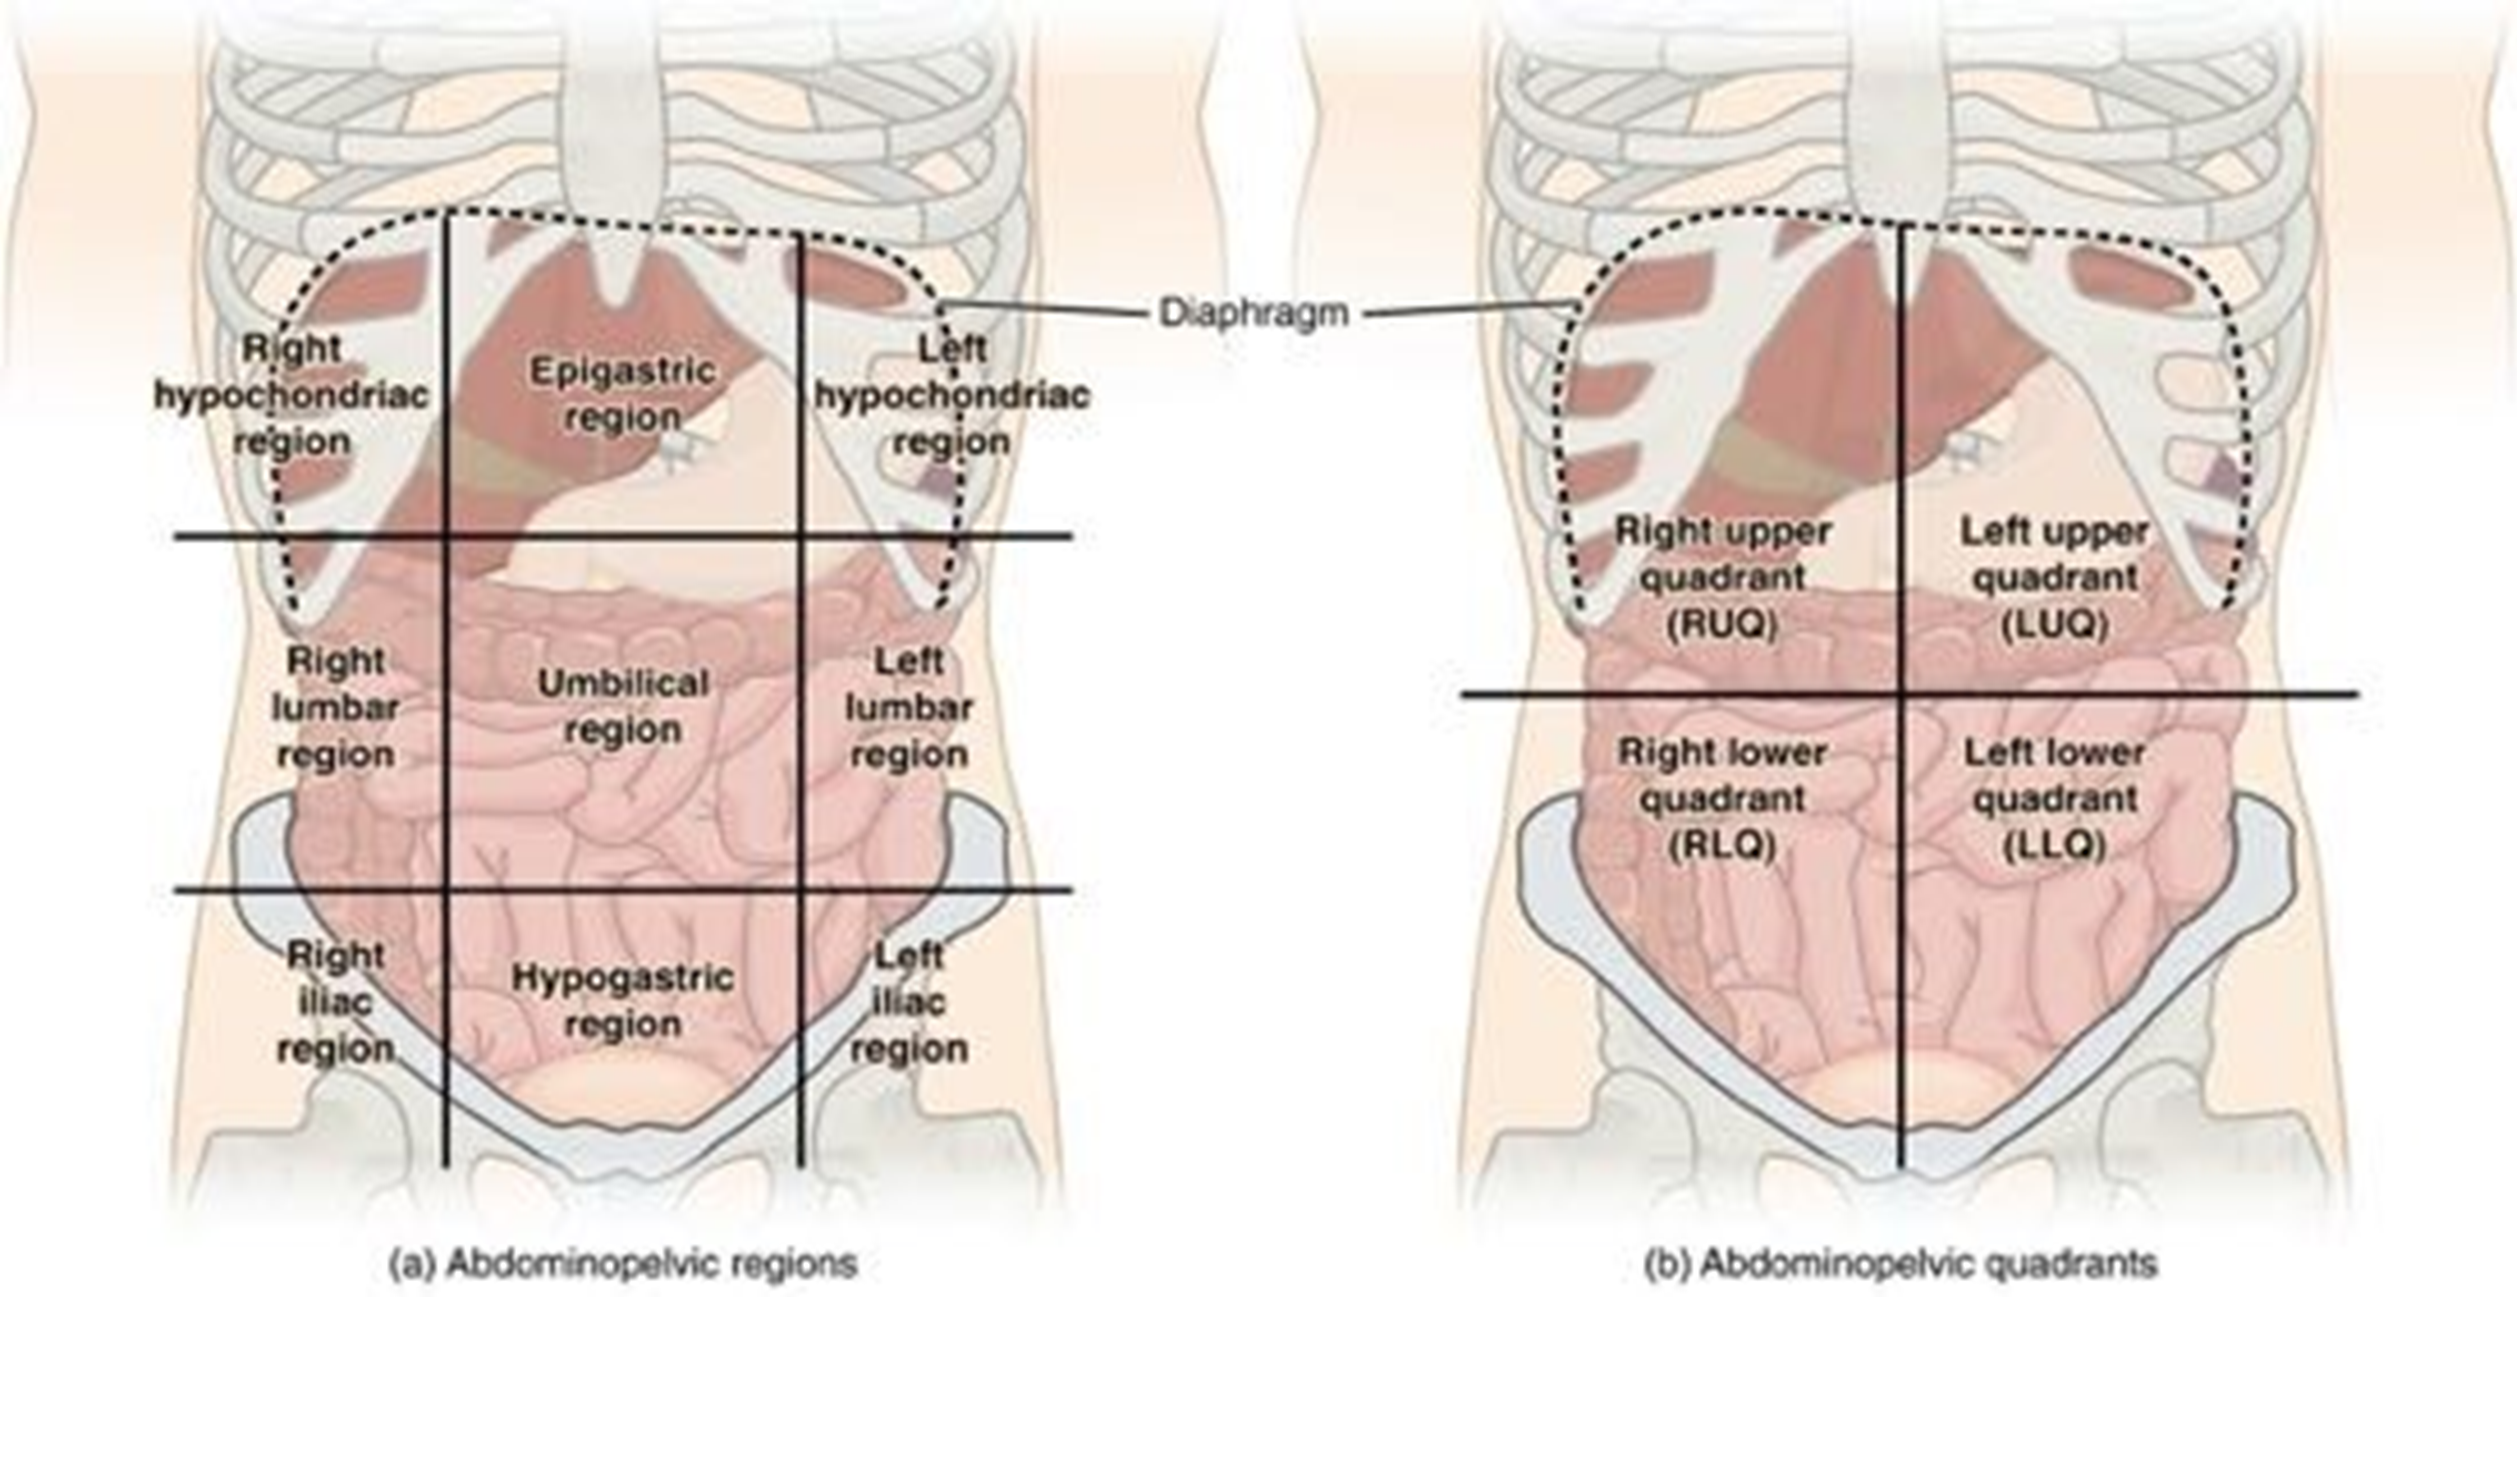
Unfortunately, from a clinical perspective, the four quadrants are often not specific enough. When a more specific location is needed, clinicians divide the abdominopelvic cavity into nine regions, much like a tic-tac-toe board. Because each region is smaller, fewer organs belong to each region. The regions are evenly divided into thirds, and the center “box” has the umbilicus in the middle. This is the umbilical region. Lateral to the umbilical region on the patient’s right side is the right lumbar region and on the left is the left lumbar region. Superior to the right lumbar region is the right hypochondriac region, and inferior to the right lumbar region is the right iliac region. Superior to the left lumbar region is the left hypochondriac region and inferior to the left lumbar region is the left iliac region. Superior to the umbilical region is the epigastric region and inferior to the umbilical region is the hypogastric region. You will need to learn both the names and positions of quadrants and regions and accurately identify the organs found in each.
Procedure:
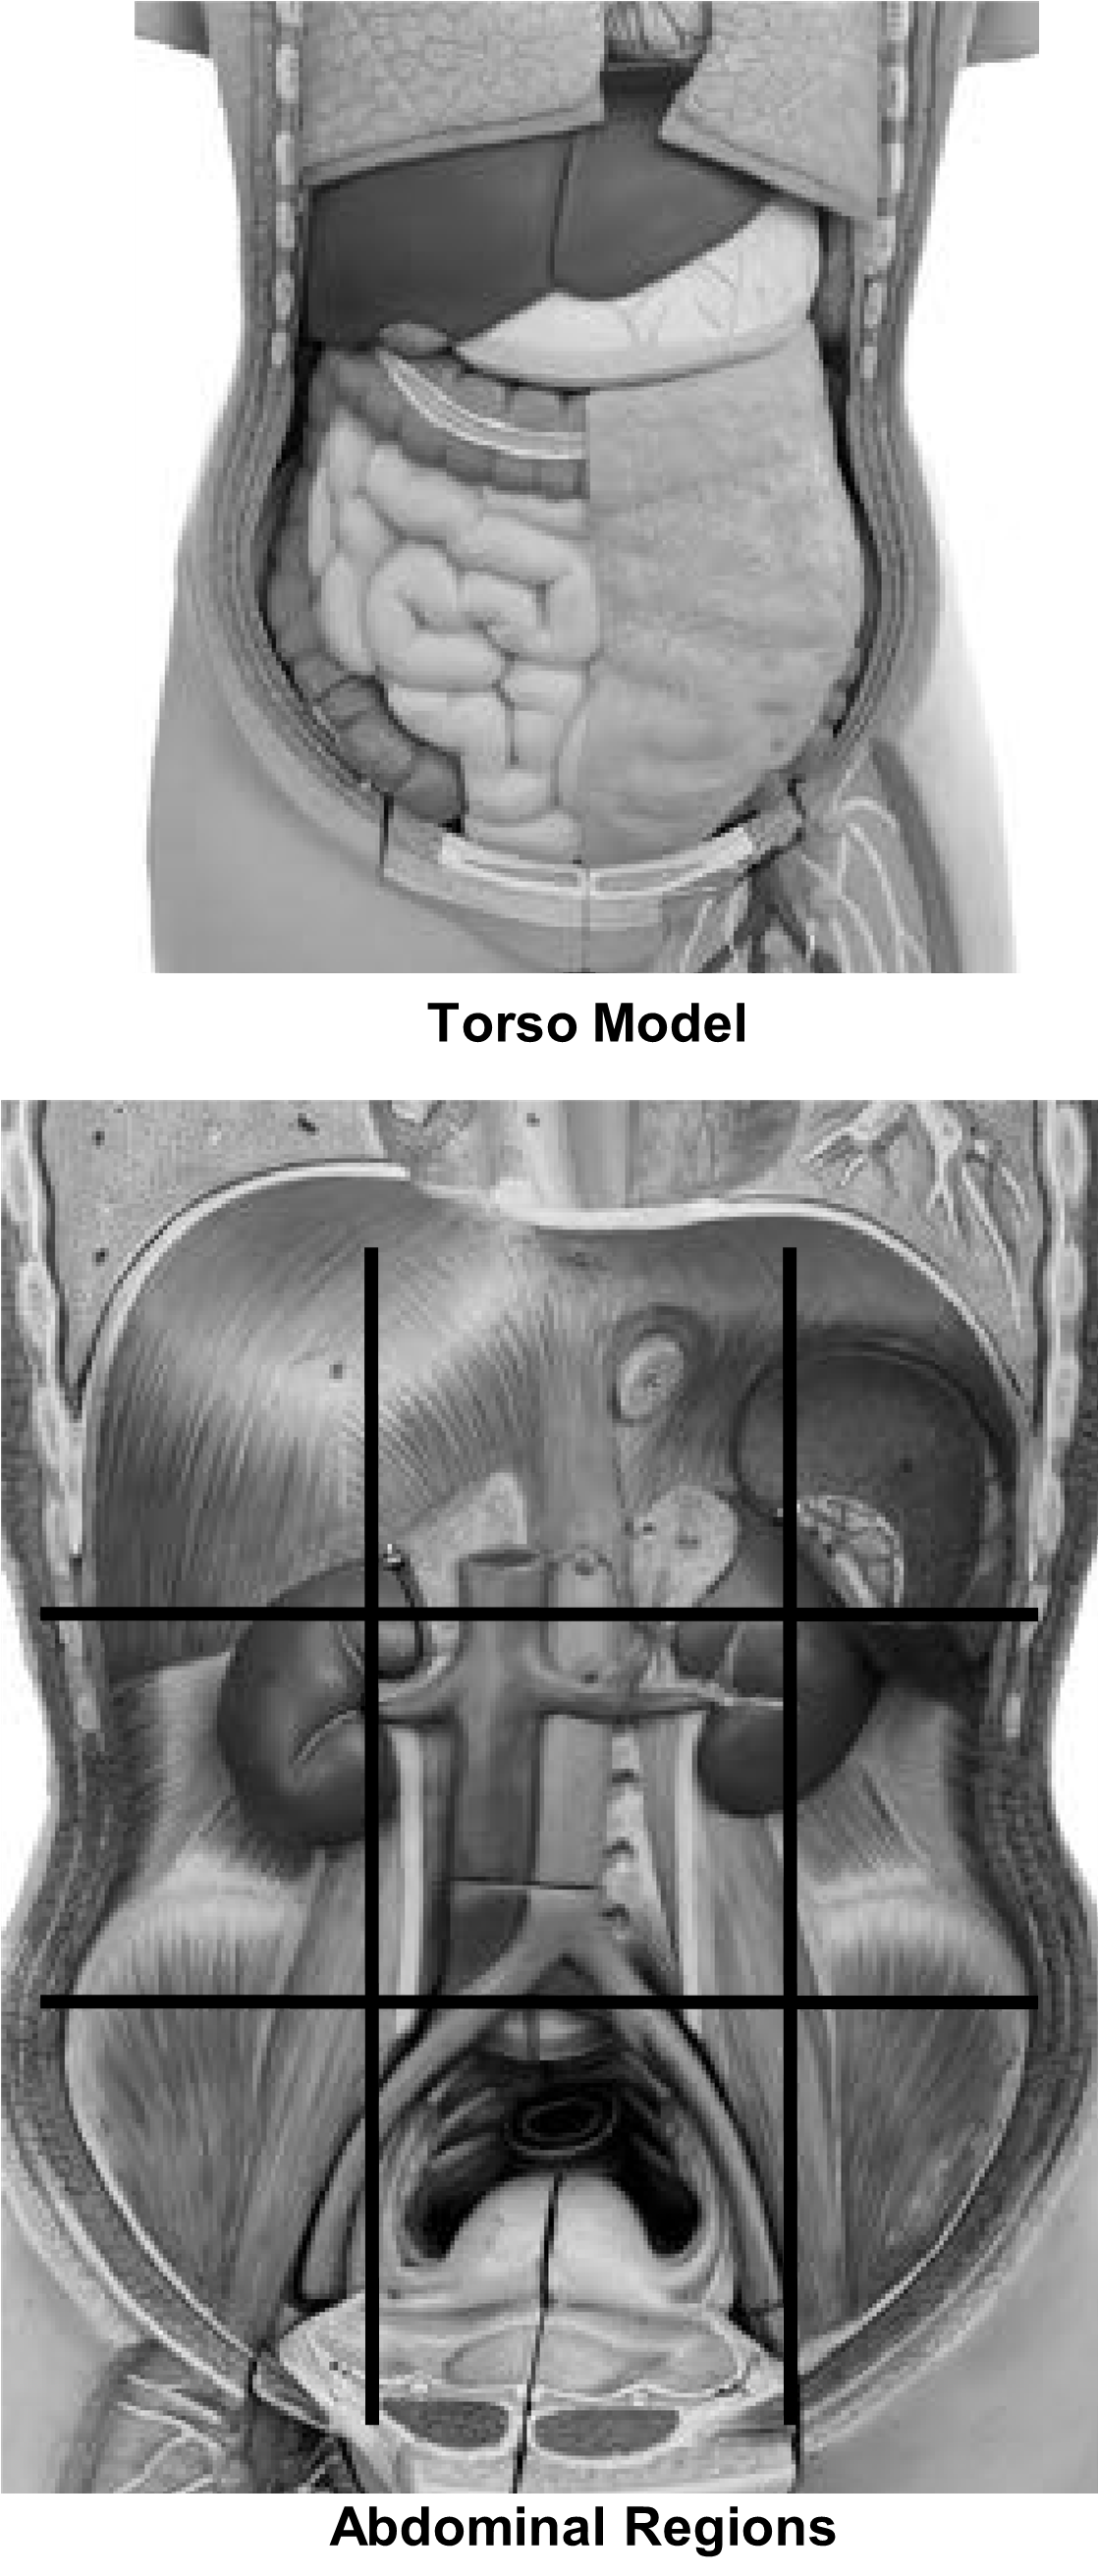
1. Using the image to the right, draw a midsagittal line, and a transverse line crossing where the bellybutton should be. Label the four abdominal quadrants.
2. Use the image provided to fill in the table below, using the names of the appropriate abdominopelvic regions. The two transverse lines were drawn at the level of the last rib and top of the hip bone (Iliac crest). The two sagittal lines divide the abdomen into thirds, with the bellybutton in the center of the umbilical region. In which of the 9 abdominal regions can the following the organs be found.
|
 |
3. Now return to the case study. View the image of stab wound 3 (Figure 1).
Stab Wound 3 (See Figure 1): Which of the 9 abdominopelvic regions is the wound located in?
Creative Commons Citations:
- Anatomical Terminology and Organ Systems Lab, Case-Study Based OER Lab Manual for A&P I © 2022 by G. Backus, H. Wangerin, P. Rodgers is licensed under CC BY-NC-SA 4.0.
- Figures 1 and 7, and Wounds for Post Lab © 2022 by H. Wangerin, using the Anatomage table, is licensed under CC BY-NC-SA 4.0.
- Figures 2, 3, 5, 6, 8, 9, and 10. © 2022 OpenStax Anatomy and Physiology 2e licensed under CC BY 4.0.
- Figure 4, and Abdominal Regions and Torso Model © 2023 by H. Wangerin are licensed under CC BY-NC-SA 4.0.
