
2 Metrics System Lab
“An ounce of prevention is worth a pound of cure.” -Benjamin Franklin
Gillian Backus; Heidi W. Wangerin; and Paula Rodgers
Objectives
- Convert measurements between different metric units.
- Determine what metric units to use when describing mass, volume, temperature, and length.
- Define body temperature, typical room temperature, and freezing and boiling points (in Celsius).
Terminology Checklist
|
Metric System
|
Metric Prefixes
|
Outline of Lab
- Case Study: “The Case of the Itchy Bottom”
- Metric Conversions
- Activity 1: Metric Units for Length
- Activity 2: Estimation
- Activity 3: Measuring and estimating volume, mass and temperature
- Putting It All Together
Case Study: The Case of the Itchy Bottom
You are a physician assistant working in a pediatrician’s office. It is a busy morning, and you receive a medical update for your next patient from the nursing intern assisting in the office. Your patient is a 6-month-old infant with a presenting complaint of an itchy bottom and fussiness with diaper changes. The patient weighs 7.5 g and is 67.6 m long. She has a head circumference of 44.32 m, a heart rate of 120 beats/min, a temperature of 38 degrees Celsius (°C) and has been drinking 180-240 L of milk every four to five hours. During the physical exam she noted inflamed skin (dermatitis) with red, raised bumps on the infant’s pubic and gluteal areas. The red bumps are about 1m diameter. Her mom reported that she had given her child 2.5 L of acetaminophen to relieve the pain.
You ask the nurse if she is confident about her measurements, as they do not seem accurate for an average female six-month old.
Please briefly describe the patient’s symptoms and write down any follow-up questions you have for the patient under the question in your workbook.
In most of the world and in all scientific fields, the metric system is the standard system of measurement. In the case study, the vital values are provided in metric units. We thus need to have a basic understanding of the metric system. Are these measurements within a normal range for a baby of this size and weight? Did the mother give a reasonable dose of acetaminophen? In this lab, you are going to learn the different units of scientific measurement, and practice converting among the different measurements. Then, we will compare the values obtained from this infant with measurements you make of an infant model in lab to see whether these measurements are accurate and reasonable.
Metric Conversions
Generally, measurements are done to measure length, mass (weight) and volume. The metric units that correspond to these measurements are:
- Length or distance = meter (m)
- Mass or weight = gram (g)
- Volume = liter (L)
The metric system is based on a factor of 10. Each subdivision of unit is 10x bigger or smaller than the one before it. These subdivisions are denoted by prefixes. It is important to know what the different prefixes mean, and how to convert between them. You should always measure in the unit best suited for that object. For example, you would not measure the length of a building in millimeters, when meters would be a more appropriate unit.
This chart below has some tricks and tips to help you to convert among the different units that you will be working with in lab (Table 1). In the chart below, meter (m), liter (L), and gram (g) are defined as base units (no prefix). The prefixes are in increments and powers of 10. From each prefix every column is either: 10 times larger or 10 times smaller.
Table 1: Prefixes for the metric system units of measurements.
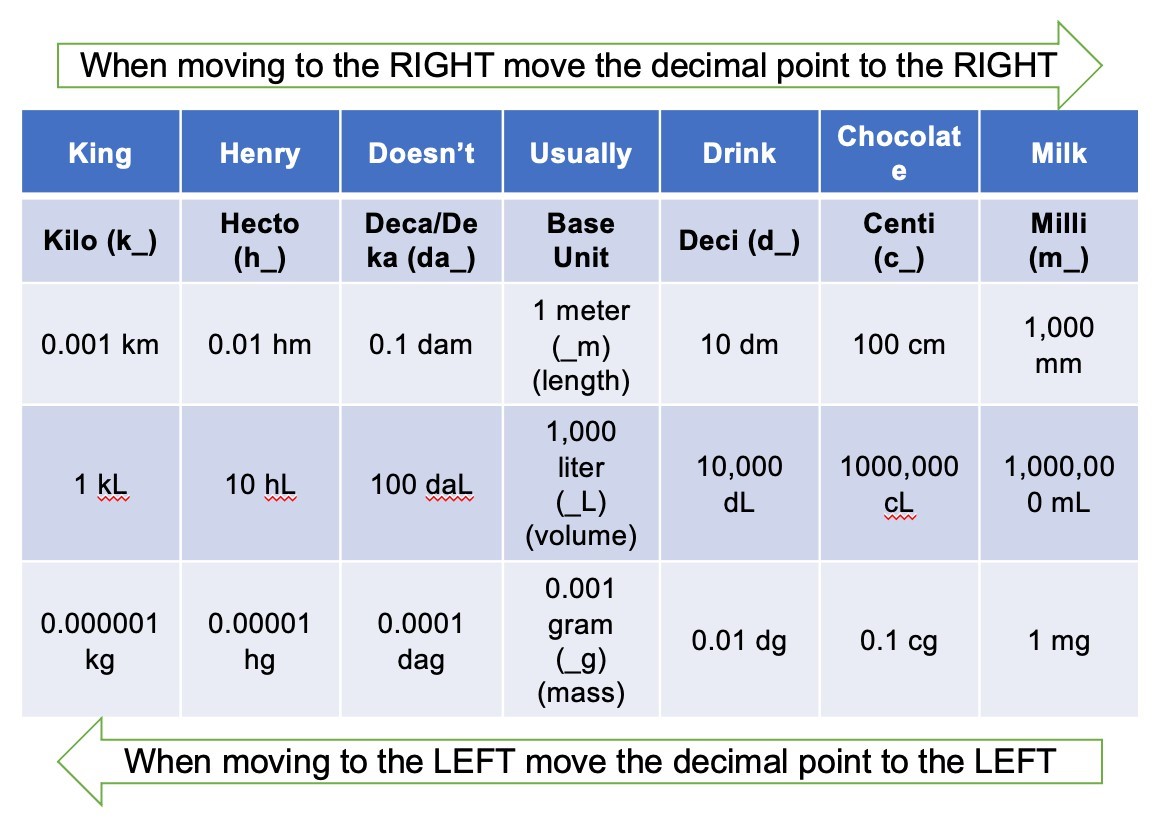
Units of measurement located to the right of the base unit are smaller. To make a measurement into a smaller unit, it therefore requires moving the decimal to the right. You move to the right the number of columns to the right the new prefix is from the original unit. Similarly, measurement values get larger as you move to the left. To ensure equivalent conversions, therefore, one must move the decimal one place value to the left (x10) for each unit of 10 that must be traversed. This will make the numbers smaller as the units get larger.
For example:
When looking at a metric ruler centimeter (cm) are indicated with whole numbers. The smaller lines between each centimeter represent millimeters (mm).
How many millimeters are in 1 centimeter?
Figure 1: A centimeter ruler with millimeter markings.
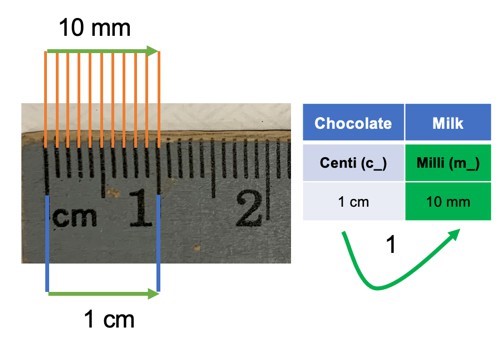
One way is to count the number of small lines from the start of the ruler to 1 cm (Figure 1). You should count 10 little lines. An easier way to do this conversion is to look at the chart and see how many columns are between the two units. To move from centimeters to millimeters you need to move 1 column to the right. This will equal moving the decimal one place to the right -> 1 cm = 10 mm.
Let’s do another example: 1-meter equals how many millimeters?
One millimeter (mm) is three columns to the right of a meter (m). Remember 1 m equals 1.0 m. For every column that you count, move the decimal place in the same direction the same number of places. To get from meters to millimeters you move three columns to the right. To convert 1.0 meter to millimeters you will move the decimal 3 places to the right. Each time you move the decimal you will add a zero. 1.0 m = 1,000 mm.
Let’s do another example moving from smaller units to larger units: 1 meter (m) equals how many kilometers (km)?
Figure 2: Conversion chart for metric units.
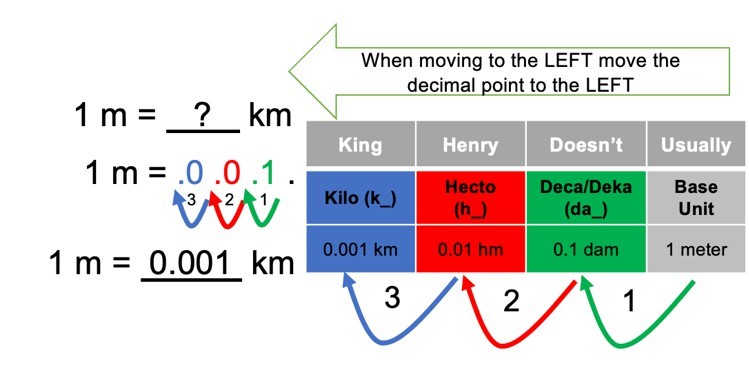 Before doing this conversion think about the units. The length of the body is typically measured in meters while the length between cities is measured in kilometers. Kilometers (km) are larger units than meters (m). Therefore, 1 meter would be a fraction of a kilometer. The number of kilometers in 1 meter will therefore need to be very small. Kilometers is three (3) columns to the left of meters. You will therefore need to move the decimal point three (3) places to the left. Again, keep in mind that 1 m is actually 1.0 m. One (1) meter will thus equal 0.001 kilometers. The number got much smaller as you moved to the left on the chart, and the units got larger (Figure 2). Conversely, as you move to the right in the chart the numbers will get bigger, and the units will get smaller, such that 1 km = 1,000 m.
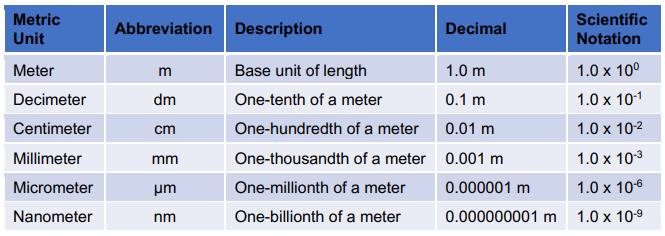
How do you convert if the prefix is not between kilometers to millimeters? Easily! You can use the following chart and follow the rule that each prefix is based on the power of 10 (Table 2).
One-meter equals how many micrometers?
Remember that meter is the base unit and is equal to 1.0 x 100 which is 1. Micrometers are 1.0 x 10⁻⁶. The exponential power tells you how many places to move the decimal and the direction. Micrometers have a negative exponent and are much smaller than meters and therefore you need to move the decimal to the right 6 places. 1m = 1,000,000 µm.
One micrometer equals how many nanometers?
Micrometer is 1.0 x 10⁻⁶, which means that you will move the decimal six places to the right from meters. Nanometer is 1.0 x 10⁻⁹, which means that you will move the decimal nine places to the right from meters. To calculate how many places to go from micrometer to nanometer simply subtract the exponential numbers: 9-6 = 3. Since you are moving from micrometers to nanometers the number will get larger because nanometers are a smaller unit. You will need to move the decimal three places to the right. 1.0 µm = 1,000 nm.
Table 2: Conversion chart between metric units.
Activity 1: Metric Units for Length
Materials:
|
Background:
During the history and exam of your patient, different metric units were used to describe the patient’s symptoms and vital signs. The following activity will describe the metric units for length and how to convert between smaller and larger metric units.
Experiment:
- Practice converting metric units by filling out the chart for the question in the workbook.
- Measure the different parts of your body using metric units and record your results in your lab workbook for the question and do the metric conversions.
- Measure the length of your body in meters.
- Measure the circumference of your head in centimeters. The tape measure should be wrapped snugly around the most prominent part of the forehead about 2 fingers above the eyebrow to the widest part of the back of the head.
- Measure the length of your brachial area in centimeters. Start at the acromial area and end at the antecubital area on the right arm.
- Measure the length of your right leg in centimeters. Start in the coxal area and end at your calcaneal region.
- Measure the width of your middle fingernail in millimeters.
Activity 2: Estimation
Materials:
|
Background:
Estimation is an important skill to practice. Getting a sense of how big, how massive, or how much volume something is. In this activity, we will practice estimating the size of several objects in lab using proper metric units.
Experiment:
- Estimate the length of the following objects. Put these estimations in the question of your workbook.
- Length of a humerus bone.
- Length of your antebrachial area. Start from the antecubital area and end at the carpal region.
- Width of your metacarpals.
- Length and width of a piece of paper.
- Diameter of a penny.
- Measure each of the above objects in step 1.
- Compare your estimates with the measurements and answer the remaining questions for activity 2 in your workbook.
Activity 3: Measuring and Estimating Volume, Mass, and Temperature
Materials:
|
|
Background:
Just as you practiced understanding the units for length (meters), now your will practice using the units for mass (grams) and volume (liters). We will also determine the range of temperatures in degrees Celsius (°C).
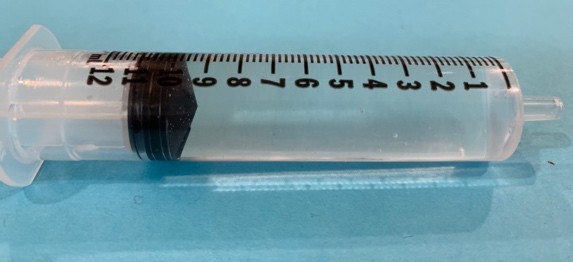
Figure 3: Liquid medicine syringe with metric markings.
Experiment:
Record the results in the questions of your workbook for each of the following steps.
- Use the scale provided to weigh the fetal skull in grams.
- Use the scale to weigh a penny in grams.
- Fill a syringe with 10 ml of water. When filling the syringe with water, you must make sure that the first line after the dome is used to measure. Look at the picture to the right to confirm the correct amount (Figure 3).
- Place a weigh boat on the scale and press the “tare” button. Now fill the weigh boat with the 10 ml of water and record the weight in grams.
- Look at the thermometer in the tray and record the room temperature in degrees of Celsius.
- To take your own body temperature clean the probe with alcohol swab and place it under your armpit for 3 minutes. Record your body temperature in degrees Celsius.
- Go to the fume hood to record the temperature of the boiling water and freezing water in degrees Celsius.
- Practice estimating volume and weight in proper metric units. Estimate the following and put your estimates in your lab workbook.
- Estimate the weight of a nickel.
- Estimate the weight of the humerus bone.
- Estimate the volume of a soda can.
- Estimate the volume of ten drops of water from a dropper.
- Estimate the wight of ten drops of water from a dropper.
- Measure each of the above objects in step 7.
- Compare your estimates with the measurements and answer the remaining questions for activity 3 in your workbook.
Putting It All Together
Materials:
|
Background:
In this lab, we reviewed the units of the metric system. We practiced conversions between different metric units and the skill of estimation.
Our case study featured measurements of a female 6-month-old infant. The history included the size of lesions on the skin and amount of medication administered. Now it is your turn to measure another patient and compare them to the case study infant to assess whether the measurements are reasonable for a normal infant of this age.
Experiment:
- Accurately measure each of the following parameters for your patient using the
appropriate units. Record the data in the questions of your lab workbook.- Measure the length of your patient.
- Measure the head circumference of your patient.
- Measure the mass of your patient.
- Weigh the wet diaper and the dry diaper. The difference will give you the output of the patient.
- Weight the empty baby bottle. Fill the baby bottle to the black line with water. Weigh the full bottle of milk.
- Then measure the volume of the water in the baby bottle. This will be the fluid intake of the patient.
- How does the fluid intake match fluid output? Compare the measurements from d, e, and f.
- Describe the lesions on the patient by measuring length and using correct anatomical terminology to describe their location.
- Review our case study measurements. Are they accurate? What are the likely correct units for each? Answer the remaining questions in your lab workbook.
Figure Citations for Instruction Book:
- Images taken using microscopes and cameras at the Loudoun campus. Images
were created by H. Wangerin (NOVA Loudoun faculty): Figures 1, 2, and 3
