
13 Spinal Cord and Spinal Nerve Lab
"He who joyfully marches to music in rank and file has already earned my contempt. He has been given a large brain by mistake, since for him the spinal cord would suffice." -Albert Einstein
Gillian Backus; Heidi W. Wangerin; and Paula Rodgers
Objectives
The Spinal Cord:
1. From a cross section of the spinal cord (microscopic specimen, digital image, and model) identify the structures from the terminology checklist.
2. Describe the functions of the following parts of the spinal cord: posterior horn, lateral horn, and anterior horn.
Spinal Nerves:
3. Name and describe the location of the four main spinal nerve plexuses.
4. Locate, identify, and describe the function of specific peripheral nerves on an image or model and match it with its corresponding nerve plexus.
5. Define and cite examples of both a somatic reflex and an autonomic reflex.
6. Identify the specific nerves and structures involved in the following reflex arcs: patellar reflex and pupillary light reflex (PLR).
7. Identify the components of a reflex on an image and describe the function of each component.
8. Evaluate a normal versus an abnormal response to a reflex test.
9. Given an abnormal response to a specific reflex, predict the damaged nerve or anatomical structure.
10. Identify the components of the ascending pathway to the pre-central gyrus and descending pathways from the post-central gyrus.
Terminology Checklist
Terms with a * must also be identified on a histology slide.
Spinal cord
|
Branches of spinal nerves
|
Spinal nerves
|
Reflexes
|
Components of a reflex arc
|
Spinal Nerve Pathways
|
Outline of Lab
Case Study: “’The Pain in the Back”
Activity 1: The Structure of the Spinal Cord
Activity 2: Histology of the Spinal Cord
Activity 3: Spinal Nerve Structure and Function
Activity 4: Identification of the Major Spinal Nerves and their Motor Functions
Activity 5: Somatic (Patellar) and Autonomic (Pupillary) Reflex Arcs
Activity 6: Spinal Nerve Pathway
Putting It All Together
Case Study: “The Pain in the Back”
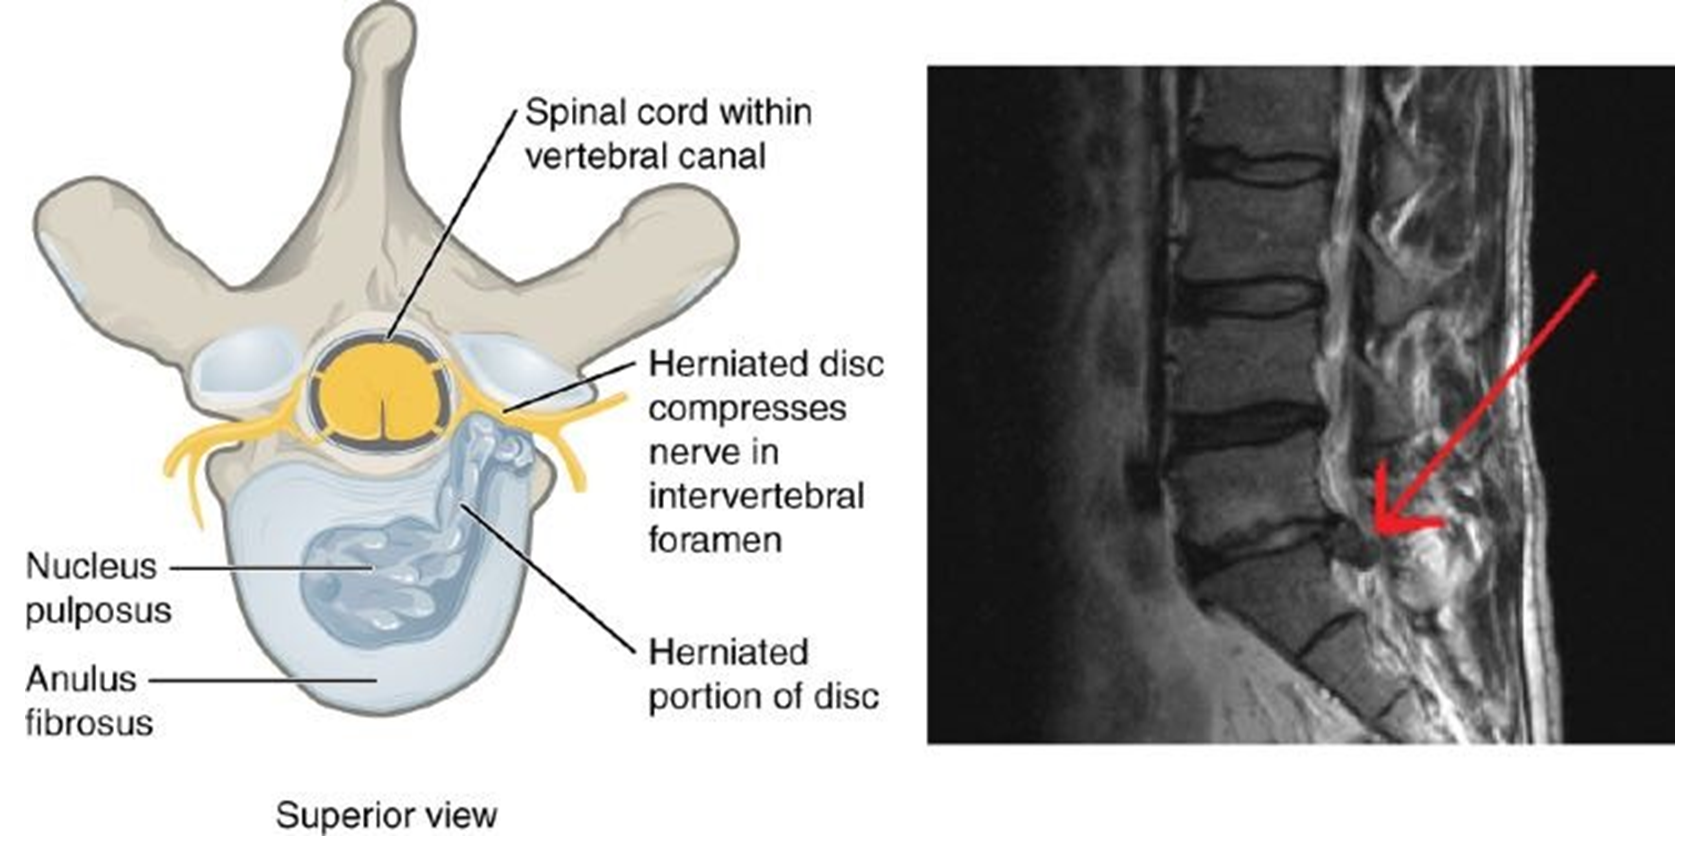
You are a nurse practitioner working in a family practice. One of your patients, Adele, a young woman in her 20’s, comes in with pain in her lower back and pain down the anterior and posterior of her leg. She remarks that the pain began shortly after she began a weightlifting regimen. The pain is quite severe, preventing her from lying down at night and disrupting her sleep. She has been struggling to walk upstairs and several times her leg has buckled (given out) from under her. She asks for medication for pain relief that will allow her to sleep. You suspect a herniated disc in which the intervertebral disc, the pad of fibrocartilage between the vertebrae, has ruptured and is putting pressure on several spinal nerves. You write a referral for an MRI and schedule an appointment with the radiologist to have her lower back imaged the following day.
Activity 1: The Structure of the Spinal Cord
Materials:
- colored pencils
- laminated terminology labels with sticky tack
- spinal cord cross section model
Background:
The spinal cord is composed of a bundle of neurons housed within a space (the intervertebral foramen) of the vertebrae. The spinal cord is therefore surrounded by bone and is well-protected. However, any disruption in the structure of the vertebrae or its associated intervertebral disks, as occurs with a herniated disc, can compress the spinal nerves and cause irritation of the nerve roots as they enter and exit the vertebral column, causing intense pain and disrupting both motor and sensory signals to and from that region of the body.
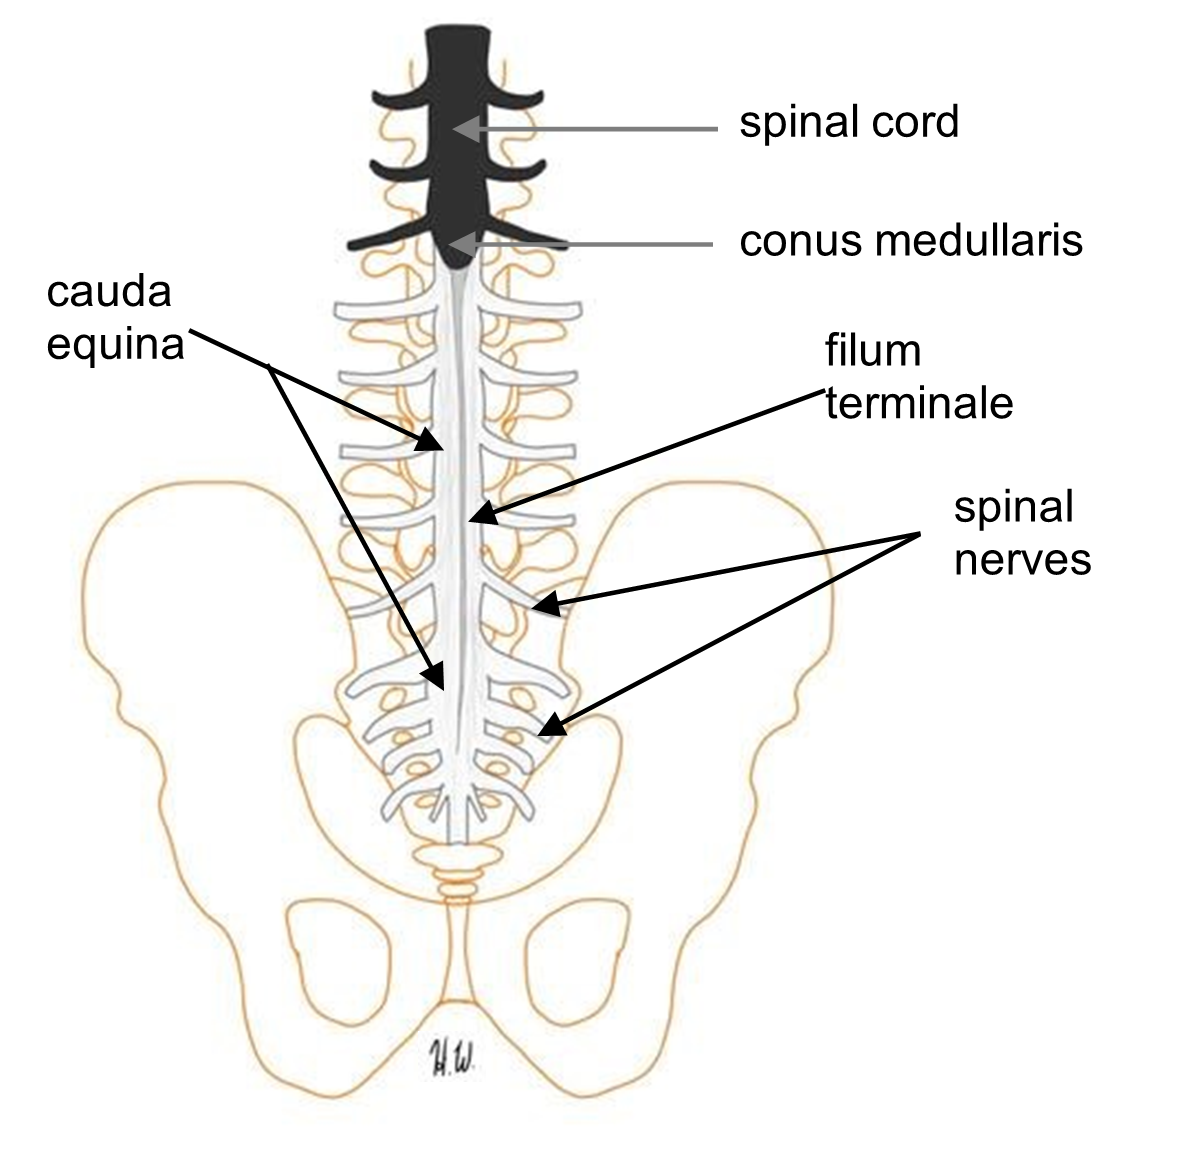
Like the brain, the spinal cord is part of the central nervous system. The spinal cord is wrapped in the same three layers of connective tissue, meninges, as the brain. Cerebrospinal fluid (CSF) flows around the subarachnoid space as well as in a canal in the center of the cord called the central canal. The spinal cord is continuous and inferior to the medulla oblongata. It begins at the level of the foramen magnum through the occipital bone. It extends down the spinal column within the vertebral foramen and is surrounded by stacked vertebral bones. The spinal cord does not grow after age 2. Since the skeletal system continues to grow, the wrapped spinal cord is shorter than the vertebral column. The spinal cord ends at the conus medullaris which is located between the first and second lumbar vertebrae. Neurons continue to grow and form the peripheral nerves which extend from the spinal cord. The bundle of peripheral nerves inferior to the conus medullaris are commonly referred to as the cauda equina as they resemble the tail (cauda) of a horse (equina). The spinal cord is anchored within the vertebral foramen by lateral extensions of the pia matter called the denticulate ligaments, and by the filum terminale an extension of pia matter from the conus medullaris to the coccyx (Figure 1). Thirty-one pairs of spinal nerves extend from the spinal cord out to the rest of the body by way of the intervertebral foramen (openings) created by the superior and inferior vertebral notches.
Figure 1: Labeled longitudinal section of the spinal cord.
In cross-section, the spinal cord is composed of both gray matter (unmyelinated axons, cell bodies and axon terminals) and white matter (myelinated axons and is organized opposite to that seen in the brain. The white matter is organized into columns called funiculi. Each funiculus is identified by its relative location: anterior funiculus, posterior funiculus, and lateral funiculus (Figure 2). These columns are composed of myelinated axons that give the tissue its white appearance. The axons of the white matter run vertically up and down the spinal cord. Within these vertical columns, electrical signals are sent rapidly up and down between the brain and peripheral nervous system.
In the center of the spinal cord is a butterfly-shaped region of grey matter. Information processing occurs here. The grey matter is regionally divided into the posterior horn (processes sensory information), the lateral horn (processes visceral motor information), the anterior horn (processes somatic motor information), and the grey commissure. In the middle of the grey commissure is a tiny hole, the central canal, which is filled with CSF (Figure 2).
Figure 2: Labelled cross section of the spinal cord.
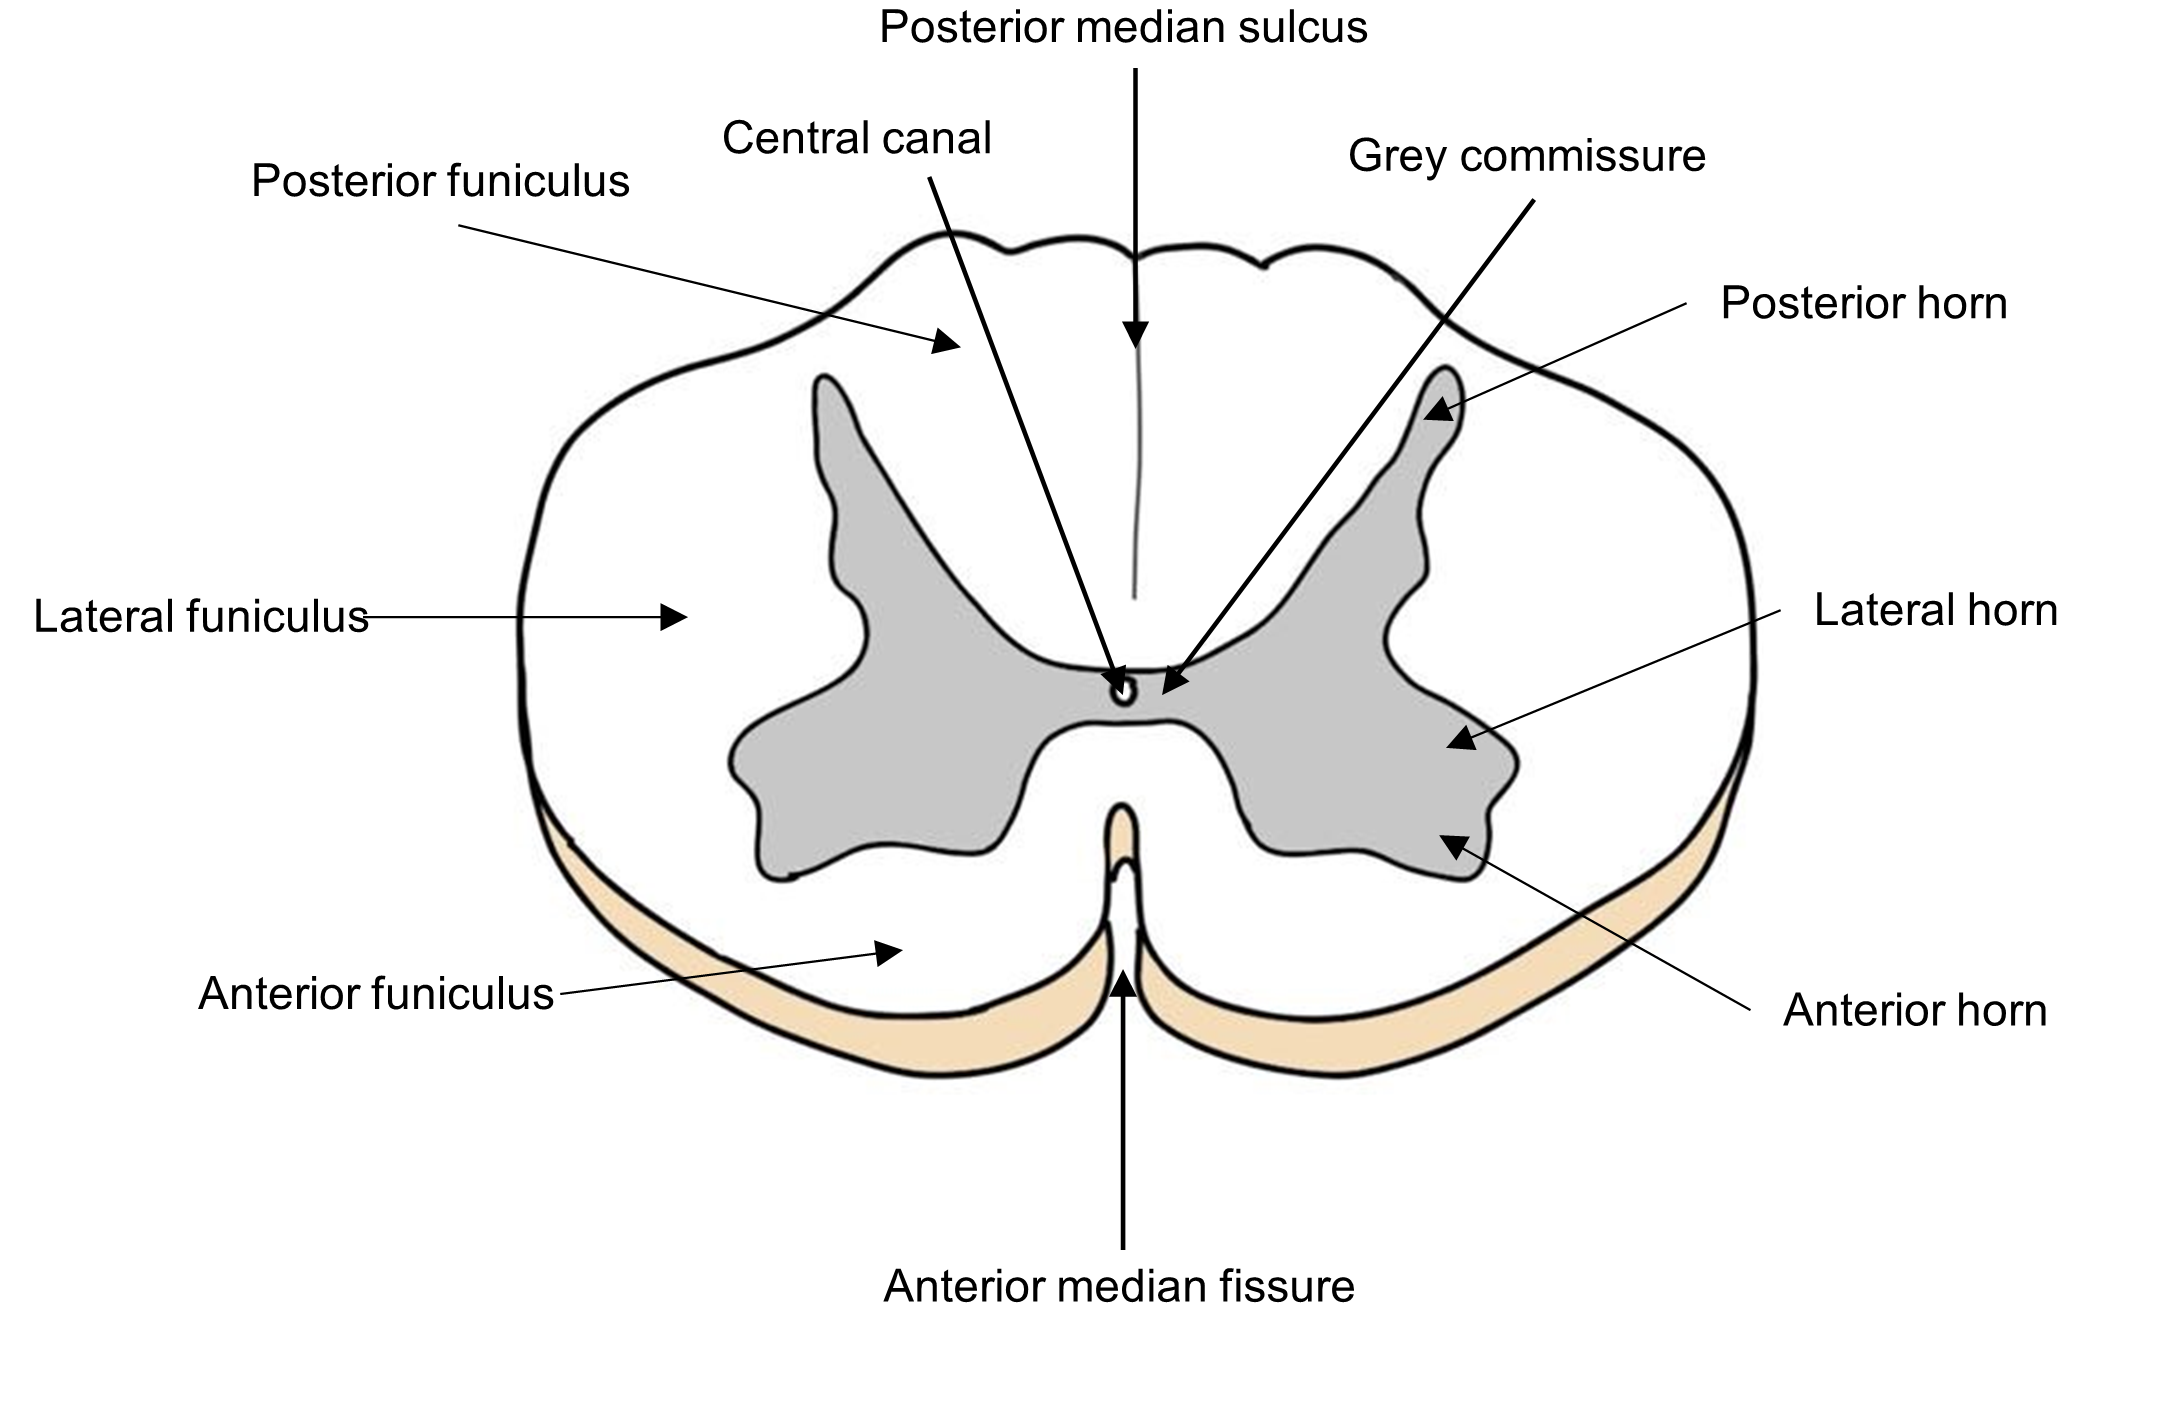
Recall that CSF is a clear, circulating fluid that serves to cushion and protect the nervous system. CSF also provides nutrients and removes wastes from nervous system cells. If you look closely at the central canal, you can see that it is lined with specialized ependymal cells, one of the glial cells of the nervous system, involved in producing CSF.
Sensory and motor neurons are processed in different regions of the grey matter of the spinal cord and follow different pathways. Sensory neurons enter the spinal cord by way of the posterior root (Figure 3). Clusters of the sensory cell bodies of these neurons form a swelling called the posterior root ganglion before forming synapses in the posterior horn. Somatic and visceral motor neurons leave the spinal cord following the anterior root. A quick saying for this is: “sensory information enters by the “back door” (posterior root) and motor information leaves through the “front door” (anterior root).”
Figure 3: Labelled cross section of the spinal cord and nerves.
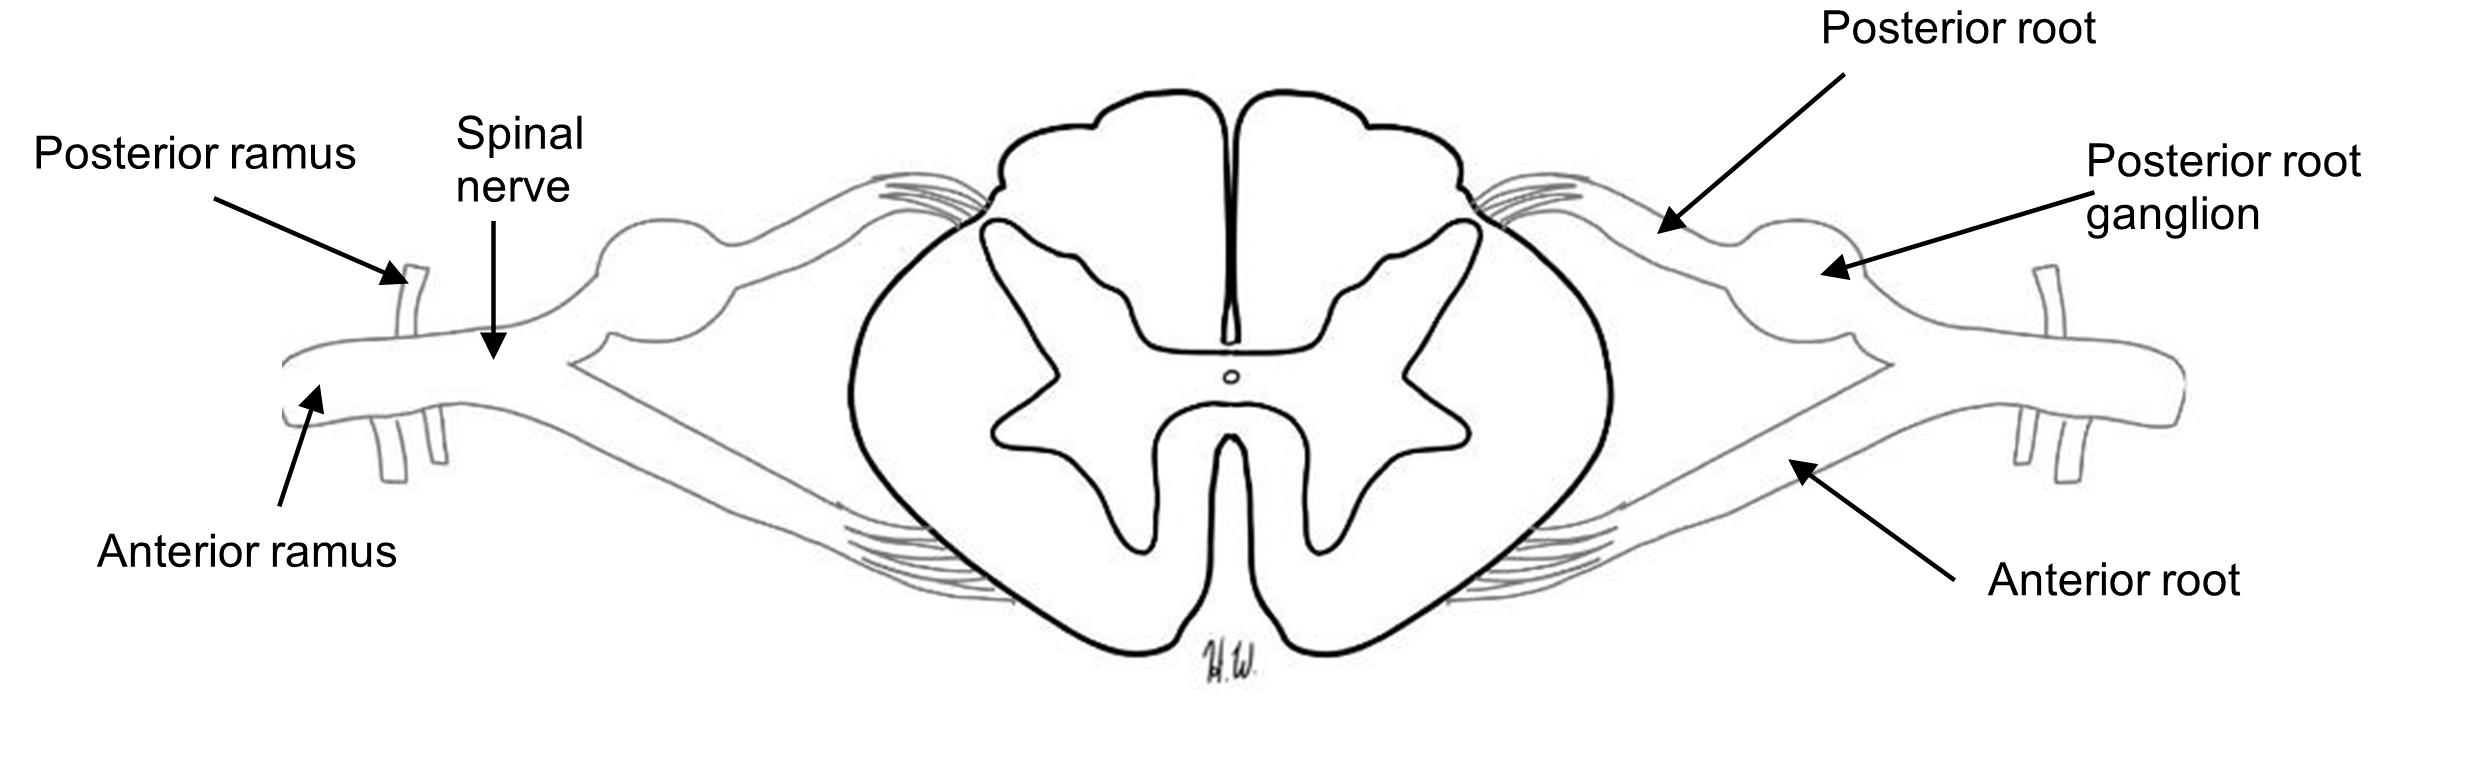
Interestingly, although the motor and sensory neurons travel in and out of the spinal cord using distinct anatomical regions, these neurons get bundled together as a mixed spinal nerve, much as various wires and cables might be consolidated in a large fiber before they enter or leave your home.
Adele’s MRI shows a herniated disc in the lumbar region of the spine (Figure 4). This injury can damage both sensory and motor function of the spinal nerves that extend from the spinal cord. She is sent to the neurologist for further testing.
Figure 4: Diagram of the vertebrae and spinal cord of a herniated disk and an MRI image of the sagittal view of the spinal cord – the red arrow marks the location of the herniated disc.
Procedure:
1. On the image below identify the structures (conus medullaris, filum terminale, spinal nerve, and cauda equina).

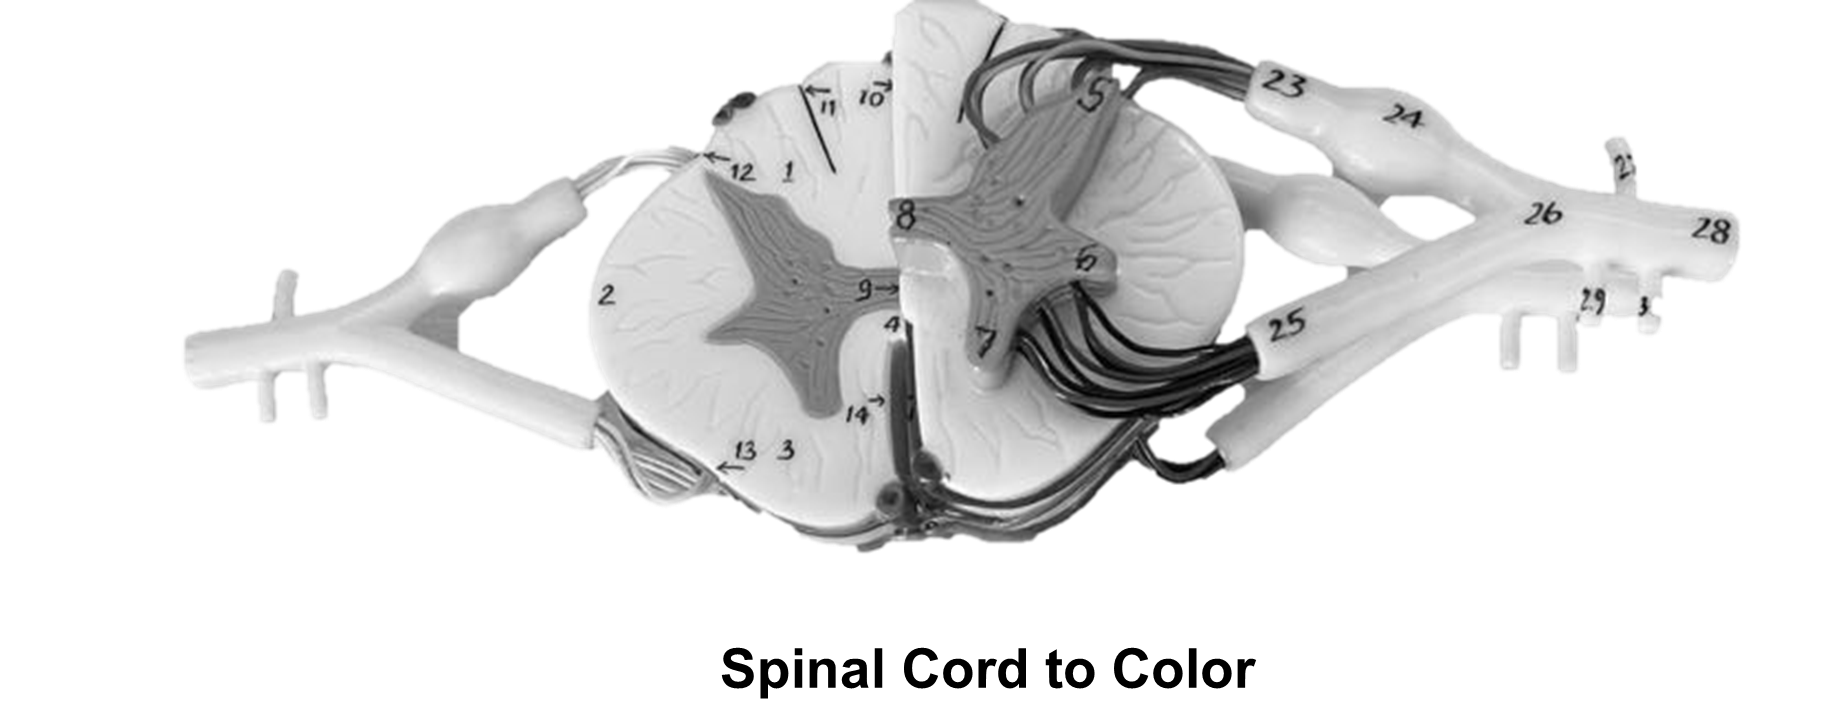
2. On the spinal cord cross section model, identify the structures using the laminated terminology labels. Have your instructor check your work:
Instructor’s Initials for labeled spinal cord ___________________
3. Remove all the labels and place them back on the terminology sheet.
Activity 2: Histology of the Spinal Cord
Materials:
- compound microscope
- histology slide of spinal cord cross section
- isopropyl alcohol
- lens paper
Background:
In this activity will view a cross section of the spinal cord under the light microscope. The basic structure of the grey and white matter of the spinal cord can be viewed at low power (10x). At high magnification (400x), the cell bodies of neurons are visible in the horns (grey matter), as well as the ependymal cells that line the central canal.
Procedure:
1. Label the image of a cross section of the spinal cord under scanning power. Correctly label the image below using these terms: posterior horn, anterior horn, lateral funiculus, and central canal.
Histological Cross-section of Spinal Cord
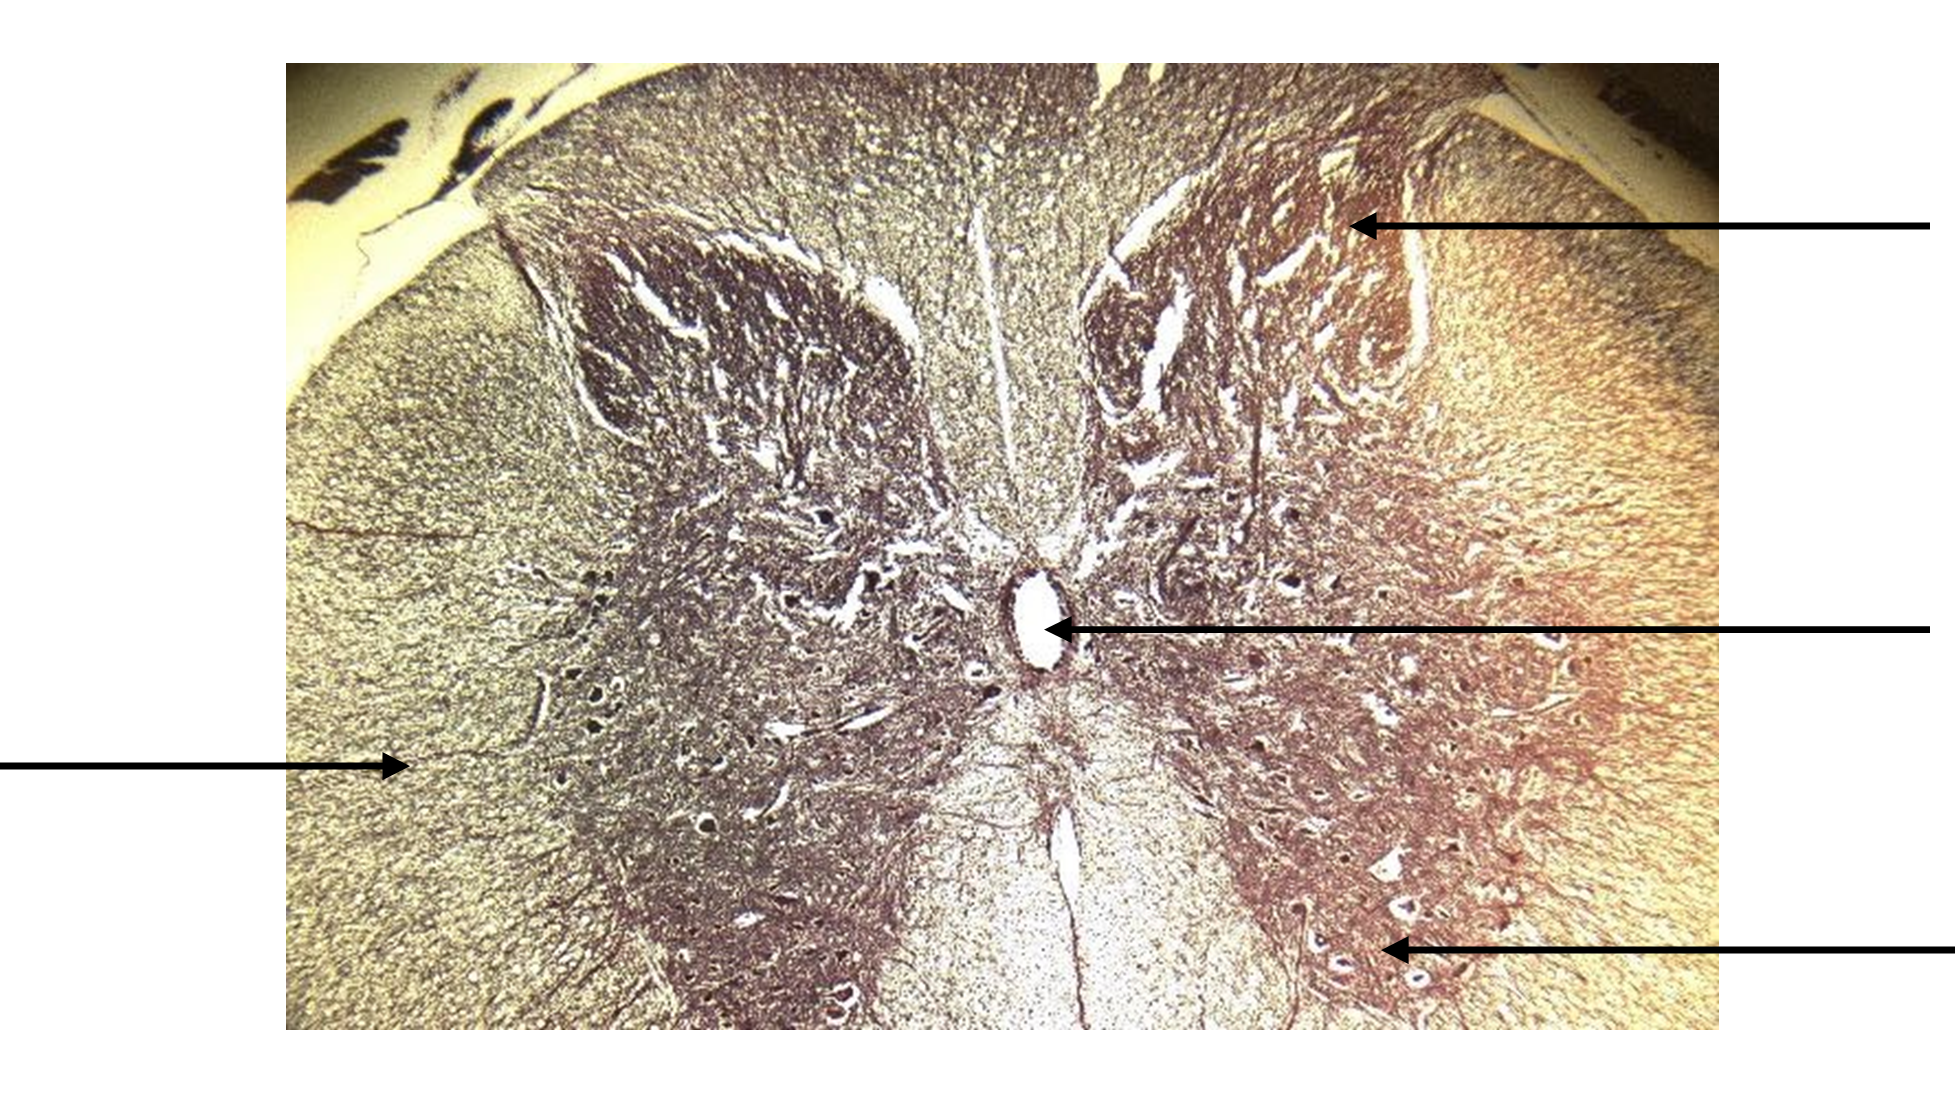
2. Obtain a microscope slide of the spinal cord in cross section (c.s.). Now focus on the middle of the specimen, where the central canal is. Using high power (400x), zoom into the central canal and observe the ciliated ependymal cells lining the canal. Draw and label the central canal and the ependymal cells.
Image under high power

Total magnification _________________
Activity 3: Spinal Nerve Structure and Function
Materials:
- colored pens, markers, or pencils
- spinal cord cross-section model
- terminology labels with sticky tack
Background:
Your patient, Adele, experienced symptoms indicative of spinal nerve damage. In this exercise you will explore the basic structure and function of the spinal nerves and the pathways of sensory and motor signals traveling to and from the spinal cord along the spinal nerves.
The 31 pairs of spinal nerves are bundles of sensory and motor neurons wrapped in connective tissue. Since they carry both sensory and motor signals, the spinal nerves are “mixed” nerves, unlike the cranial nerves which can be sensory, motor or mixed. Use the image of the cross section of the spinal cord to first review the major anatomical structures of the spinal cord (Figures 2 and 3).
A motor signal causes a response, such as signaling a muscle to contract. This signal may initiate from the motor cortex of the cerebrum, then travels down the spinal cord along a vertical tract (or column). The signal leaves the spinal cord via the anterior horn of the spinal cord. At this point the signal travels along a spinal nerve, and ultimately synapses at the neuromuscular junction of a muscle. When the muscle receives the signal, it contracts (Figure 5).
Figure 5: A typical spinal nerve reflex.
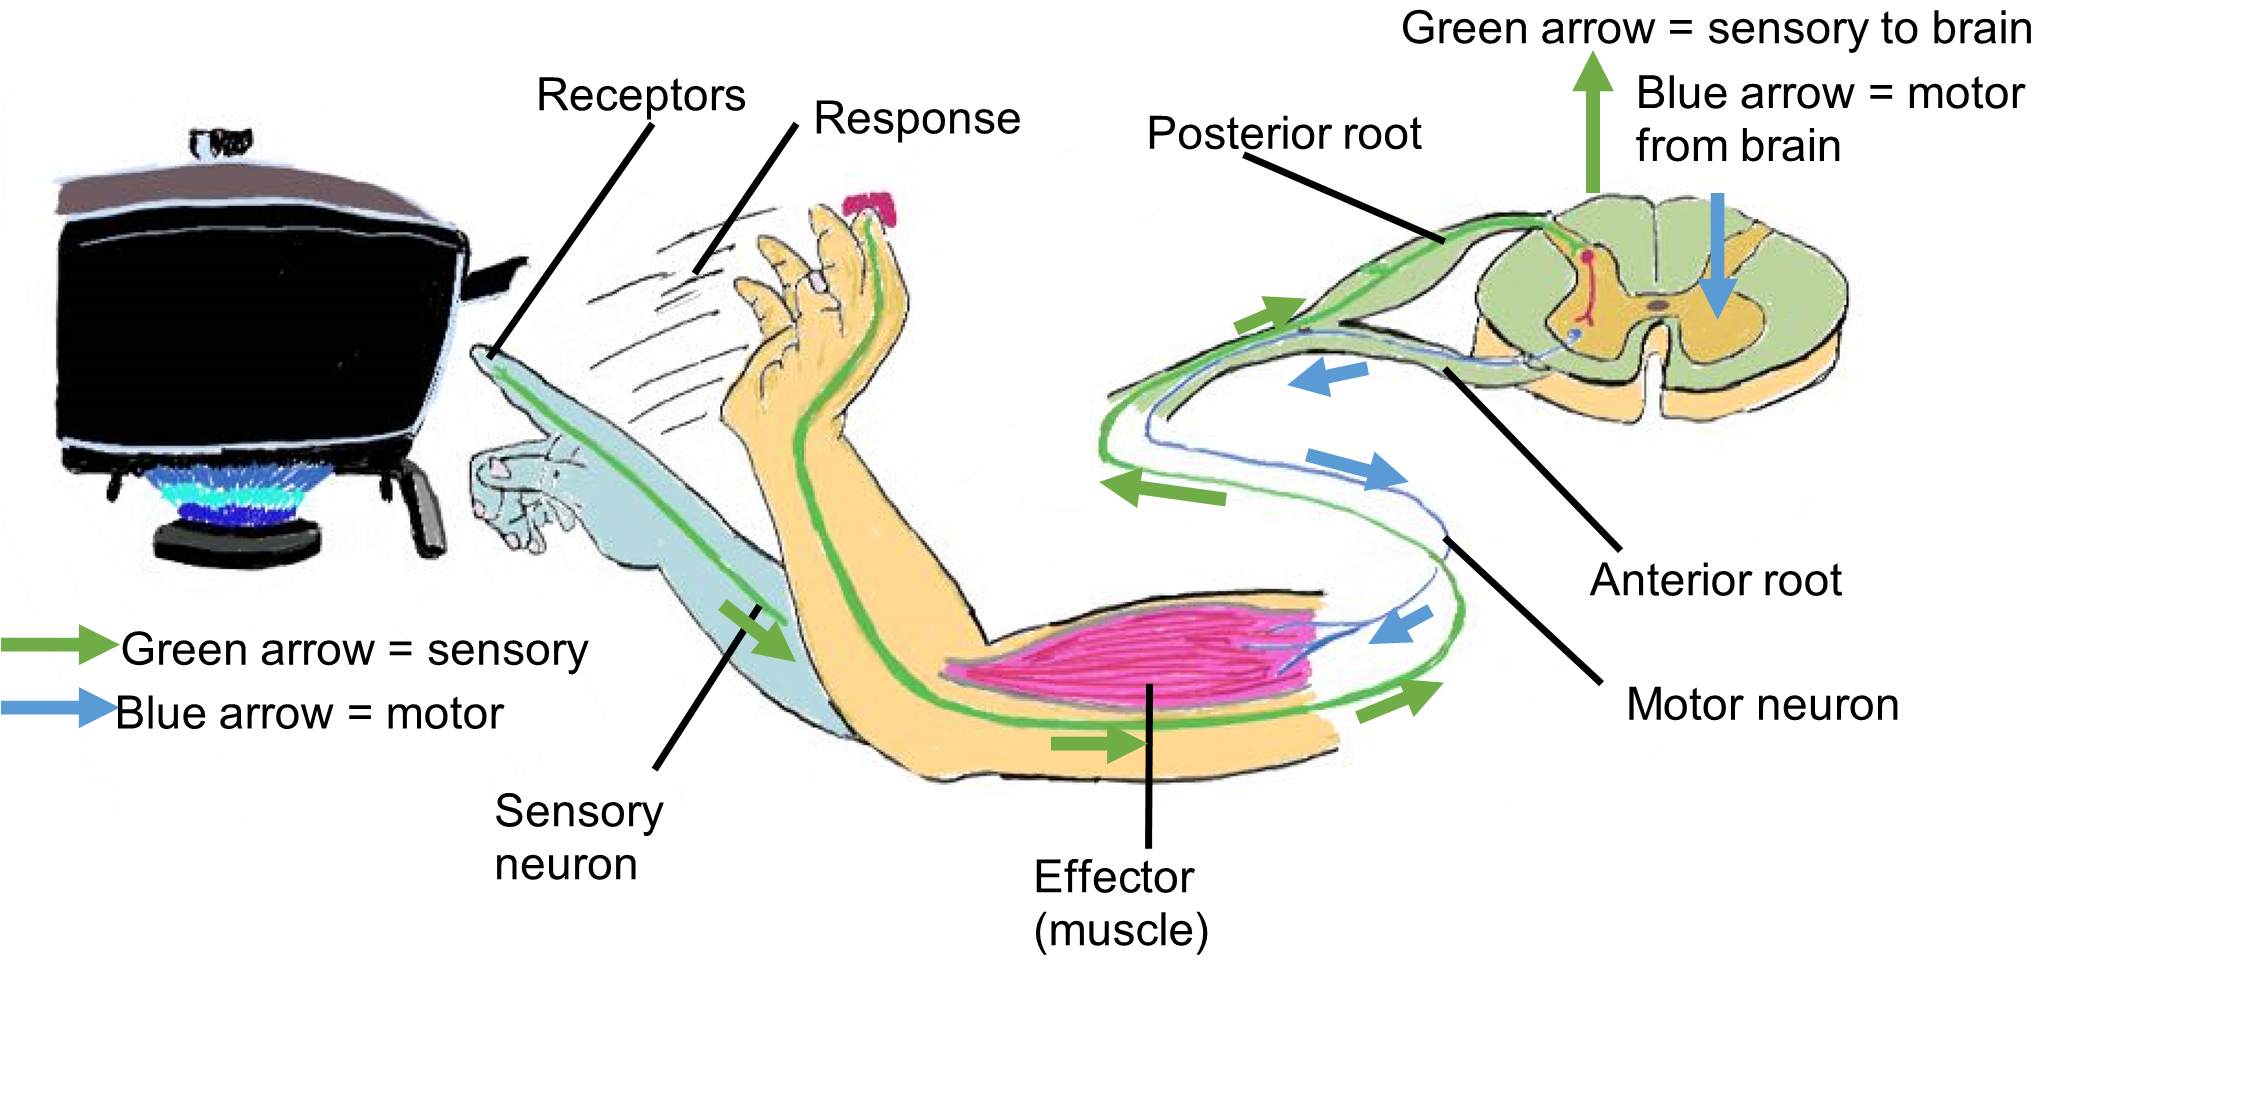
If the motor signal is to activate a structure on the anterior side of the body (or a structure in one of the limbs), it will branch from the spinal nerve into the anterior ramus. If the motor signal is to innervate a structure on the posterior side of the body, it will follow the posterior ramus. (Note: Anterior and posterior roots coming from the spinal cord combine to form the spinal nerve while the spinal nerve branches into the posterior and anterior rami which extend to other parts of the body.) (Figure 3)
Spinal nerves contain neurons from the anterior root (motor neurons) and from the posterior root (sensory neurons). A sensory signal, such as a sensation of tickle in the armpit, or tingling in the arms and legs, uses a particular path, depending on whether it is coming from the anterior or posterior side of the body. From the anterior side of the body or from the limbs, sensory input enters the spinal nerve from the ventral ramus. From there it follows the posterior root into the posterior horn of the spinal cord. If the sensory signal is coming from the posterior side of the body (not including the limbs), it will follow the dorsal ramus into the spinal nerve and then follow the posterior root into the posterior horn of the spinal cord.
Procedure:
1. Label the following structures on the image below: anterior ramus, spinal nerve, sensory receptors, posterior root, posterior horn, anterior horn, anterior root, posterior root ganglion, and posterior ramus.
2. On the image below, color all the parts of the spinal cord associated with motor functions in red, all associated with sensory functions in blue, and parts which carry both motor and sensory neurons in green.
Spinal Cord Drawing
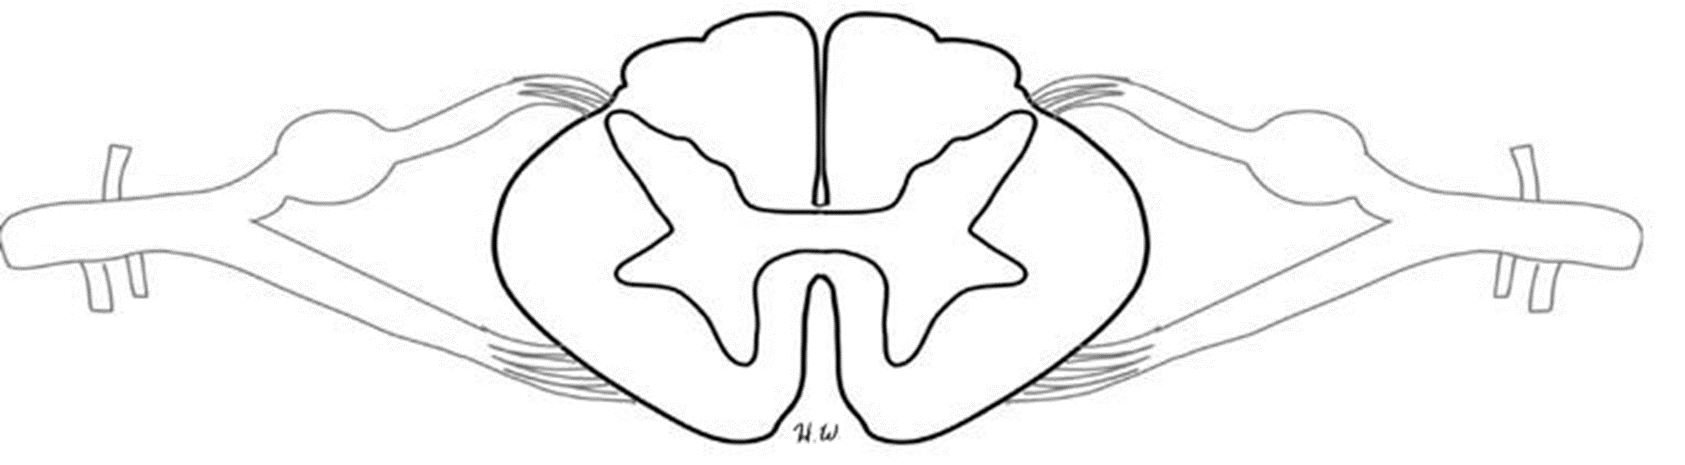
Instructor’s initials for spinal cord image: ________________
Activity 4: Identification of the Major Spinal Nerves and their Motor Functions
Materials:
- colored pencils
- muscle chart
Background:
Adele exhibits a loss of motor function as well as sensory function on the posterior of the leg that seem to be a result of the herniated disc. Adele will undergo a series of electromyography tests to determine which spinal nerves are damaged. During electromyography, needles are inserted into various skeletal muscles and the electrical activity of the spinal nerves in each muscle is recorded during contraction and relaxation.
Figure 6: Cervical and brachial plexuses and their associated nerves.
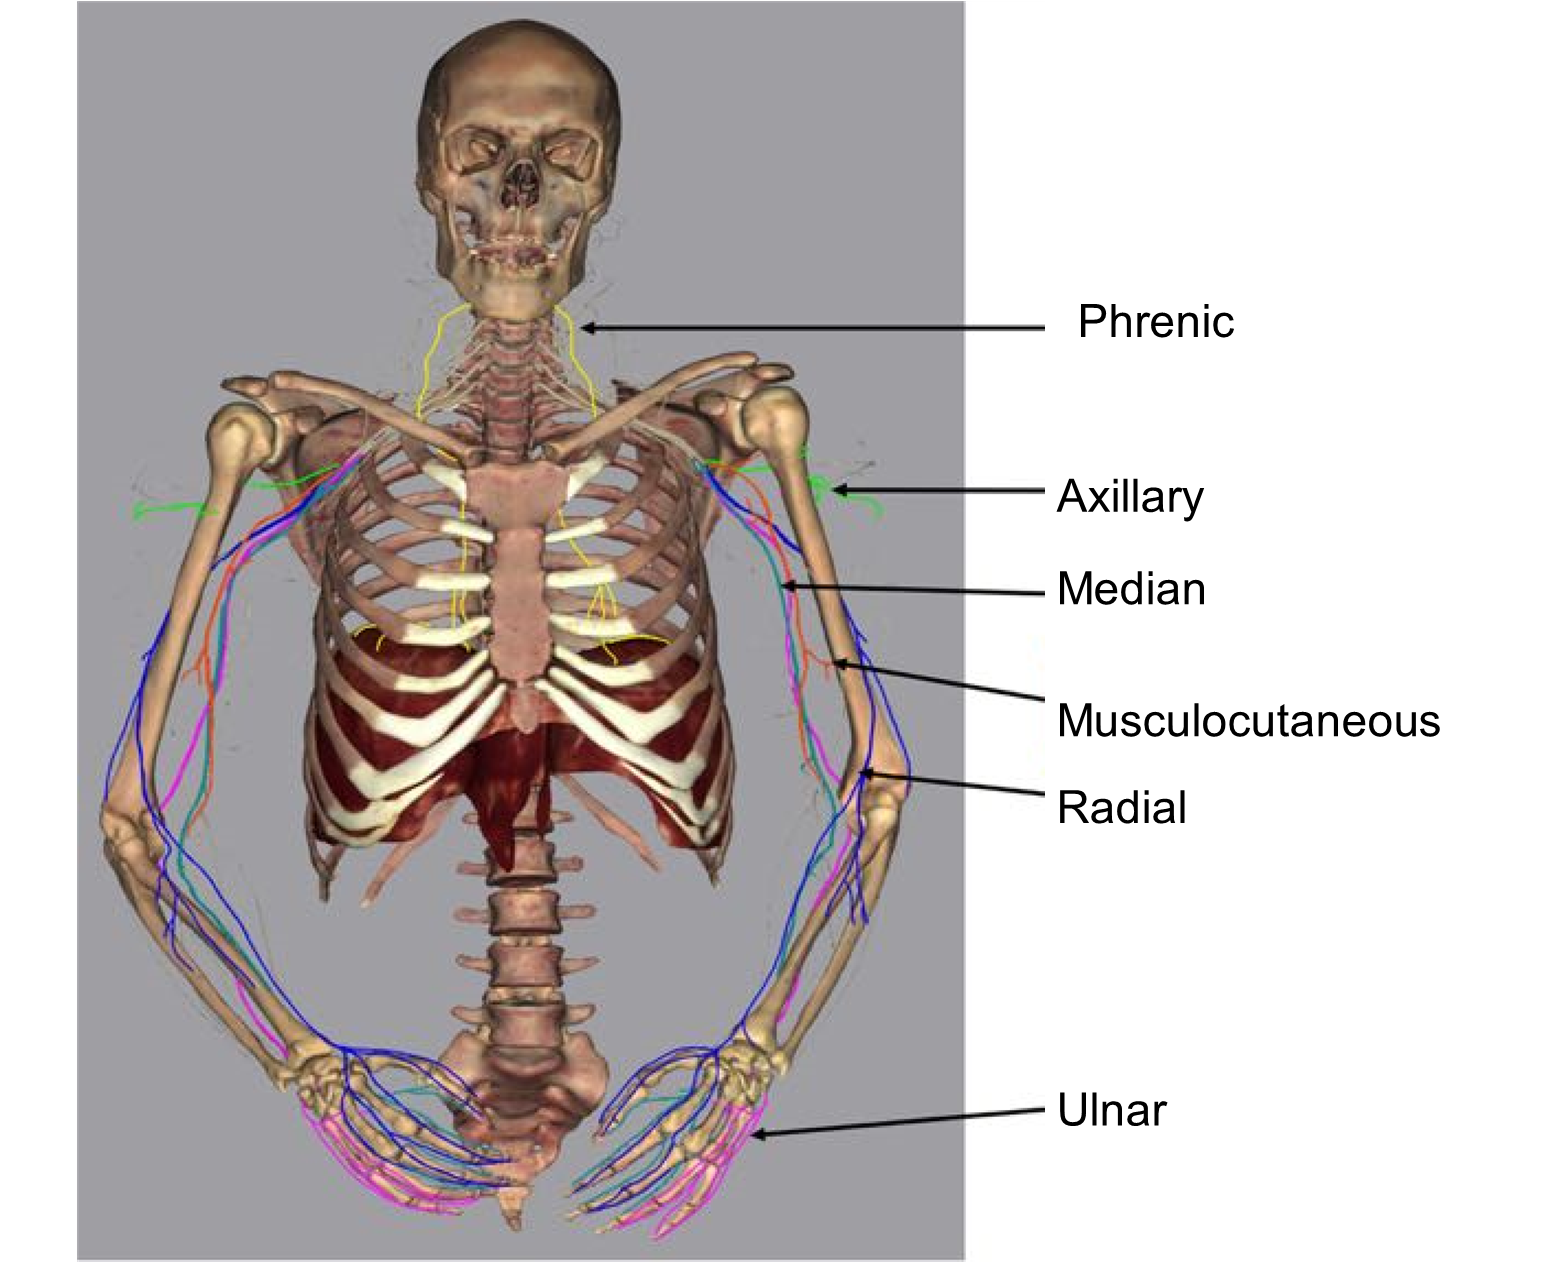
Nerve plexuses are bundles of tangled nerves that intertwine soon after leaving the spinal cord. Each plexus gives rise to specific spinal nerves. Nerve plexuses are complex interconnections of the ventral rami of different spinal nerves. There are four nerve plexuses which innervate different regions of the body (Figures 6 and 7):
-
- cervical plexus – innervates the head and neck, and extends from the cervical region of the spinal column
- brachial plexus – innervates the arm, and extends from the cervical region of the spinal column
- lumbar plexus – innervates the anterior and medial portions of the thigh and extends from the lumbar region of the spinal column
- sacral plexus – innervates the posterior of the thigh, the lower leg and most of the pelvis, and it includes nerves with extends from the lumbar region of the spinal column and from the sacrum
- Note: the thoracic region of the spinal cord does not contain any plexuses.
Spinal nerves also carry sensory information to specific locations on the body (Table 1).
Figure 7: Sacral and lumbar plexuses and their associated nerves.
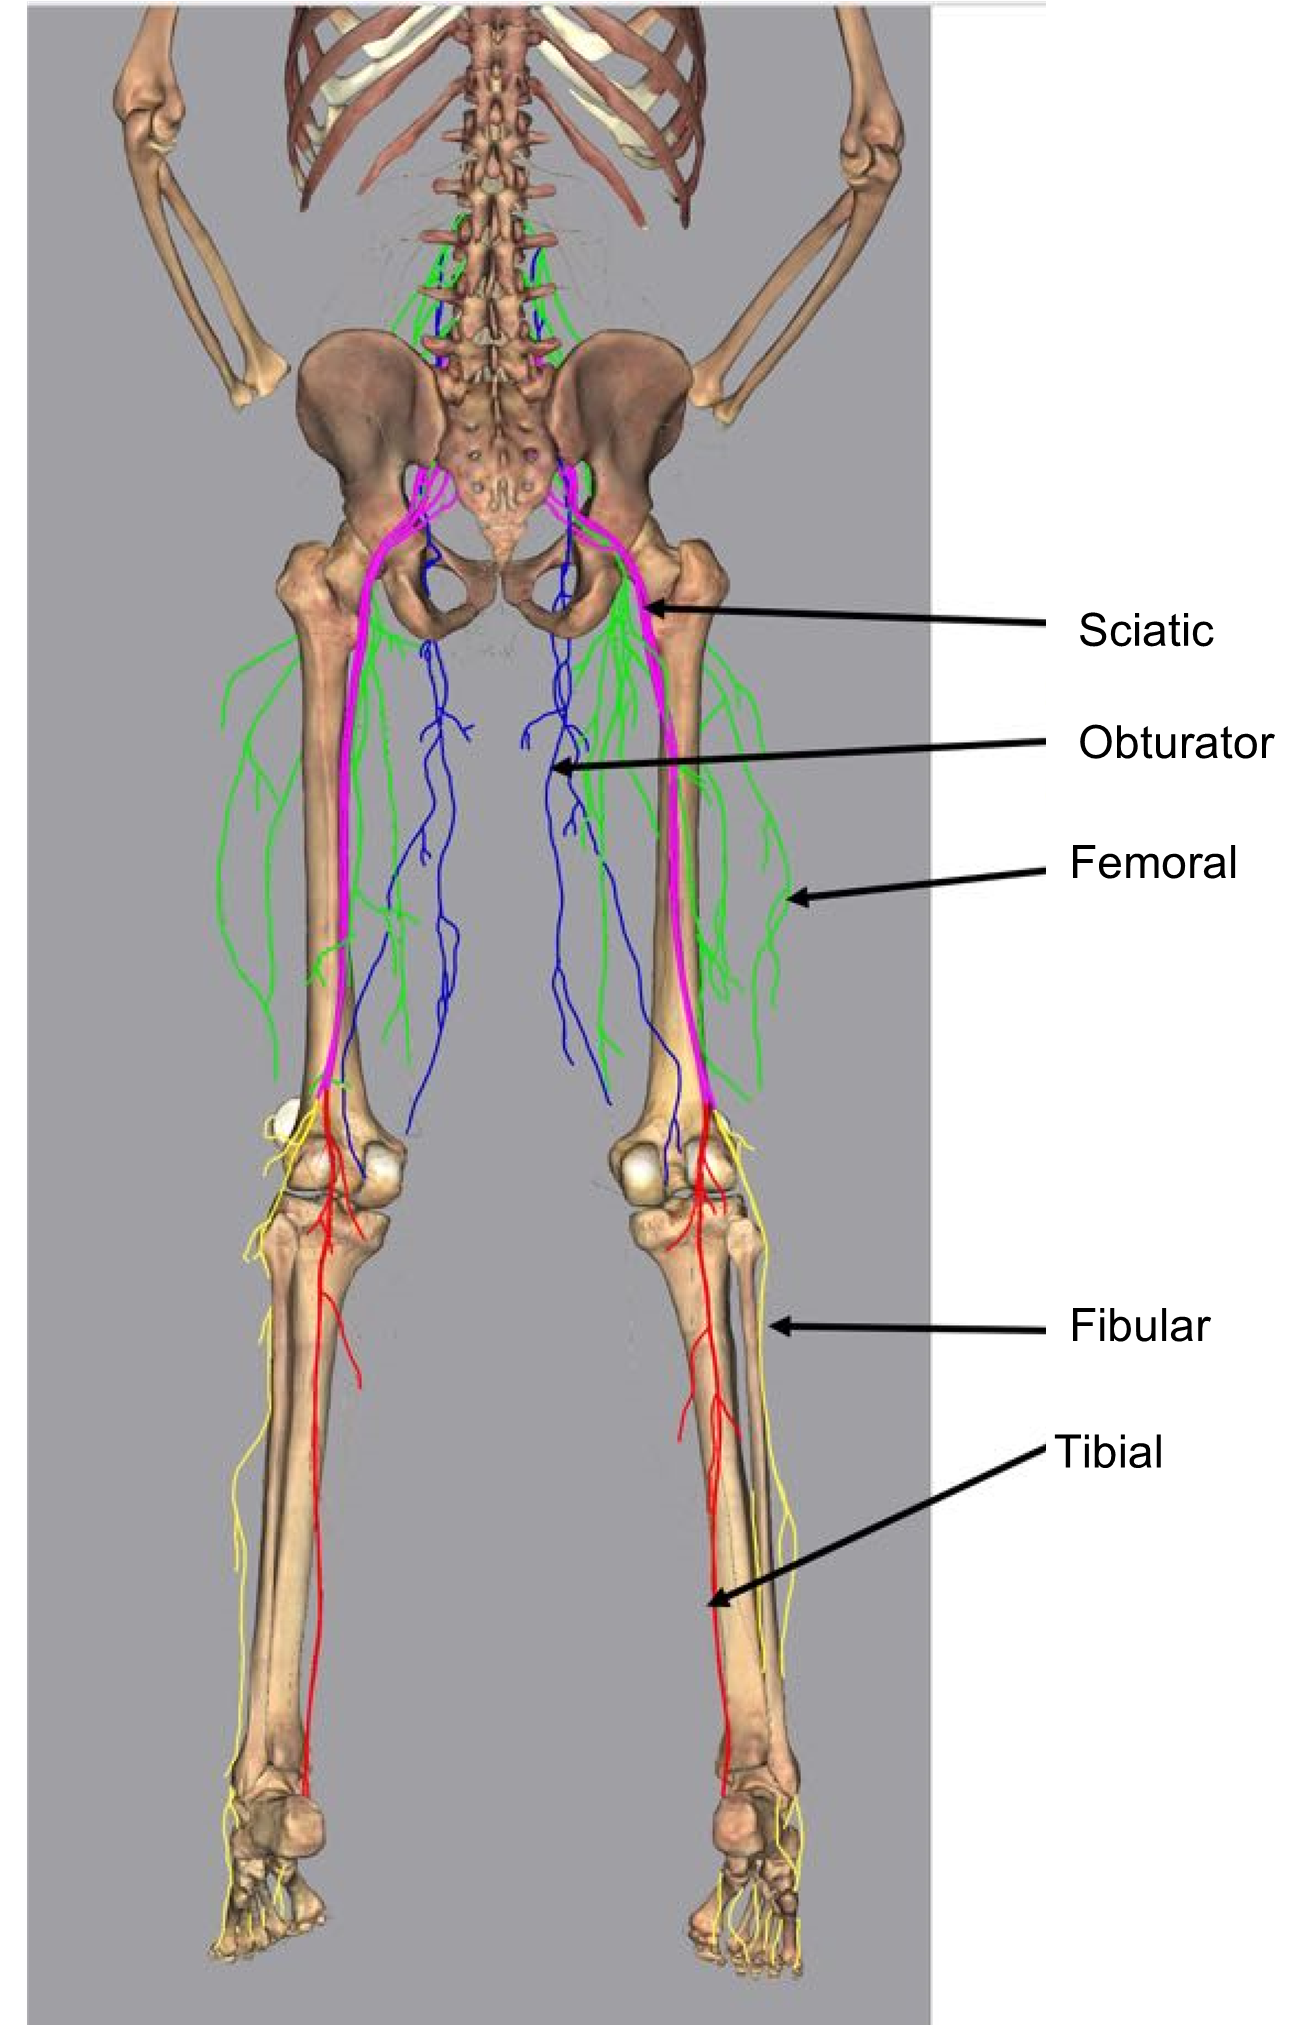
Table 1: Sensory areas served by different spinal nerves.
| Nerve | Surface area served | Nerve | Surface area served |
| Axillary | Skin of the shoulder | Obturator | Skin of medial thigh |
| Median | Skin of dorsal region of fingers 2 and 3, 2/3 of the ventral side of hand towards the lateral edge | Femoral | Skin of anterior of the thigh and medial surface of the leg from the knee to the foot, knee joint |
| Radial | Skin of posterolateral surface of arms (not dorsal area of finger 2 and 3) | Sciatic | Skin of medial thigh, knee and hip joints |
| Ulnar | Skin of medial area of hand (anterior and posterior) | Tibial | Skin of posterior calf and plantar surface of foot |
| Musculocutaneous | Lateral of forearm | Fibular | Skin of anterior and lateral leg and dorsum of foot |
Procedure:
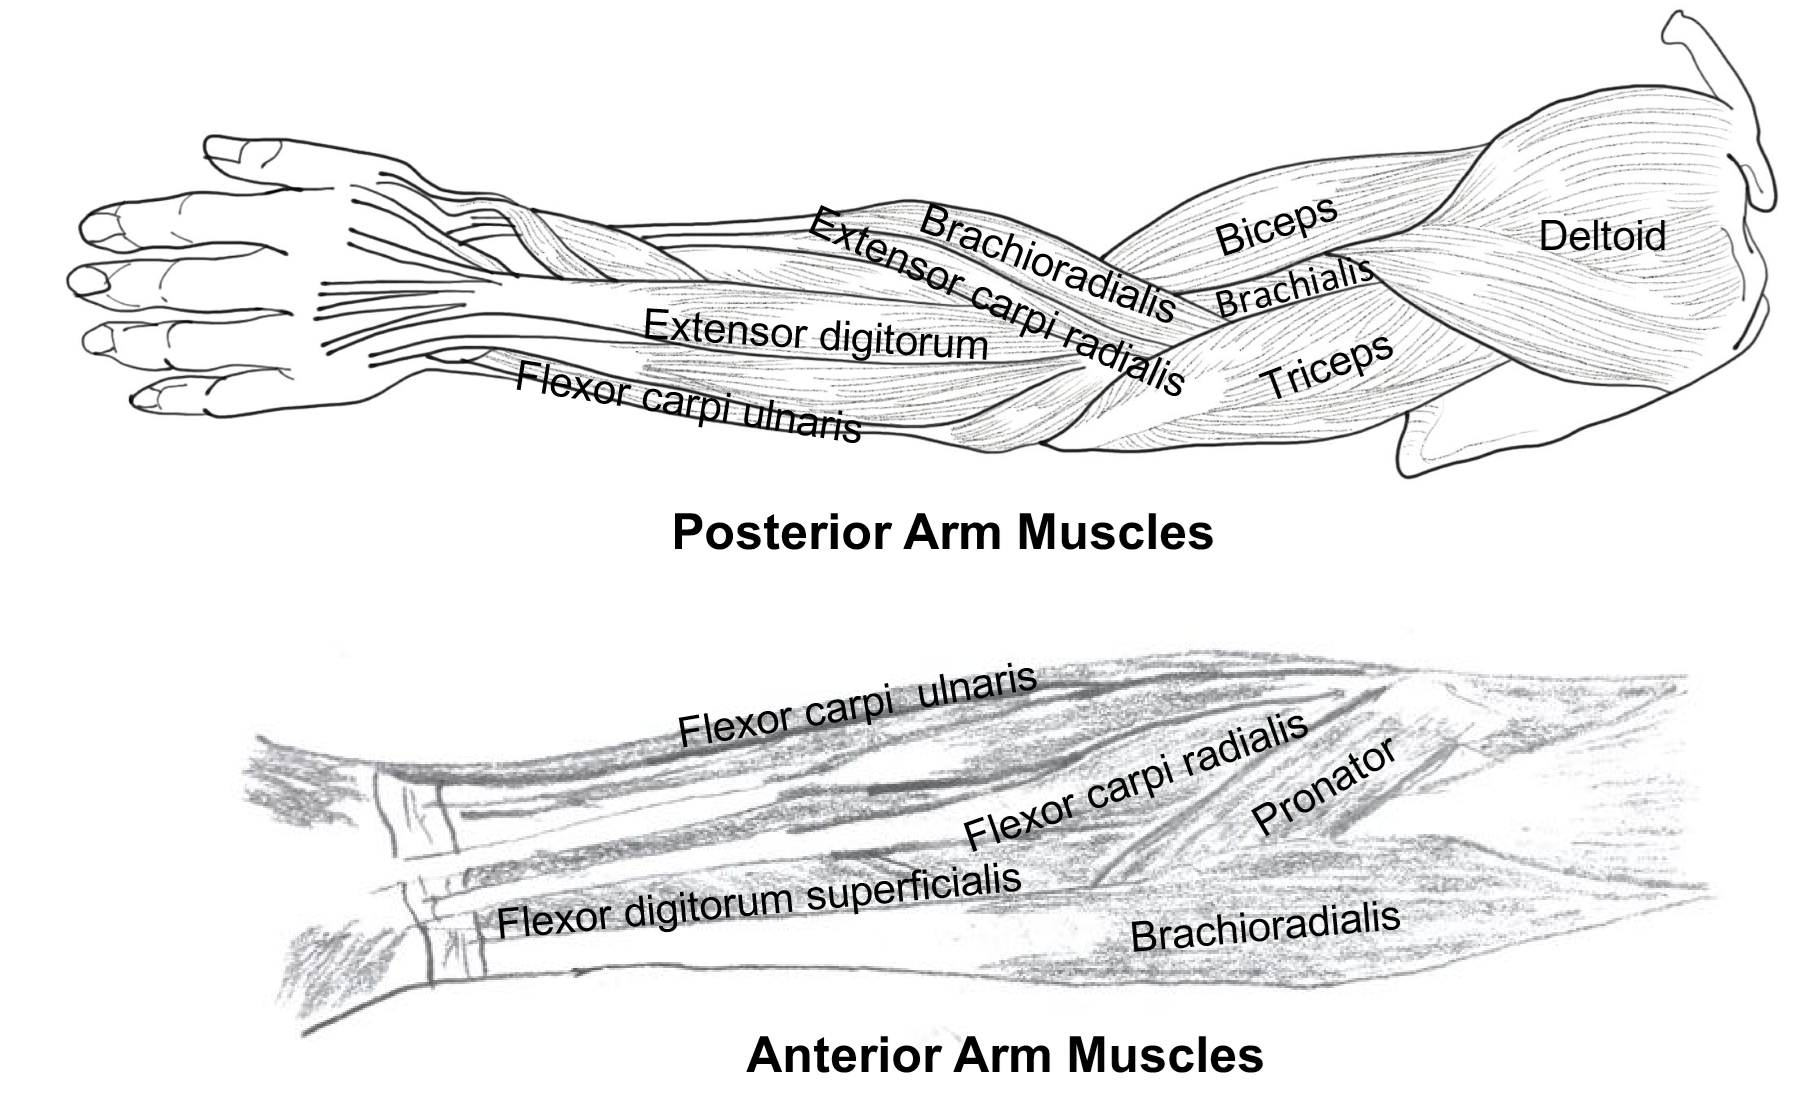
1. Color the muscles that are innervated by the following nerves from the brachial plexuses (use the muscle chart): musculocutaneous (orange), axillary (green), ulnar (brown), radial (dark blue), median (light blue).
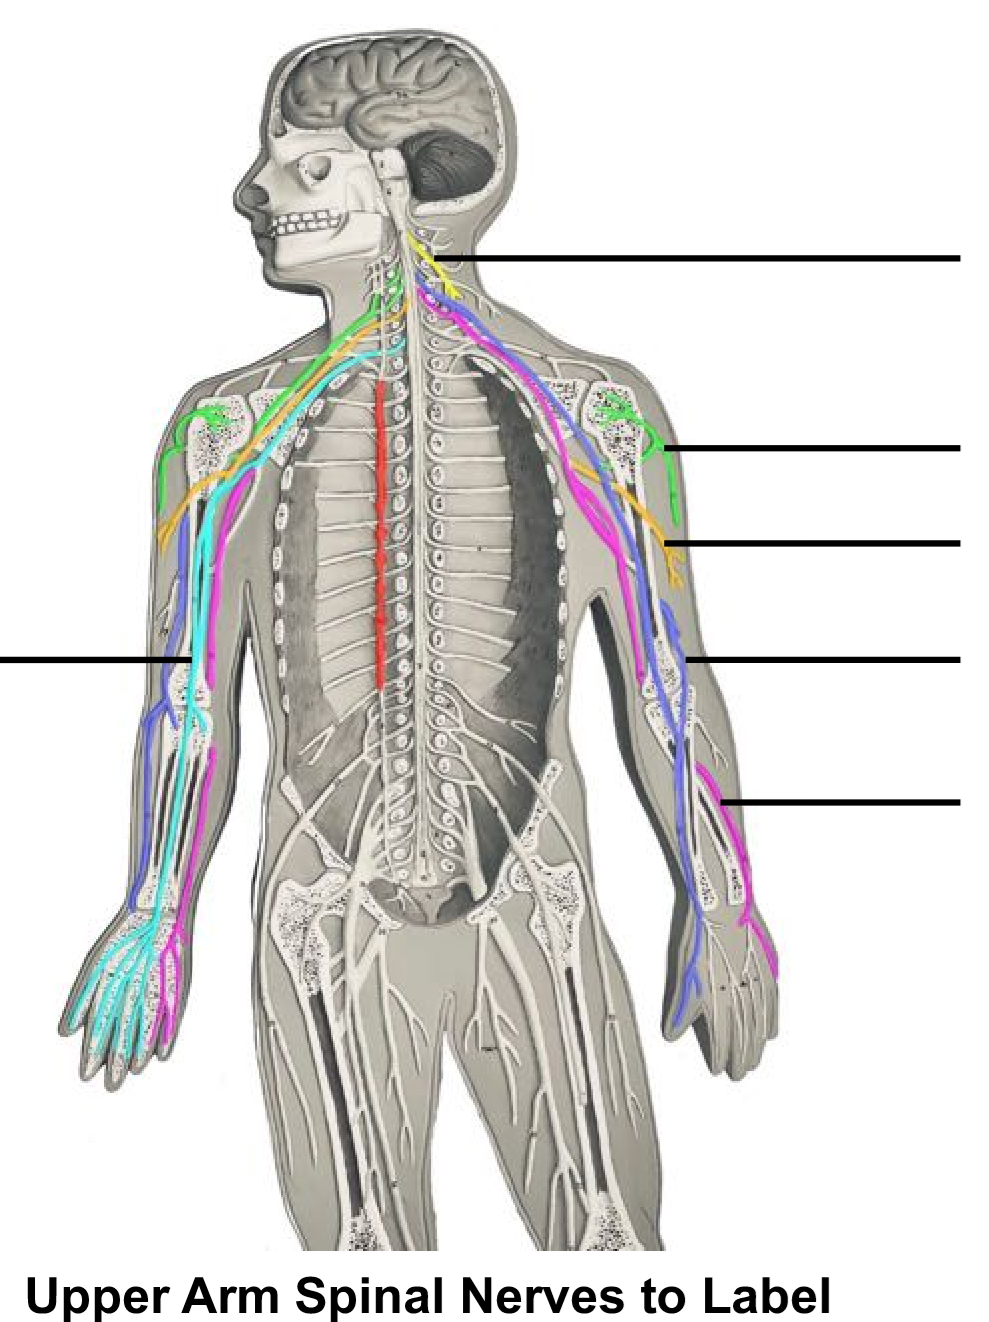
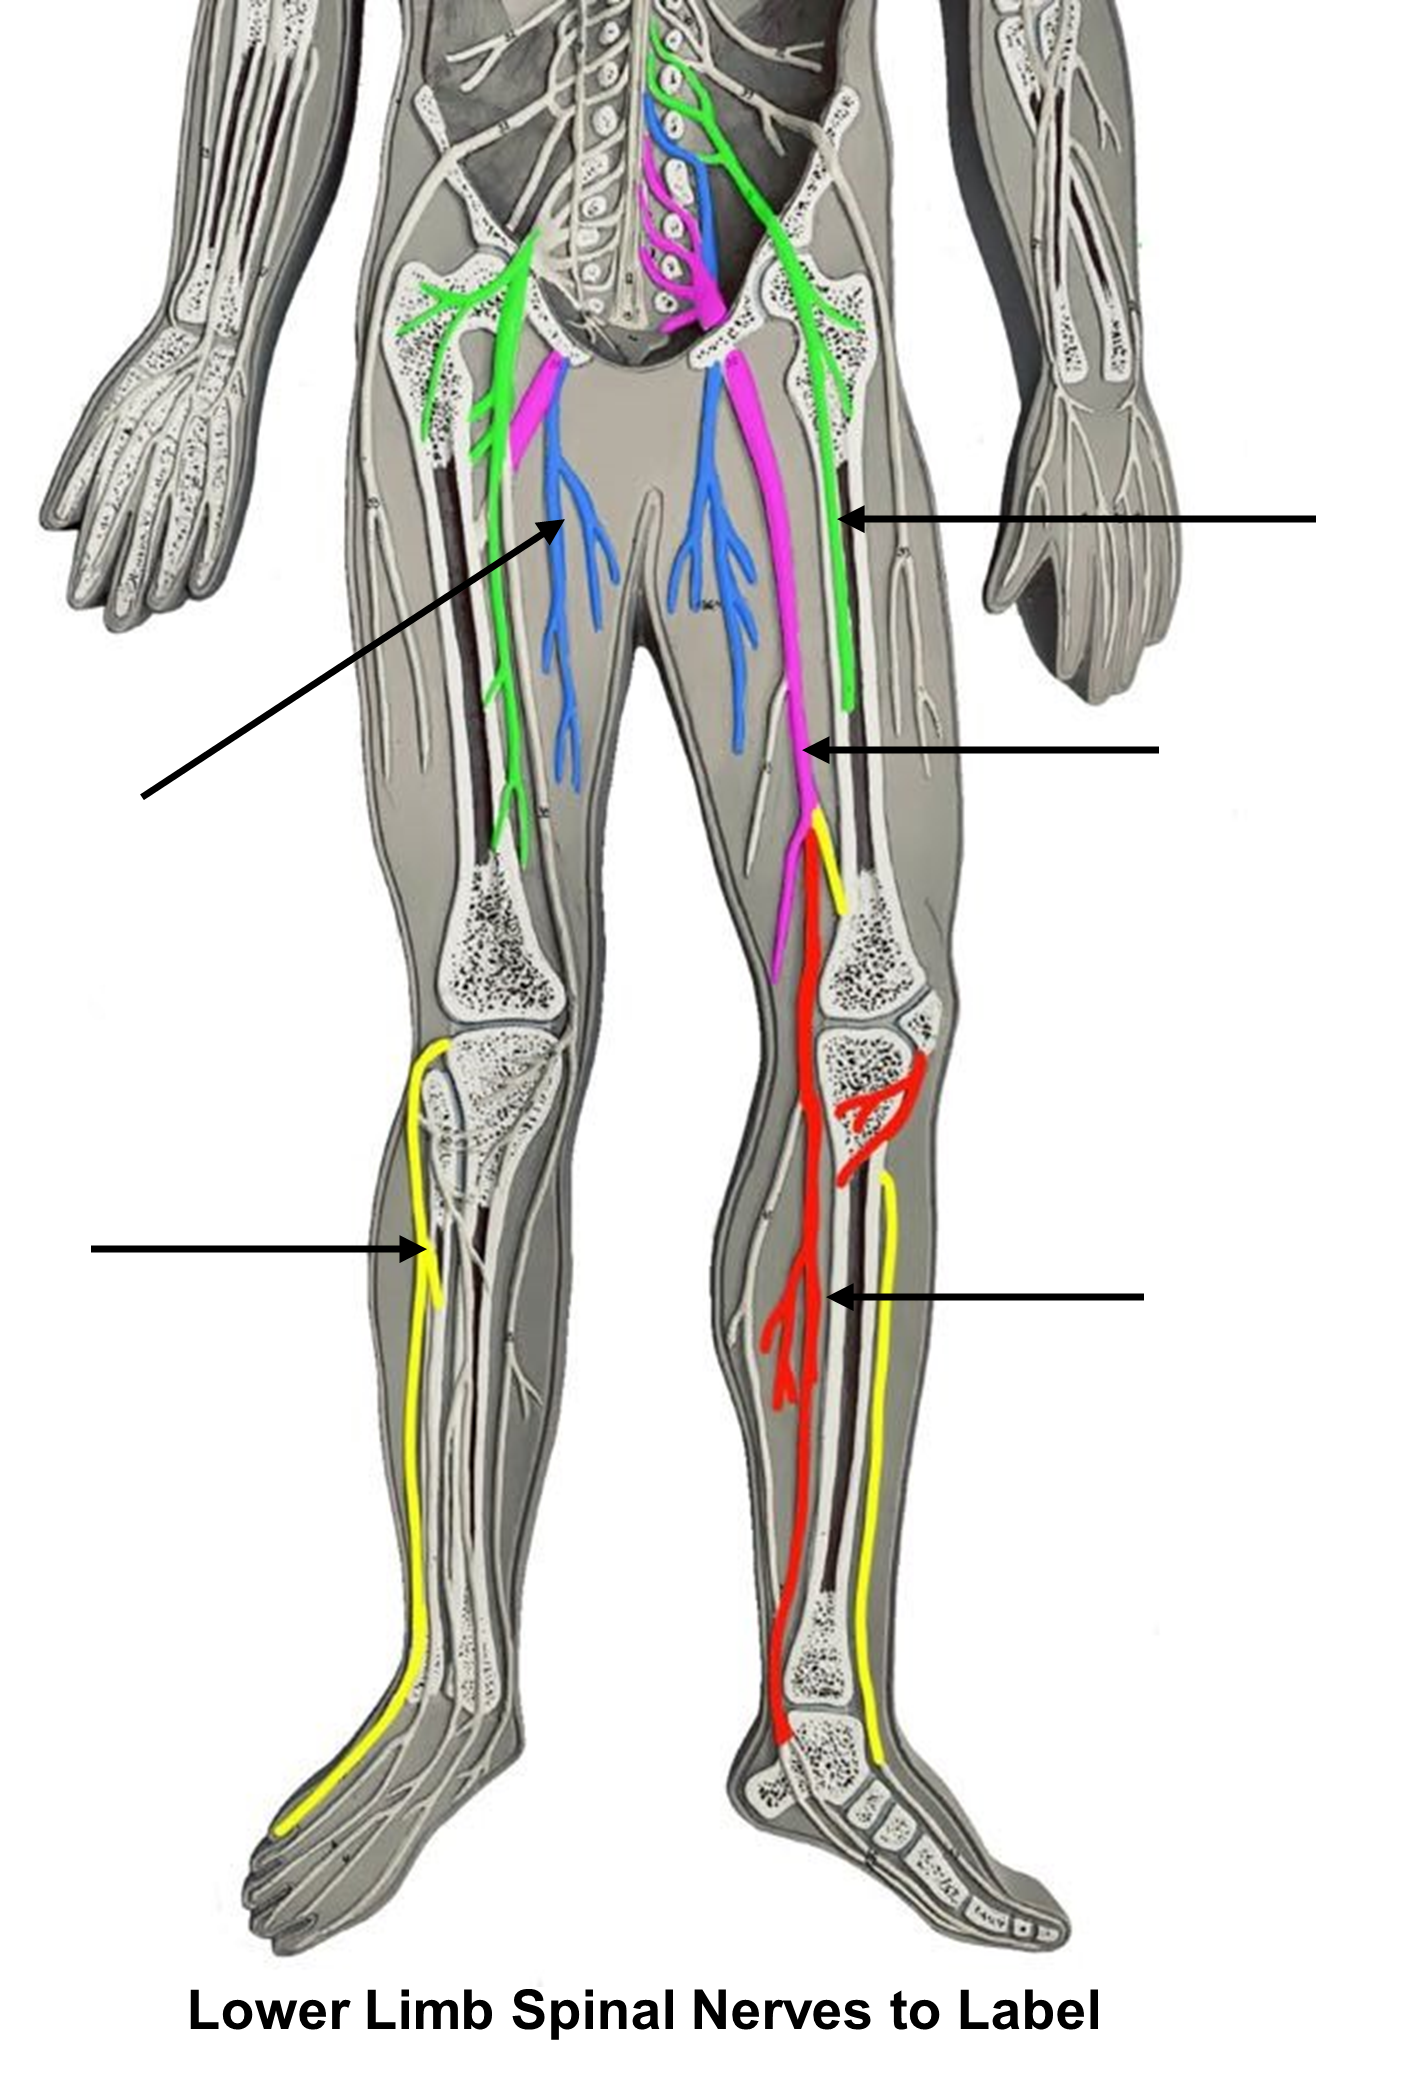
2. On the image to the right label the spinal nerves of the upper limb.
3. Color the muscles that are innervated by the following nerves from the lumbar and sacral plexuses (use the muscles chart): obturator (blue), femoral (green), tibial (yellow), fibular (red), sciatic (brown) (Note: the sciatic nerve branches into the fibular and tibial nerves).
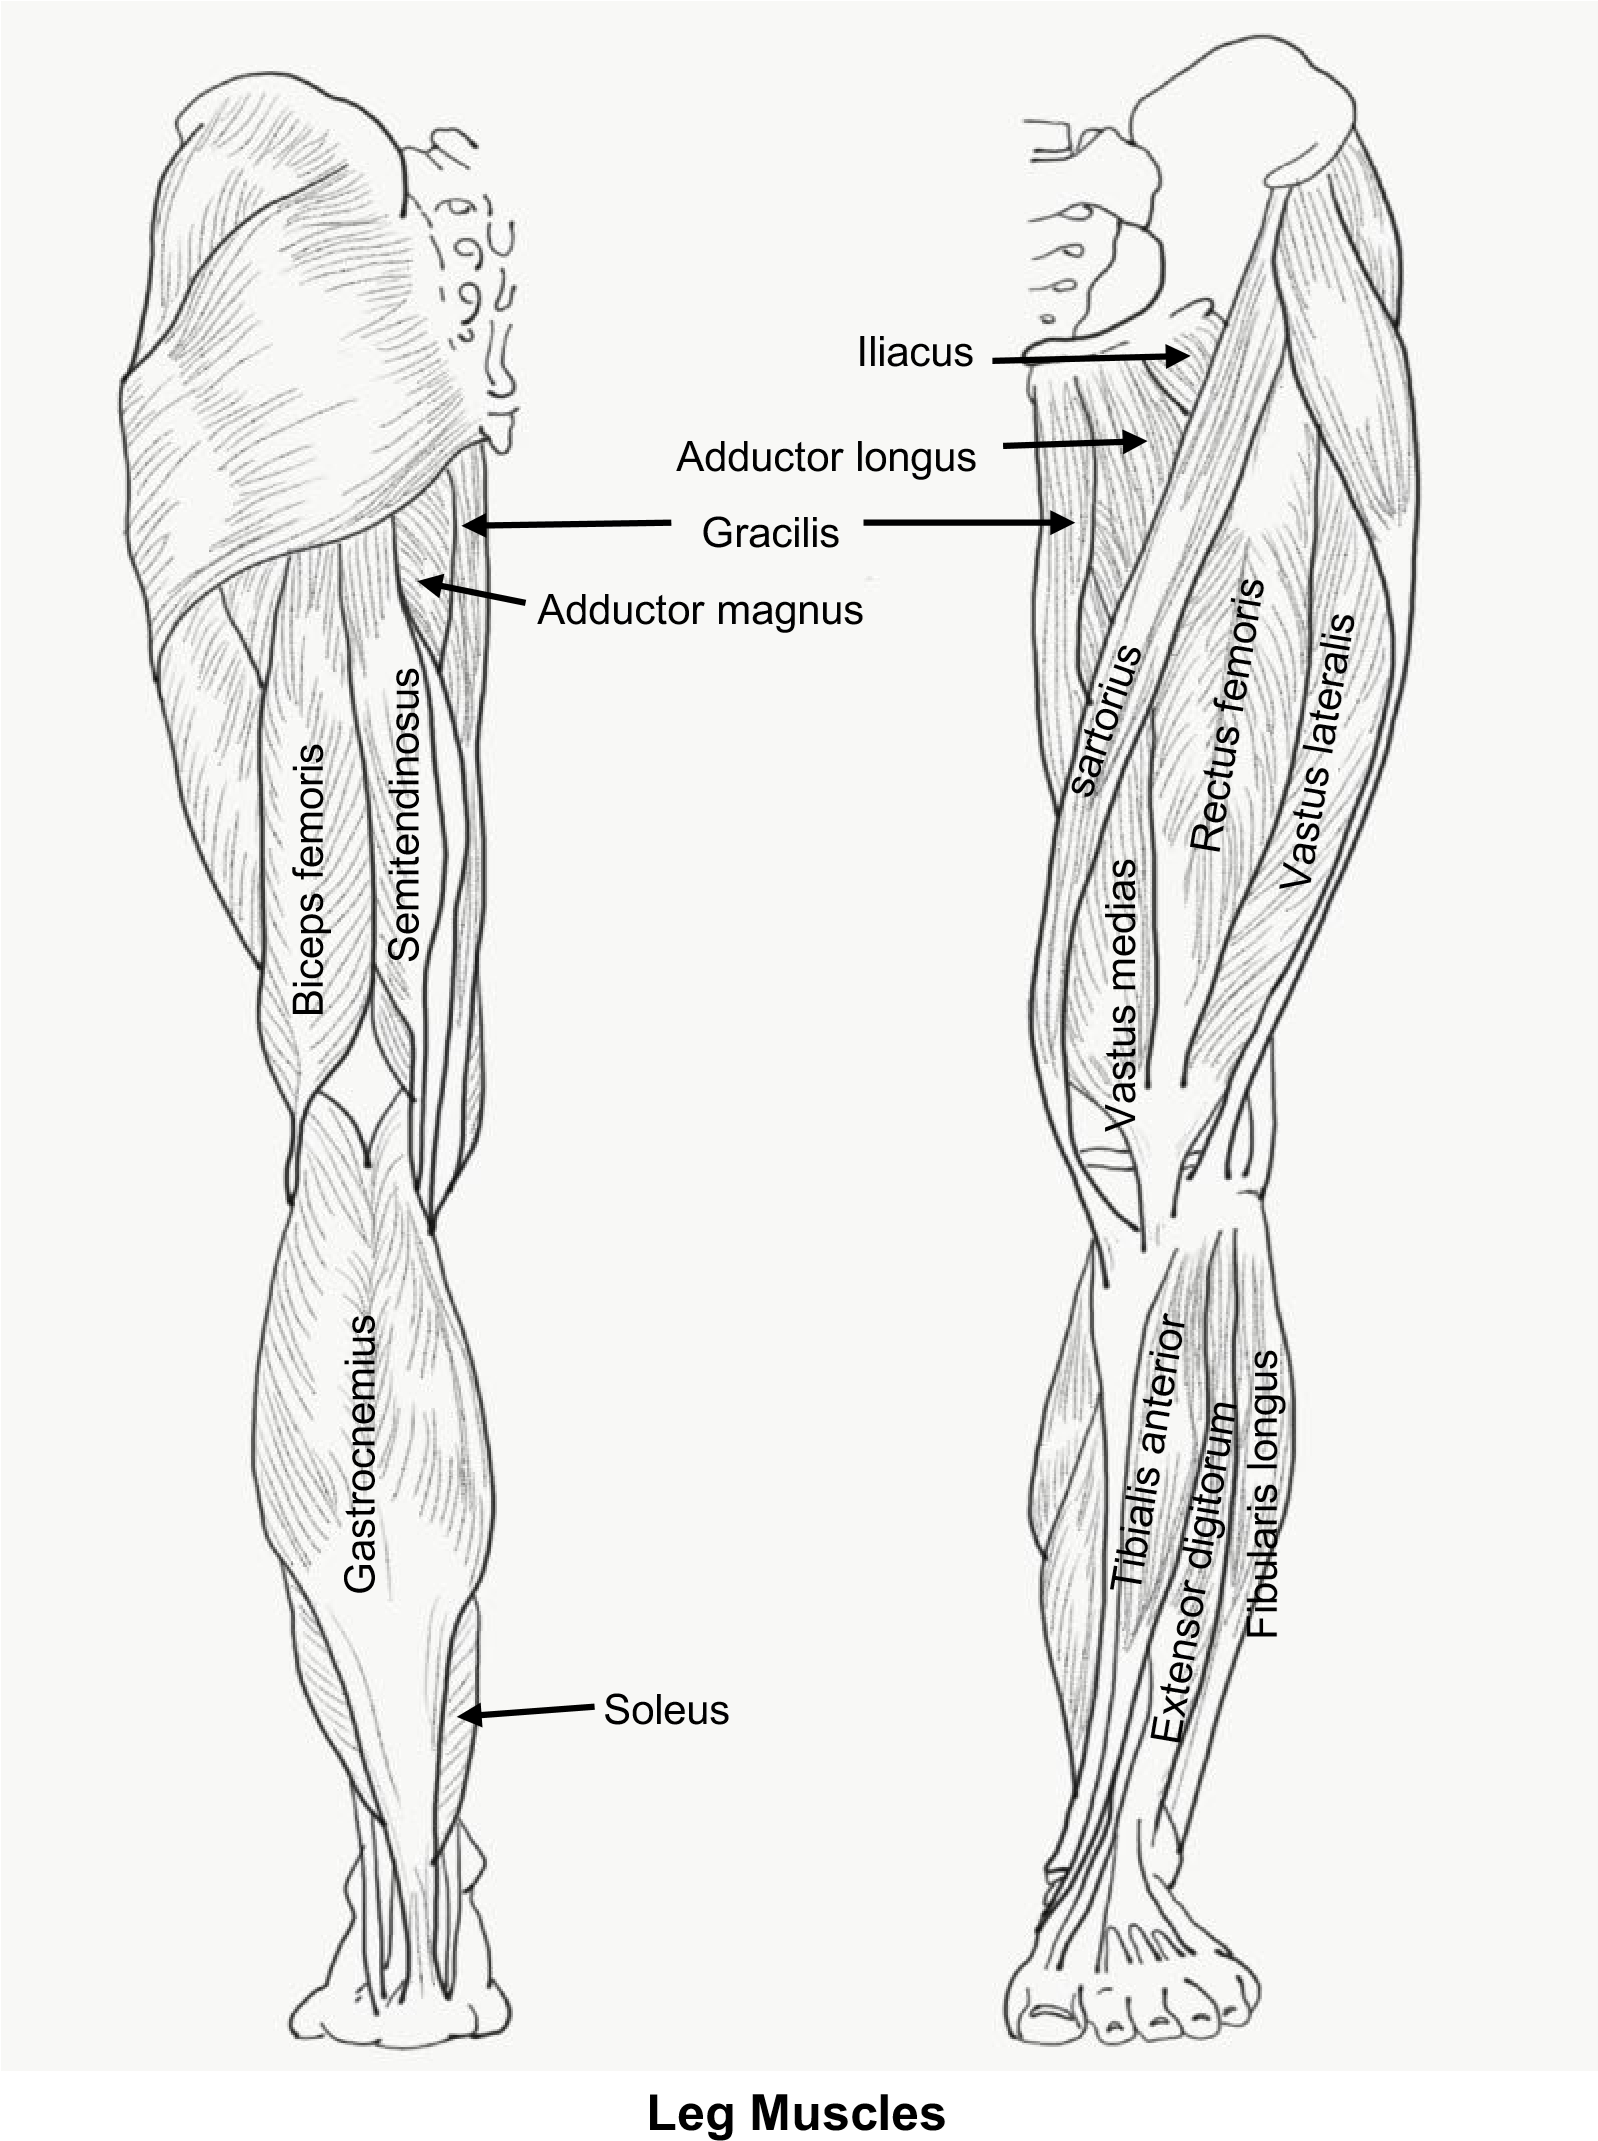
4. On the image to the right label the spinal nerves of the lower limb.
5. The only nerve that was not covered in the coloring activity above was the phrenic nerve. It innervates the ________________.
6. Once you have labelled the upper and lower spinal nerves, ask your instructor to check and initial here:
Instructor’s Initials for labeled spinal nerves: ____________
7. The results of Adele’s electromyography are shown below in Table 2. Complete the table by determining which nerves sustained damage from the herniated disc.
Table 2: Results from the patient’s electromyography.
| Muscle | Notes from physical exam | Electromyography results | Nerve involved |
| Biceps brachii | Normal forearm flexion | Normal | |
| Triceps brachii | Normal forearm extension | Normal | |
| Tibialis anterior | Slapping of foot (weak dorsiflexion) | Abnormal | |
| Gastrocnemius | Normal plantar flexion | Normal | |
| Quads | Weak extension of leg at the knee | Abnormal | |
| Hamstrings | Weak flexion of leg at the knee | Abnormal |
Activity 5: Somatic and Autonomic Reflex Arcs
Materials:
- colored pencils, markers or pens
- pen light
- reflex hammer
Background:
Health professionals perform reflex tests to help localize nerve damage. A reflex is a predictable, fast response to a sensory signal. When you touch something hot or painful with your hand, you will immediately withdraw your hand before you experience any pain. The sensory signal to withdraw your hand is a somatic reflex which is processed in the spinal cord, whereas the sensory pain signal is processed consciously and takes longer to travel to its integration center in the cerebral cortex. If, however, a patient does not respond in the way a reflex would predict, then the information can confirm damage to sensory and motor nerves.
There are two different categories of reflexes:
-
- somatic which involve contraction of skeletal muscle
- autonomic reflexes which involve contractions of smooth muscle, cardiac muscle and glands.
A reflex follows a specific pathway or “arc”. View the example of the withdrawal reflex (Figure 5) and notice the labelled components. A reflex arc has five components summarized below:
-
- Receptor: detects the sensory stimulus ex) pain receptors in the hand
- Sensory neuron: neuron that carries the sensory signal towards the CNS ex) median nerve
- Integration neuron: processing of the sensory signal in the CNS ex) interneurons in the spinal cord
- Motor neuron: neuron that carries the motor signal away from the CNS ex) musculocutaneous nerve
- Effector: the structure that produces a response, a muscle or gland ex) biceps brachii
The withdrawal reflex (Figure 5) is an ipsilateral reflex as the sensory neuron and motor neuron are processed on the same side of the spinal cord. Reflex arcs in which the motor neuron is on the opposite side of the body as the sensory neuron are contralateral reflexes (meaning that the reflex is processed on the opposite side of the body).
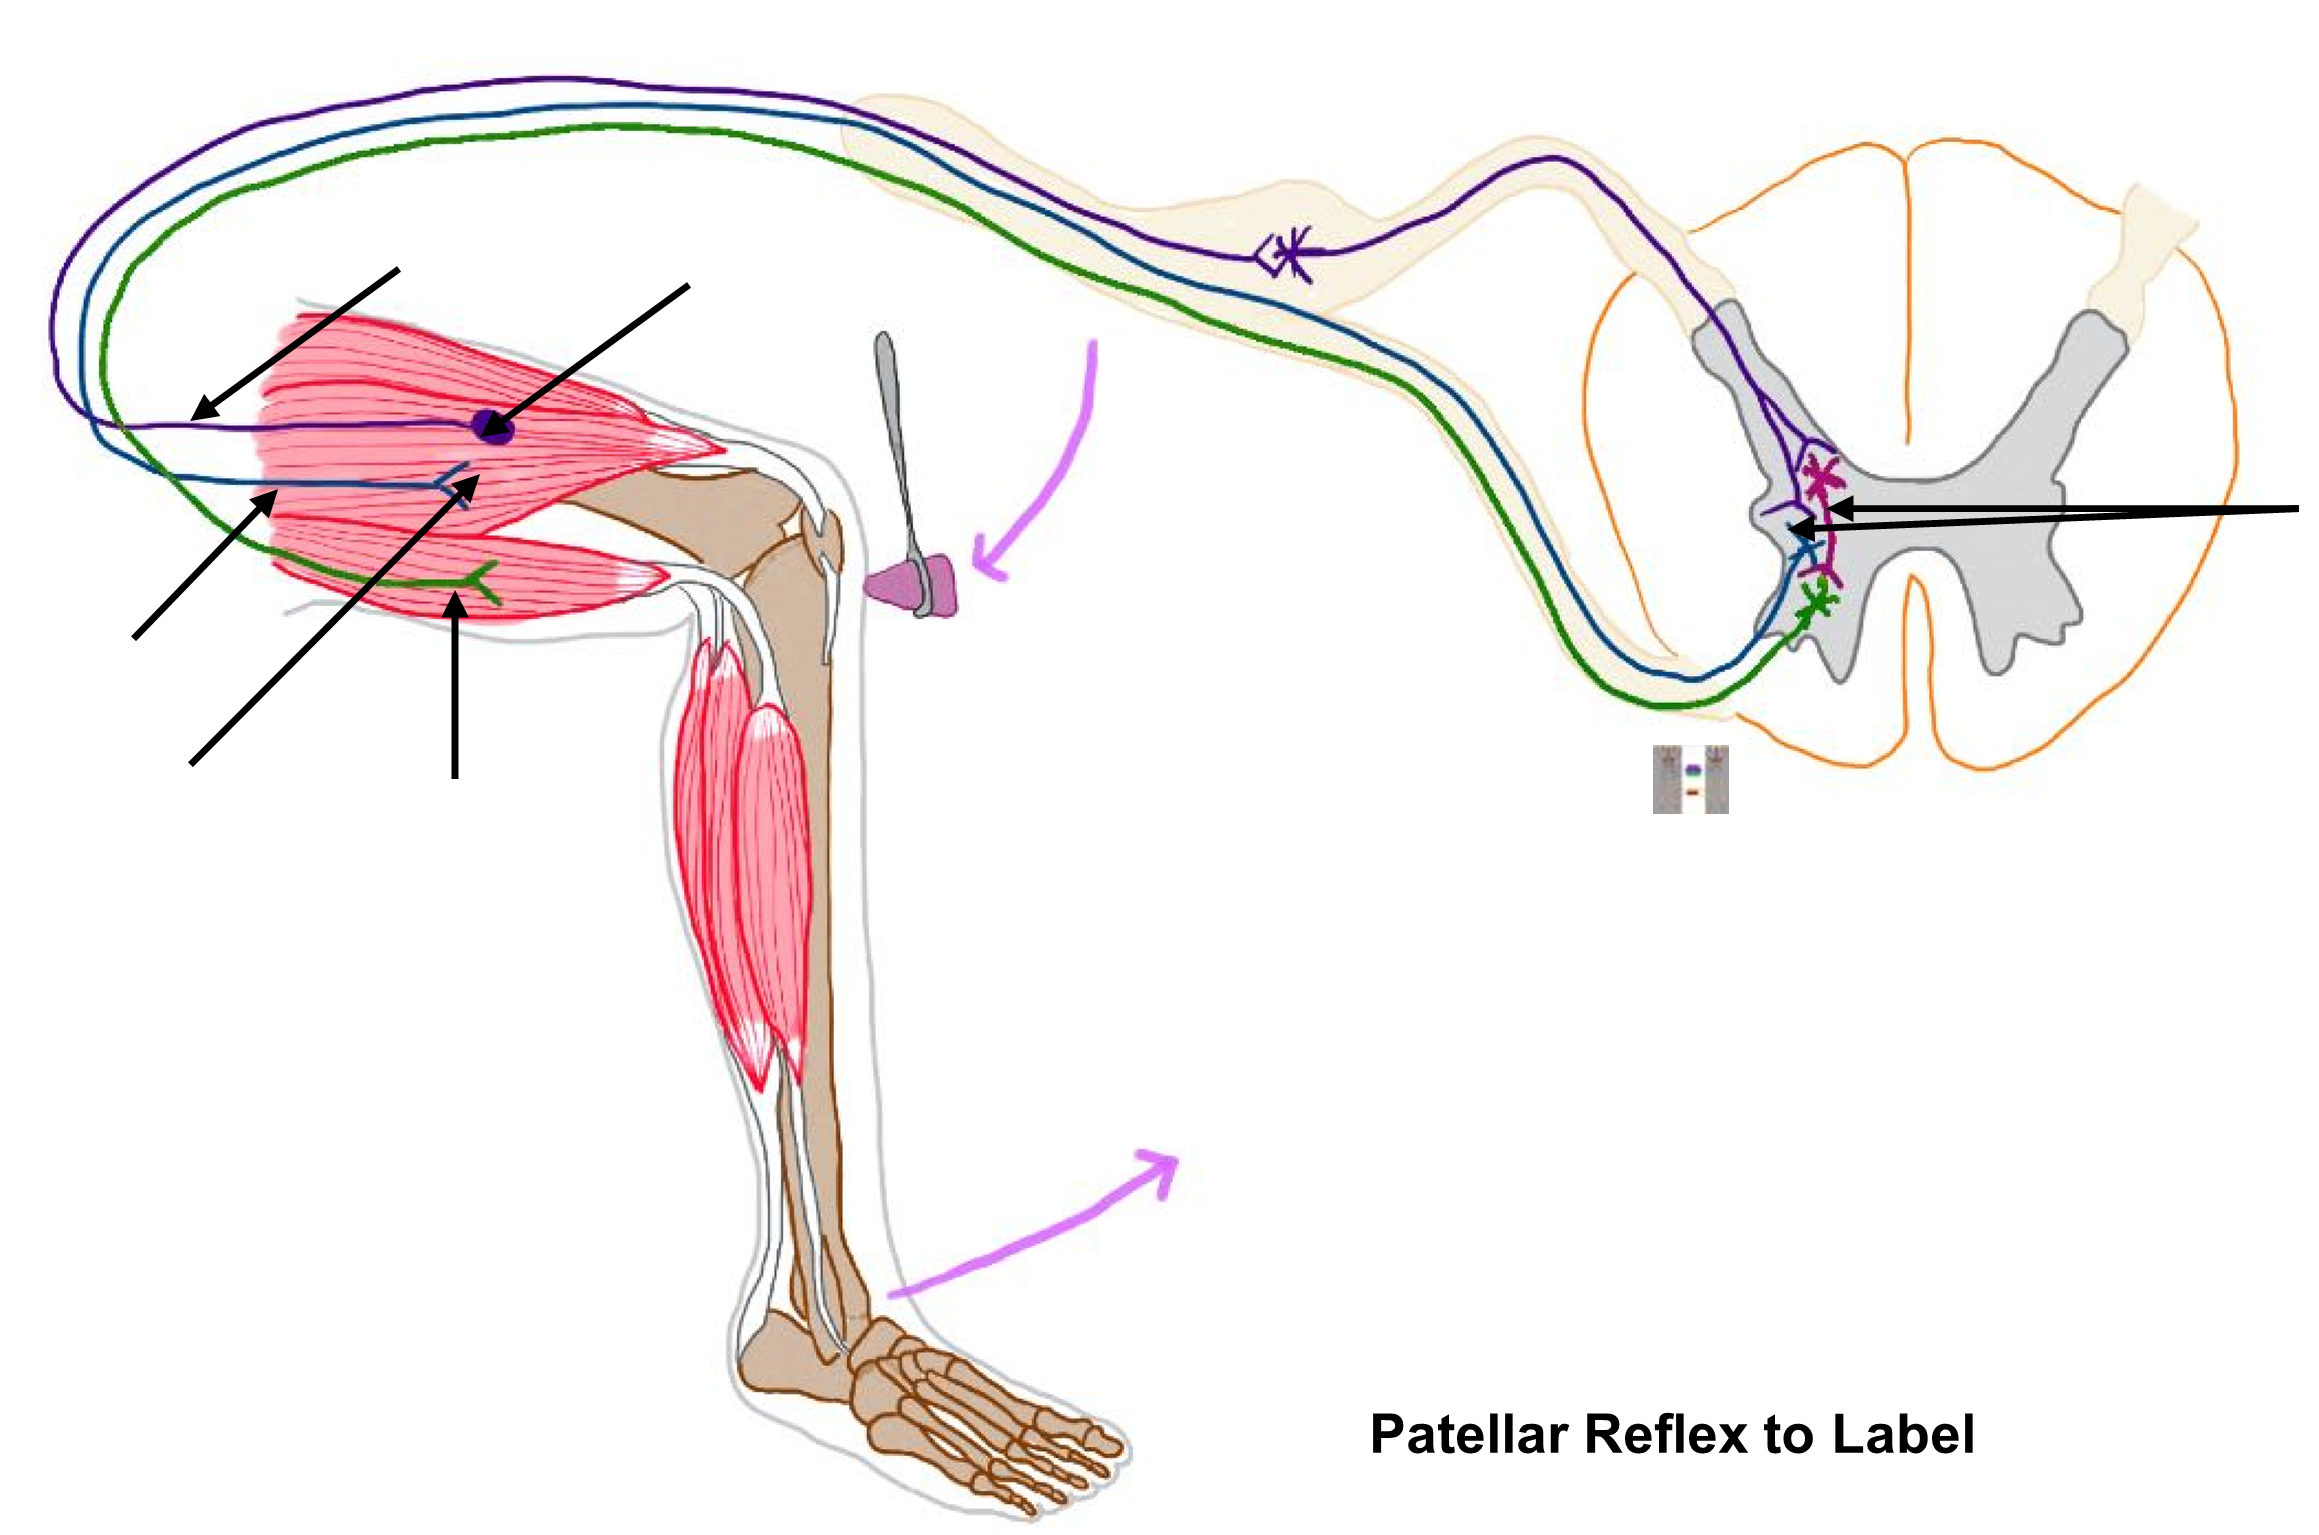
The patellar reflex, a somatic reflex, causes your quadriceps muscle to contract immediately after being stretched. Embedded in the quadriceps muscle is a muscle spindle, a special sensory receptor that detects stretch in the muscle. You can stimulate this muscle spindle by tapping on the patellar ligament. When the muscle spindle is activated by stretching, a signal is sent by way of the femoral nerve to the spinal cord. In response, an excitatory motor signal is returned to the quads also via the femoral nerve. There is a second inhibitory signal that is carried on the sciatic nerve to the hamstring muscles. This prevents the antagonistic muscles from contracting. As a result of these contradicting actions, you remain standing upright.
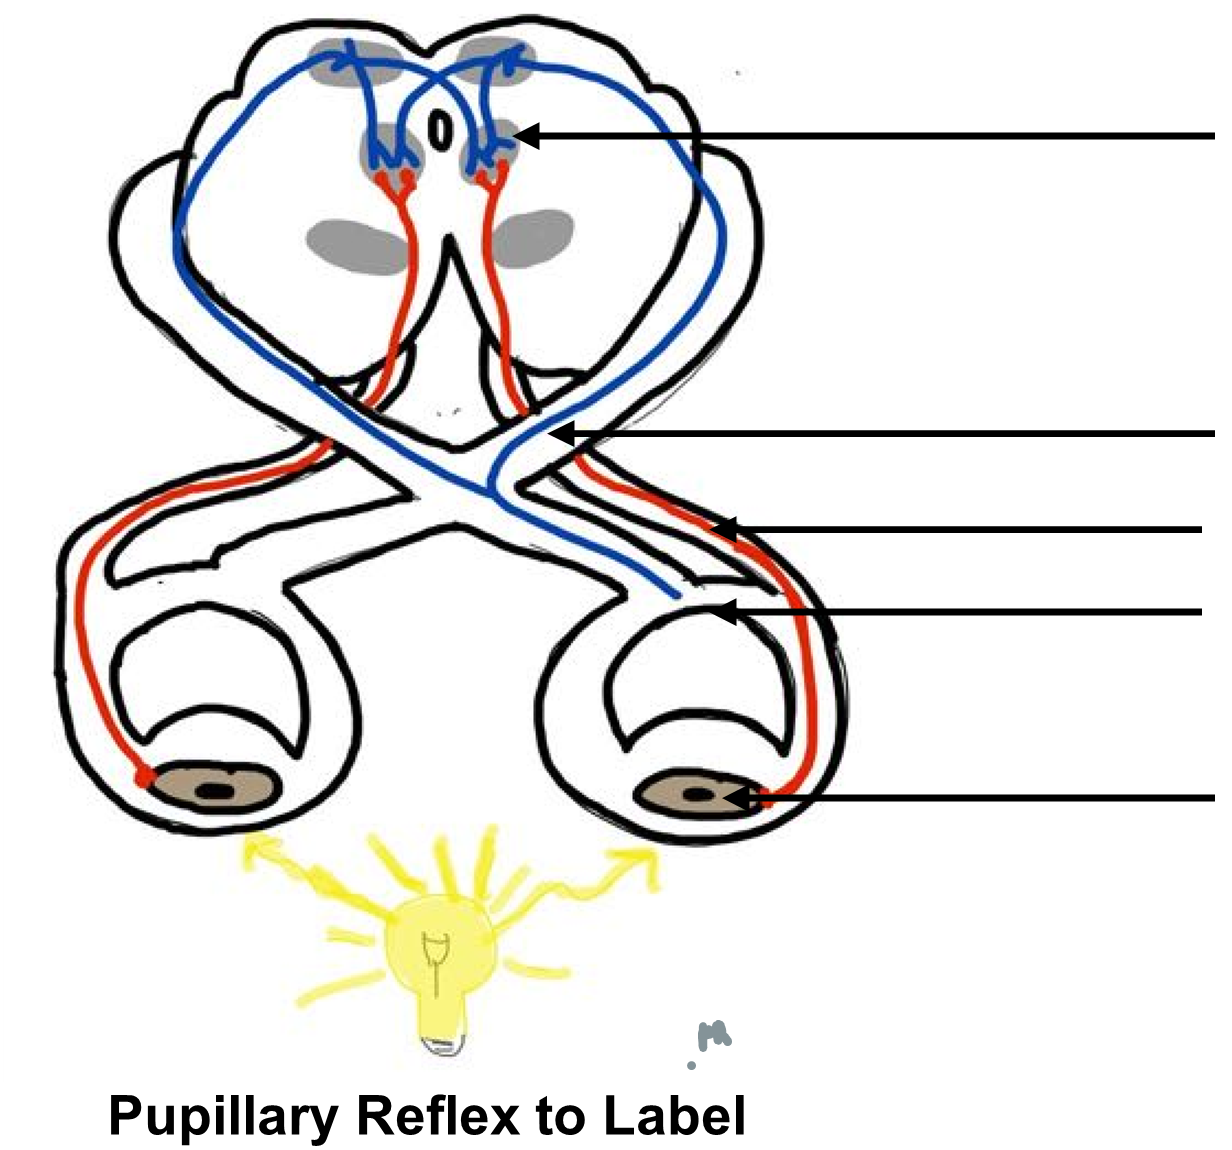
The pupillary reflex, an autonomic reflex, occurs when light is shined on the eye. The sensory photoreceptors in the retina send a signal by way of the optic nerve to the midbrain on both sides of the brain. A motor signal is returned via the left and right branches of the oculomotor nerve to contract the ciliary muscles (smooth muscle) to constrict the pupil. You will use this information to label the laminated images (Table 3).
Table 3: Components of the reflex arc for the patellar and pupillary reflexes.
| Receptor | Sensory neuron | Integration center | Motor neuron(s) | Effector | |
| Patellar reflex |
Muscle spindle | Femoral nerve | Spinal cord | Femoral nerve (and Sciatic) | Quad muscles |
| Pupillary reflex |
Retina (photoreceptors) | Optic nerve | Midbrain | Oculomotor | Ciliary muscles |
Procedure:
1. On the patellar reflex image below, label the components of the reflex arc listed in Table 3 above.
2. On the pupillary reflex image to the right, label the components of the reflex arc listed in Table 3 above.
3. Show your instructor your completed sheets and have them initial below:
Instructor’s initials for labeled reflex arcs: _________
4. Test the patellar reflex, a somatic reflex.
- Have your lab partner sit on a high stool and rest their legs with their knees bent. The feet should not touch the floor.
- Using the blunt reflex hammer, lightly but firmly tap the patellar ligament. The ligament is located about one (1) inch below the bottom of the patella.
- Record the results in the table below.
| Tap Left knee (Movement? No movement?) | Tap Right knee (Movement? No movement?) |
5. Test the pupillary reflex, autonomic reflex.
- Have your lab partner sit calmly and ask them to look straight ahead.
- Shine a pen light (please only use the pen light) into first one eye and then the other and notice any changes in the pupil.
- Record your observations in the table below.
| Right pupil (dilated or constricted) | Left pupil (dilated or constricted) | |
| Shine Light in Left eye | ||
| Shine Light in Right eye |
6. The patellar and pupillary reflexes were tested in your patient from the case study. Given the results in the table below, which type of reflex (somatic or autonomic) was damaged in your patient?
| Patellar Reflex | Pupillary Reflex |
| Abnormal – unresponsive on both sides | Normal |
Activity 6: Spinal Nerve Pathways
Materials:
- colored pencils, pens or markers
Background:
There are two types of spinal pathways: ascending and descending. Ascending pathways bring sensory information from the sensory receptors towards the central nervous system. These signals are integrated (processed) in either the spinal cord or brain. These pathways use three (3) different neurons called the first order, second order and third order neurons. A brief description of each neuron is listed below. along with two examples of ascending pathways: the dorsal column and the spinothalamic tracts (Figure 8). The example below illustrates how sensory information is processed consciously in the cerebral cortex:
-
- 1st order neuron: begins at the sensory receptor, enters into the spinal cord and synapses in the dorsal horn
- 2nd order neuron: begins in the dorsal horn, crosses over in the grey commissure (or in the medulla to the other side of the spinal cord and travels up through the spinal cord in one of the funiculi (columns of white matter), and synapses in the thalamus
- 3rd order neuron: begins in the thalamus and synapses in the cerebral cortex
There are two examples of ascending pathways: the dorsal column and the spinothalamic tracts. The dorsal column pathway is depicted in Figure 8. The exact location where each neuron synapses (connects/communicates to another neuron) will vary slightly depending on the type of sensory information being sent and its final destination in the CNS.
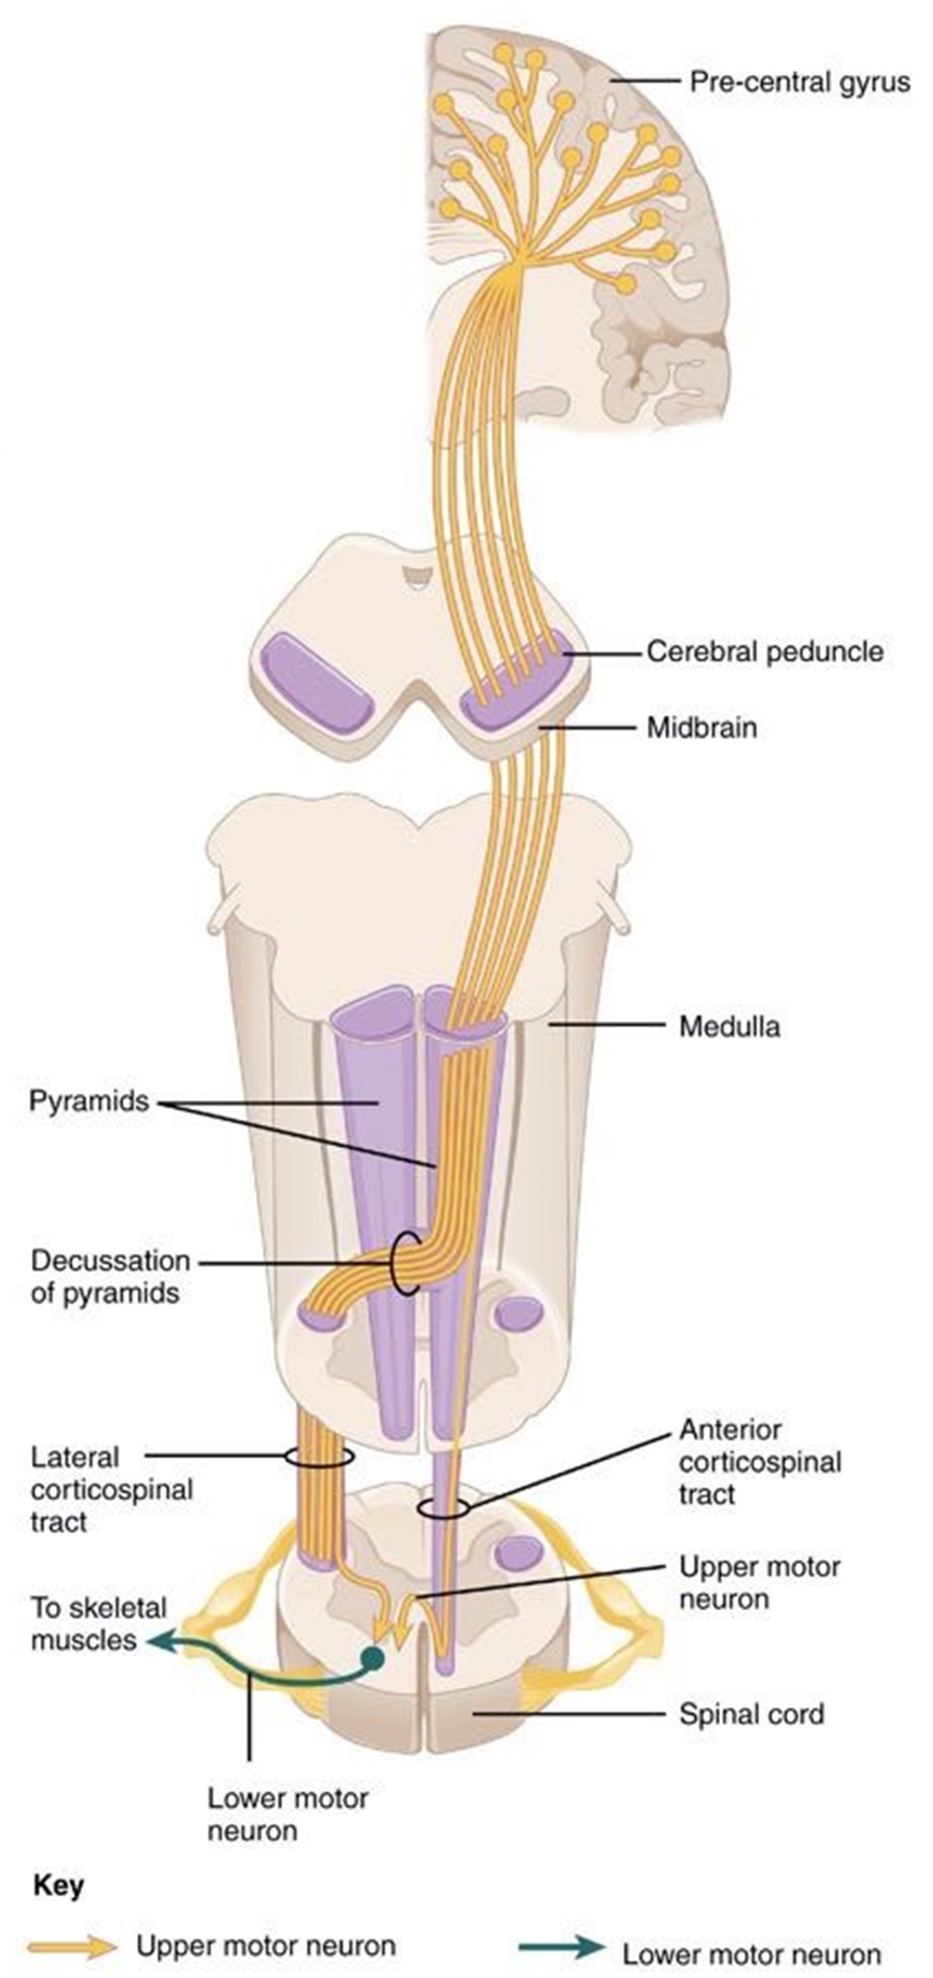
Descending pathways involve two neurons that extend from the central nervous system: upper and lower motor neurons. These two neurons convey motor signals from the CNS to the muscles and glands of the body. A motor signal involved in consciously moving skeletal muscle begins in the primary motor cortex of the cerebrum and travels down the spinal cord in a funiculus (white matter column of the spinal cord). Motor signals typically decussate (cross over) in the pyramid of the medulla, crossing to the opposite side of the spinal cord. The upper motor neuron synapses in the ventral horn with the lower neuron. The lower neuron will leave the ventral horn and extend to the skeletal muscle. Below is an example of a descending pathway (Figure 9).
In the activity below, you will connect the information you learned in this lab about the structures of the PNS along with the information you learned about the structures of the CNS to follow an ascending and a descending pathway, naming all the structures involved.
Figure 8: The dorsal column ascending (sensory) spinal pathway.
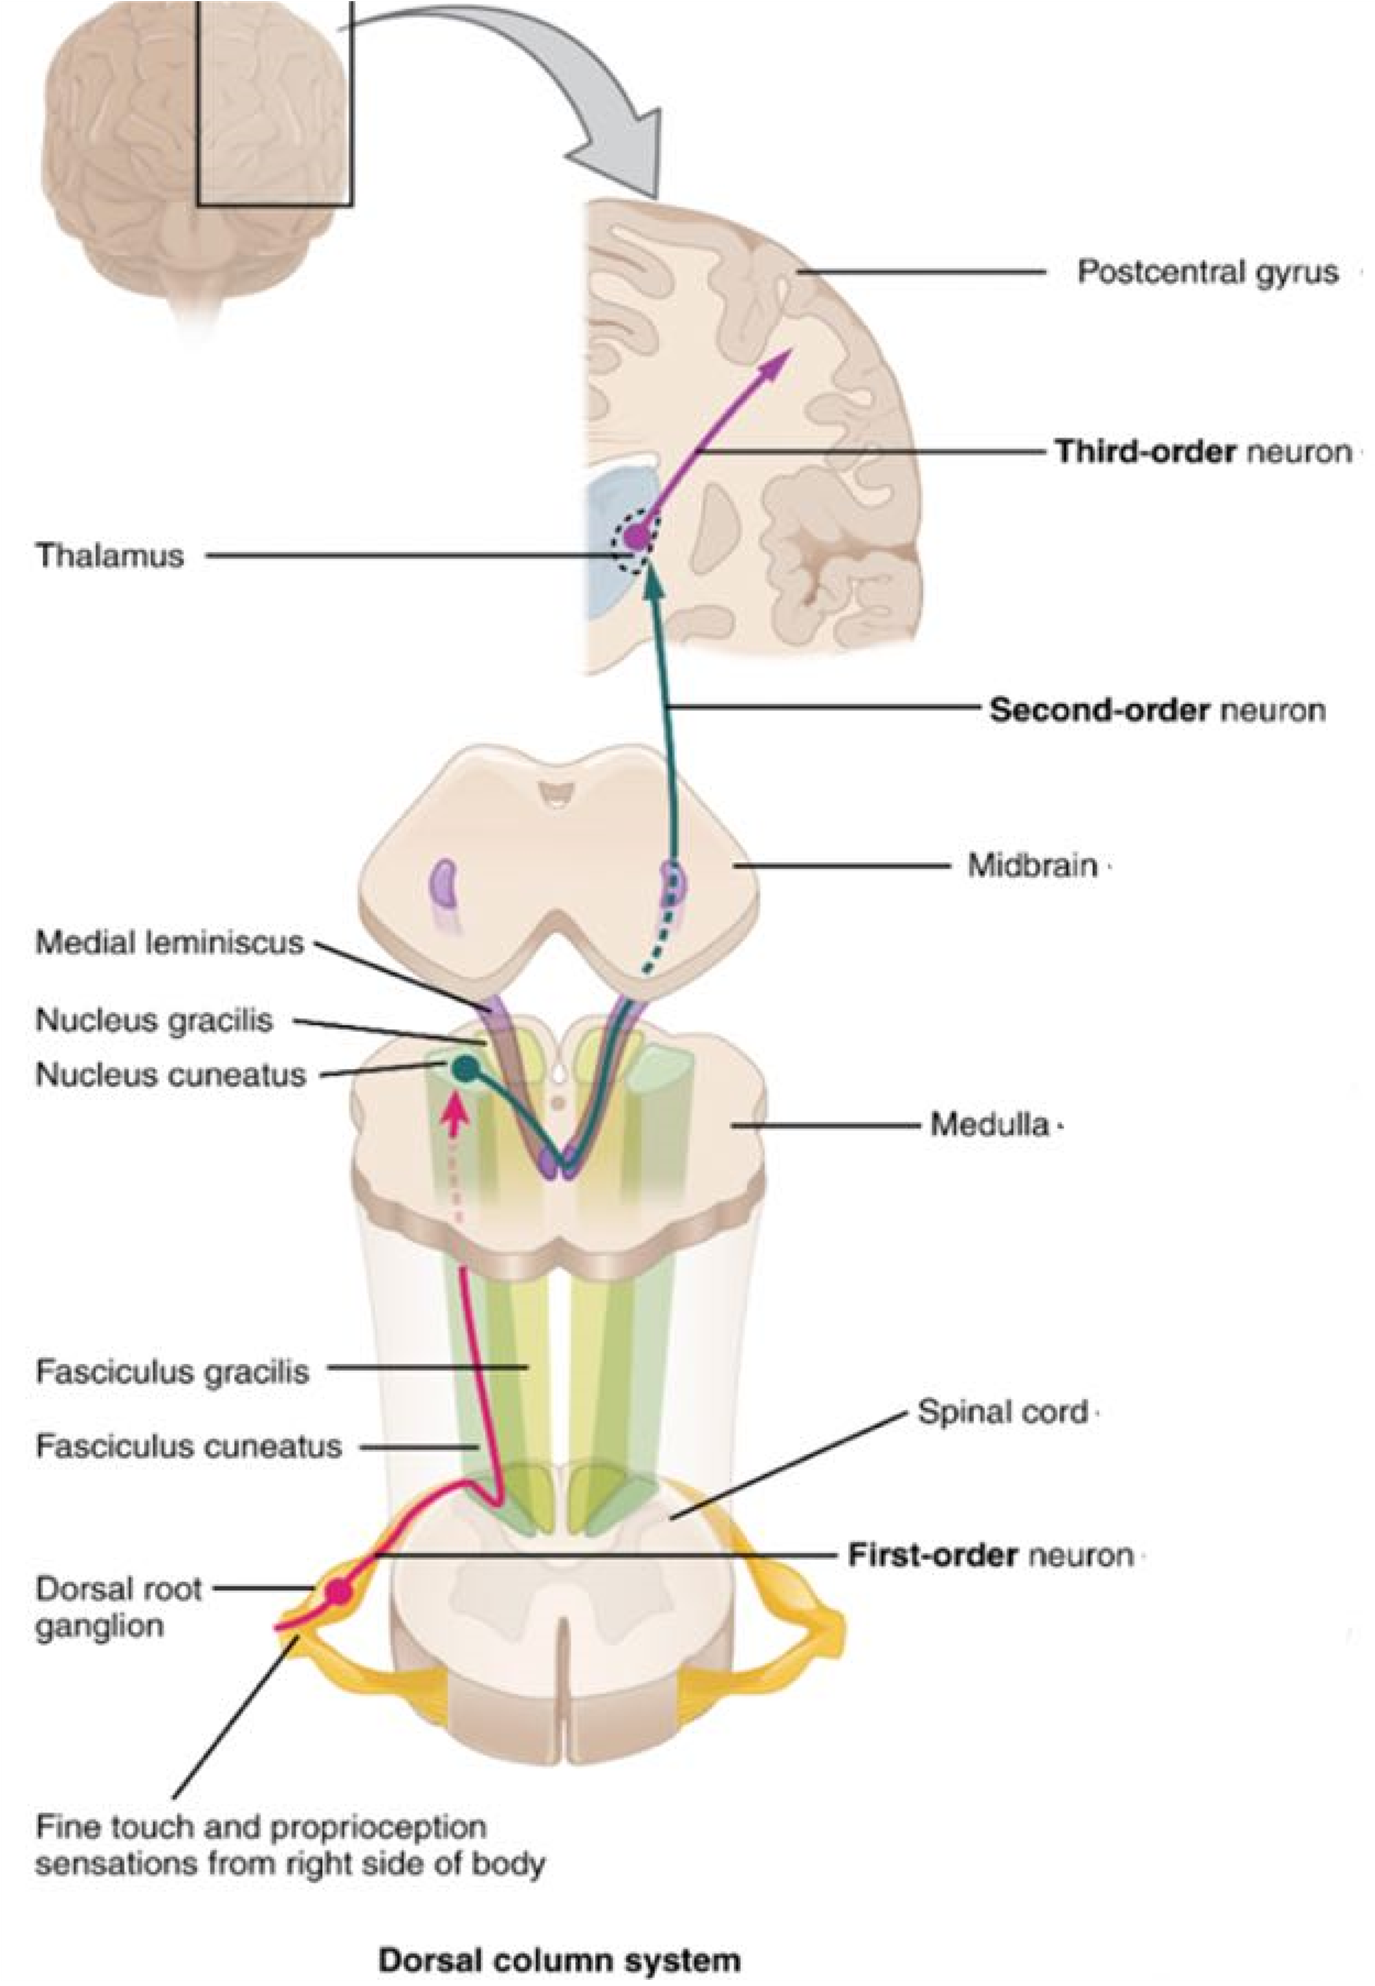
Figure 9: Pyramidal pathway descending (motor) pathway.
Procedure:
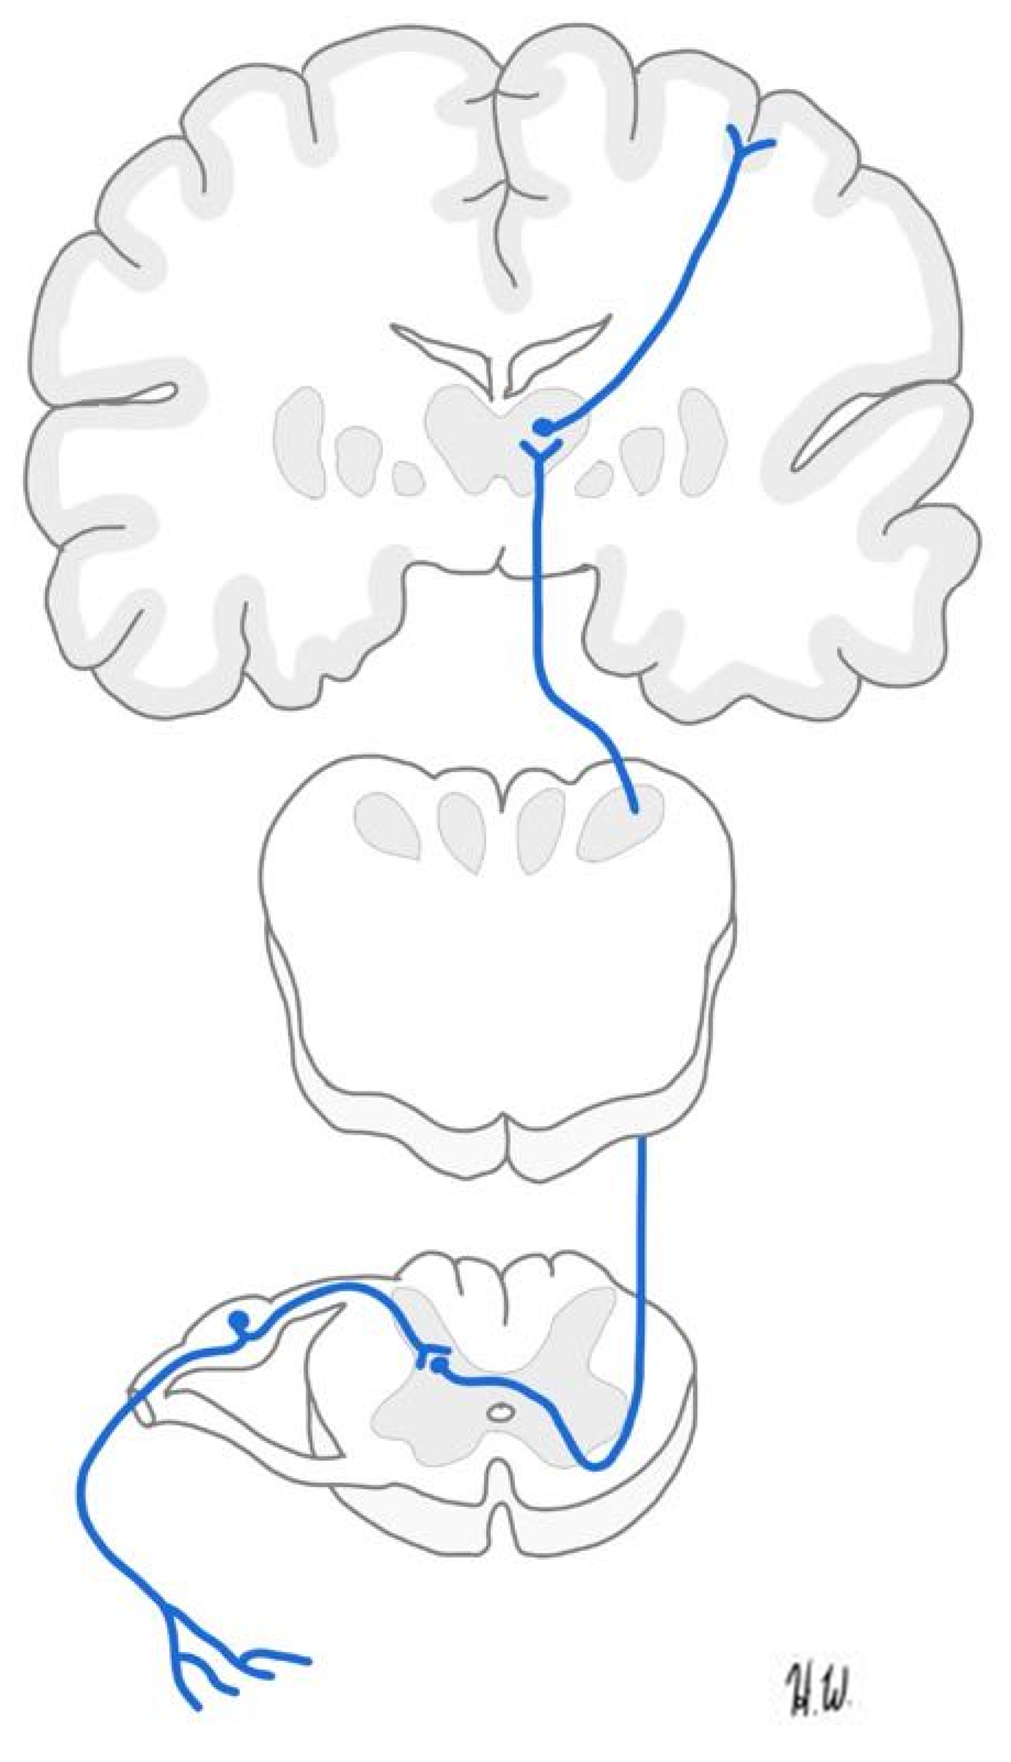
1. Label the structures marked on the ascending pathways below (primary somatosensory cortex, sensory receptors, spinal nerve, posterior root, posterior horn, thalamus, anterior funiculus, and 1st, 2nd and 3rd order neuron).
Ascending Pathway
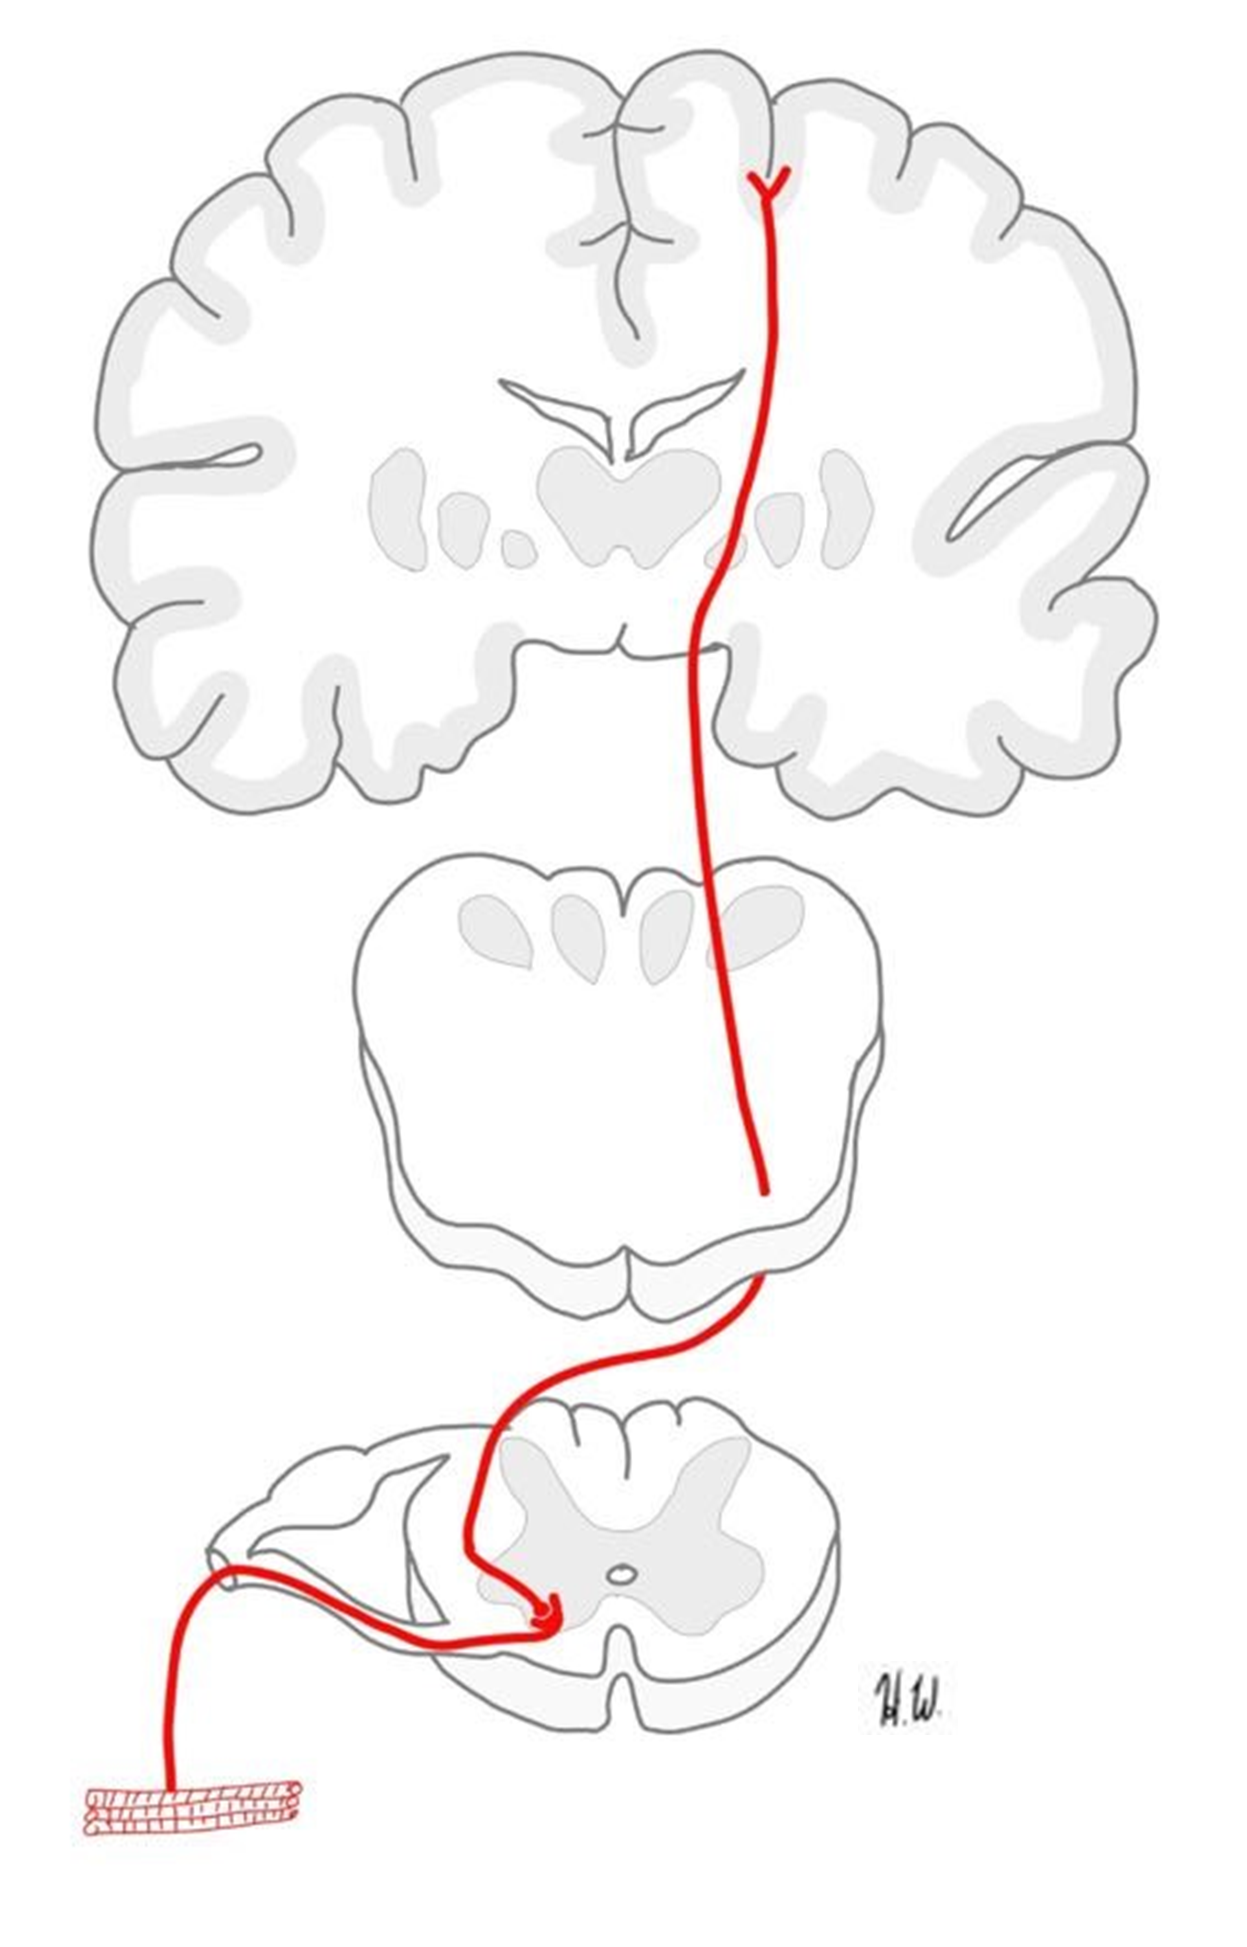
2. Label the structures marked on the descending pathway below (effector/muscle, medullary pyramids, anterior root, spinal nerve, anterior horn, primary motor cortex, upper neuron and lower neuron).
Descending Pathway
Instructor’s initials for labeled pathways: _______
Putting It All Together
Your patient’s herniated disc has led to the compression of the sciatic and femoral nerves. The neurologist prescribes Adele an anti-inflammatory, to help reduce inflammation around the sciatic and femoral nerves, and physical therapy to help strengthen the muscles of the back.
Creative Commons Citations:
- Spinal Cord and Spinal Nerve Lab. Case-Study Based OER Lab Manual for A&P I © 2022 by G. Backus, H. Wangerin, P. Rodgers is licensed under CC BY-NC-SA 4.0.
- Figures 1, 2, 3, Histological Cross-section of Spinal Cord, Spinal Cord Drawing, Spinal Column to Label, Posterior Arm Muscles, Leg Muscles, Spinal Nerves to Label, Patellar Reflex to Label, Ascending Pathway, and Descending Pathway © 2022 by H. Wangerin is licensed under CC BY-NC-SA 4.0.
- Figures 4, 8, 9 © 2023 OpenStax Anatomy and Physiology 2e is licensed under BB BY 4.0.
- Figure 5 © 2022 by G. Backus is licensed under CC BY-NC-SA 4.0.
- Figures 6, 7, © 2022 by H. Wangerin, using the Anatomage table, is licensed under CC BY-NC-SA 4.0.
- Pupillary Reflex © 2022 by P. Rodgers is licensed under CC BY-NC-SA 4.0.
- Anterior Arm Muscles© 2022 by M. Williamson is licensed under CC BY-NC-SA 4.0.
