
9 Appendicular Skeleton Lab
"Your past is a skeleton walking one step behind you, and your future is a skeleton walking one step in front of you. Maybe you don't wear a watch, but your skeletons do, and they always know what time it is." -Sherman Alexie
Gillian Backus; Heidi W. Wangerin; and Paula Rodgers
Objectives
- Identify the bones and markings on the terminology checklist for the appendicular skeleton.
- Correctly determine whether each of the following disarticulated bone is right or left: scapula, humerus, femur, and tibia.
Terminology Checklist
Bones and bone markings of the upper limb
|
Bones and bone markings of the lower limb
|
Outline of Lab
Case Study: “Hips of Steel”
Activity 1: Bones of the Appendicular Skeleton
Activity 2: Bone markings of the Upper Limb
Activity 3: Bone markings of the Lower Limb
Putting It All Together
Case Study: “Hips of Steel”
Summer is peak activity in the physical therapy office where you volunteer as an assistant to the physical therapist. The next patient is a 70-year-old female who has just had a second hip replacement surgery. She is 30 days (about 4 and a half weeks) post-op and is coming in for an evaluation of her hip and for an exercise and strengthening plan for rehabilitation. Before she comes in you compare her before and after radiographs and realize that the anatomy of her hip has changed. The physical therapist starts quizzing you on the bones of the lower limb. You accidentally identify the femur as the humerus. The physical therapist gently suggests you review the appendicular skeleton to identify the main bones of the upper and lower limb on the articulated skeleton.
Activity 1: Bones of the Appendicular Skeleton
Materials:
- articulated skeleton
- laminated terminology labels with sticky tack
Background:
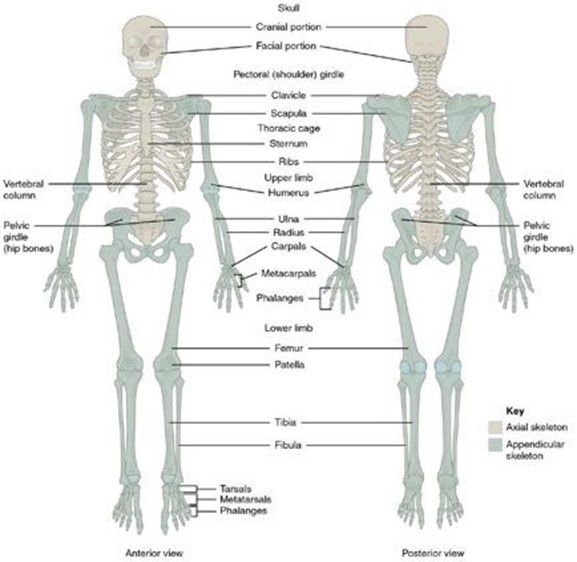
You grab the articulated skeleton; there are a lot of bones! The appendicular skeleton consists of 126 of the 206 bones (on average) in the human skeleton (Figure 1). The upper and lower limb look similar, but you start to notice some major differences. The 32 bones of the upper limb start at the pectoral girdle and end at the fingers. The pectoral girdle is made up of just 2 bones: the clavicle and scapula. The upper limb has three parts: 1) the arm (humerus), 2) the forearm (radius and ulna), and 3) the wrist and hand (carpals and metacarpals). Each hand contains 27 bones–the carpals make up 8 bones, the metacarpals have 5 bones, and the fingers (phalanges) contain 14 bones.
The lower extremities have a similar basic structure, but functionally are hugely different. Locomotion and support of the upper body comes from the lower limbs. Functionally, the pelvis supports the superior part of the body. The lower limb can be broken down into three parts: the thigh (femur), the leg (tibia and fibula), and the ankle and foot (tarsals and metatarsals). The entire weight of the body is supported by two bones in the ankle, the talus and calcaneus. The toes, like the fingers, are called phalanges.
Figure 1: Bones of the appendicular skeleton.
Procedure:
1. Label the appendicular bones on the articulated skeleton using the labels provided.
Instructor’s initials for labeled bones: ____________
2. Remove the labels and place them back on the terminology sheet.
Activity 2: Bone Markings of the Upper Limb
Materials:
- disarticulated skeleton
- laminated terminology labels with sticky tack
Background:
Now that you have mastered the identification of the appendicular skeleton’s bones, it is time to start working on the individual bone markings on each bone. Notice that the bone markings are unique to each bone. This fact helps you to identify the individual bones. The physical therapist comes by to check on your progress. He gives you a list of bone markings to identify on each bone. These bone markings are important landmarks for how bones articulate and how muscles insert or originate on the bones to generate movement.
Figure 2: Bone markings of the clavicle.
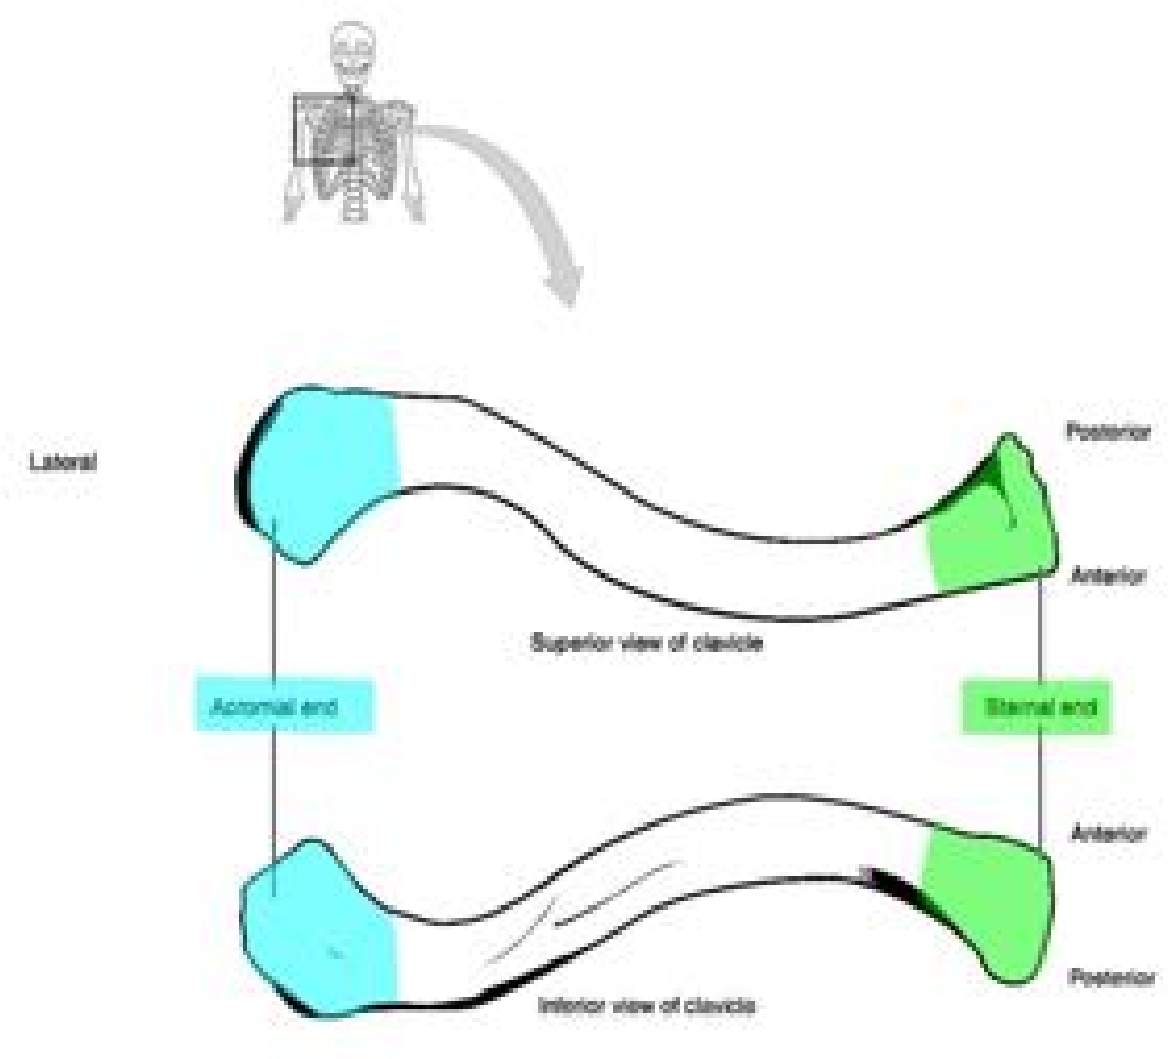
Clavicle: (Figure 2)
The clavicle is commonly called the collarbone. This bone is slightly “s” shaped and is the only bony attachment between the trunk and the upper limb. The acromial (lateral) end of the clavicle is flat and articulates with the acromial process of the scapula. The sternal (medial) end is more rectangular in shape and articulates with the manubrium of the sternum. Due to its location, the clavicle is the most fractured bone in the body.
Figure 3: Bone markings of the scapula.
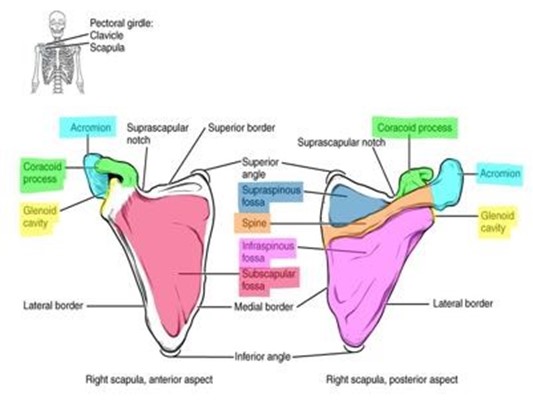
Scapula: (Figure 3)
The scapula or shoulder blade is a flat, triangular bone with a prominent spine on the posterior aspect. The scapula has three major processes (acromion, coracoid process, and spine). The prominent (posterior) spine separates the supraspinous fossa from the infraspinous fossa. The spine extends into an articulating process called the acromion, at its medial end. The medial surface of the acromion articulates with the lateral (acromial) end of the clavicle. The coracoid process makes a “c” and is a prominent attachment for muscles of the arm. The subscapular fossa is found on the anterior part of the scapula. The glenoid cavity is a shallow, smooth depression which articulates with the head of the humerus to form the glenohumeral joint.
Figure 4: Bone markings of the humerus.
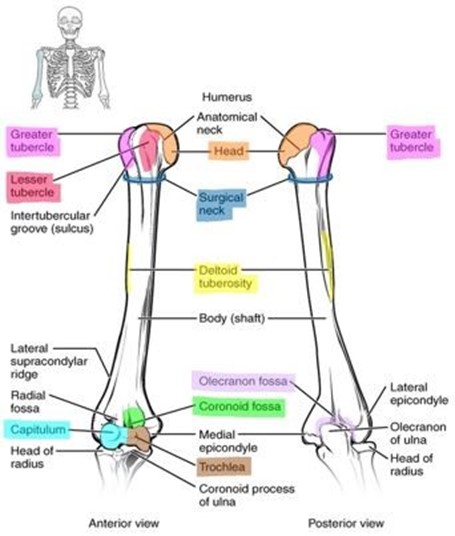
Humerus: (Figure 4)
The humerus is the only bone found in the brachial region of the arm. The proximal end of the humerus is marked by the head which articulates with the glenoid cavity of the scapula to form the glenohumeral joint. The prominent landmarks on the proximal side of the humerus are the greater and lesser tubercles. The greater tubercle is larger and more lateral while the lesser tubercle is smaller and located in the anterior position. The tubercles are major sites for muscle attachment. The surgical neck is distal to the tubercles and is the junction between the proximal epiphysis and the diaphysis. The surgical neck is so named because it is a common site for humeral fractures. The deltoid tuberosity is a roughened area on the lateral mid-diaphysis (shaft) of the humerus and is an attachment site for the deltoid muscle. The deltoid tuberosity can sometimes be hard to see on the model but can be felt as a roughened area. As you move distally on the humerus the next two large bony protuberances are the epicondyles. The medial epicondyle is the larger of the two and immediately distal to it is the trochlea (medial condyle) which articulates with the ulna. The lesser bony protuberance is the lateral epicondyle and immediately distal to it is the capitulum (lateral condyle). The capitulum articulates with the radius. Just proximal to the trochlea is the coronoid fossa. The coronoid fossa accommodates the coronoid process of the ulna. Superior to the capitulum and lateral to the coronoid fossa is the radial fossa, the least distinct of the three. The radial fossa receives the head of the radius. Looking at the posterior aspect of the distal humerus you should notice a large singular fossa called the olecranon fossa that articulates with the olecranon process of the ulna, forming the hinge joint we know as the elbow.
Figure 5: Bone markings of the radius and ulna bones.
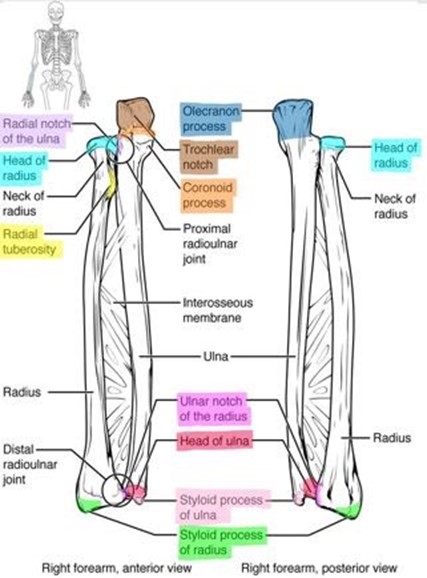
Radius: (Figure 5)
The head of the radius resembles a small hockey puck and articulates with the capitulum of the humerus. The radial tuberosity is a large projection on the medial surface of the diaphysis just inferior to the radial neck. The radial tuberosity is the site of attachment for the biceps brachii tendon. The distal end of the radius is broader than the distal end of the ulna. The distal end of the radius forms a point on the lateral aspect called the radial styloid process. This process helps stabilize the lateral aspect of the carpus (wrist). On the medial side is a facet called the ulnar notch of the radius which articulates with the head of the ulna. The ulnar notch and head of the ulna form the distal radioulnar joint.
Ulna: (Figure 5)
The proximal end of the ulna has a large projection on the posterior aspect called the olecranon process which articulates with the olecranon fossa of the humerus. The olecranon process forms the elbow. When you hit your “funny bone” on a hard surface, the nerve that runs along the outer portion of the olecranon process gets pinched between the two hard spots, sending tingly sensations up and down the arm. The anterior aspect of the olecranon forms the trochlear notch which articulates with the trochlea of the humerus. The trochlear notch makes a distinct “u” shape that can be used to help you identify the bone as the ulna. The coronoid process projects anteriorly from the distal end of the trochlear notch. The coronoid process articulates with the coronoid fossa of the humerus. Just lateral to the coronoid process is the radial notch which articulates with the head of the radius. Together they form the proximal radioulnar joint. The distal end of the ulna ends in a rounded head, which articulates with the ulnar notch of the radius, and the pointed ulnar styloid process. The styloid process of the radius provides medial stabilization to the carpus. The two styloid processes form the bony protuberances of your wrist. Can you figure out which one is from the radius and which is from the ulna?
Figure 6: Bones and bone markings of the hand and wrist.
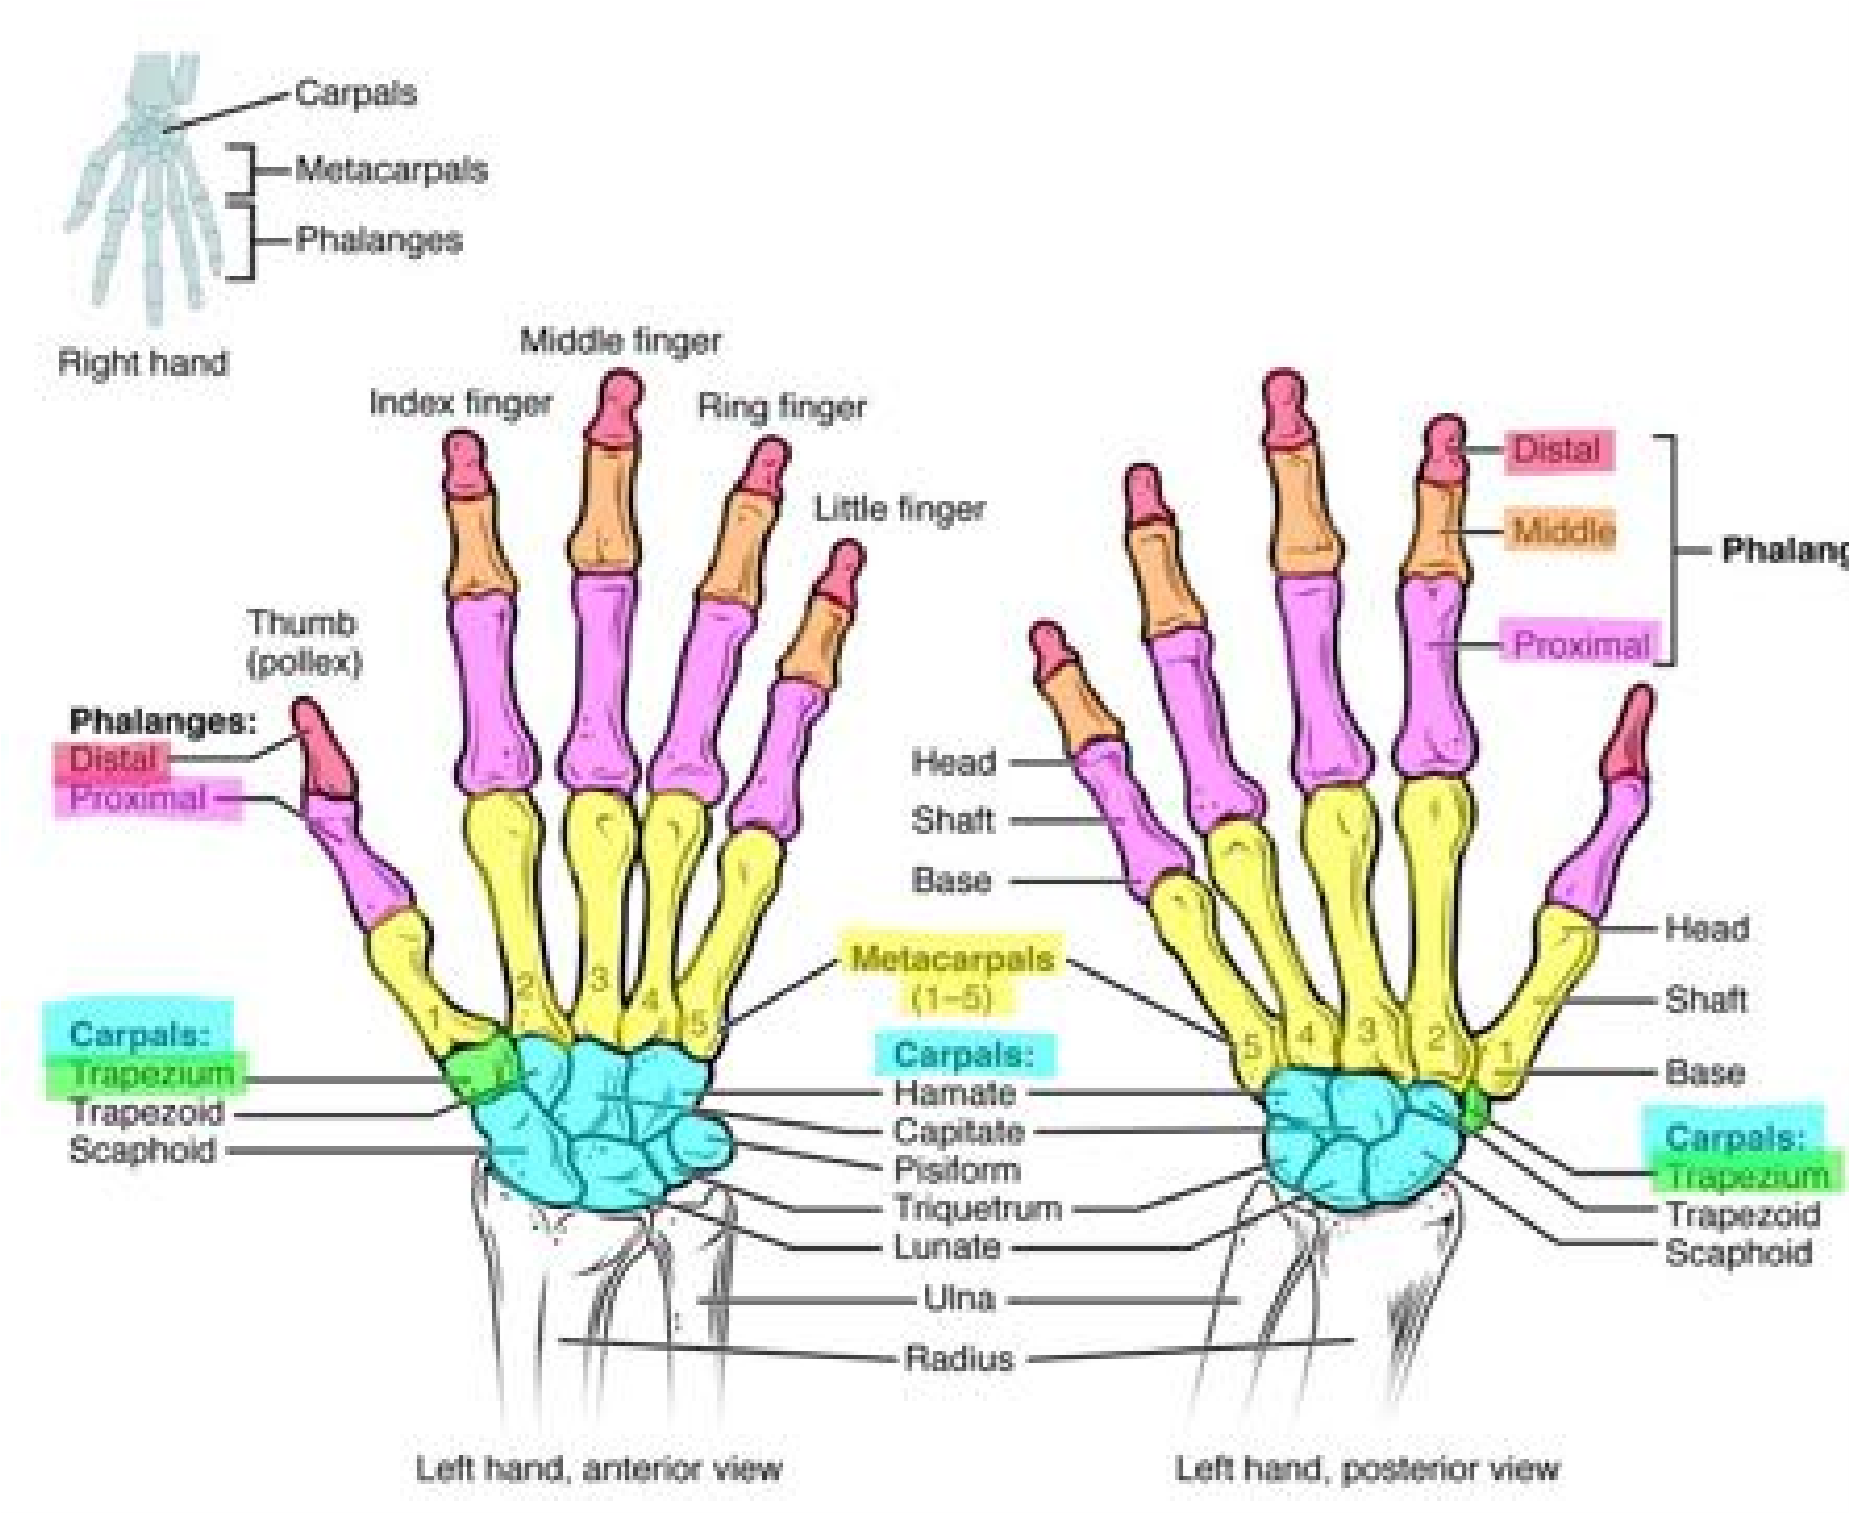
Carpals: (Figure 6)
The wrist is made up of a series of eight short bones, collectively called the carpals. The carpal bones are arranged in two rows. The trapezium articulates with the 1st metacarpal bone (the thumb).
Metacarpals: (Figure 6)
Each hand has 5 metacarpal bones labeled I – V (1-5). These long bones make skeletons appear to have extra-long fingers. They are not; they are hand bones. Metacarpal I leads to the thumb or pollex. Metacarpal II is just proximal to the index finger. Metacarpal III is the hand bone associated with the middle finger, metacarpal IV is the hand bone that corresponds to the ring finger, and metacarpal V is proximal to the pinky finger. Each metacarpal bone has a base that articulates with the carpal bones proximally, a shaft (body), and a head (distally) that articulates with the proximal phalanx of the corresponding finger. The articulation of each metacarpal with its proximal phalange is called the metacarpophalangeal joint. These five joints are commonly called knuckles.
Phalanges: (Figure 6)
The phalanges are the bones of the digits (fingers). Digits II-V have three phalanges labeled proximal, middle (medial), and distal. The slightly shorter thumb or pollex has only 2 phalanges, proximal and distal. In total, each hand has 14 phalanges! Each phalanx has a base, a shaft (body), and a head (distally). The articulation between each phalanx is called an interphalangeal joint.
Procedure:
1. Take out the following bones: clavicle, scapula, humerus, radius, ulna, and articulated wrist and hand.
2. Label the markings on each bone.
3. Professor’s check of labeled bone.
Instructor’s Initials: _______________
4. You also need to be able to distinguish between left and right bones.
- Examine the right and left scapula on the articulated skeleton and then identify the right and left scapula of the disarticulated skeleton.
- Examine the right and left humerus on the articulated skeleton and then identify the right and left humerus of the disarticulated skeleton.
5. Explain how you identified the right scapula from the left scapula. Be sure to refer to the bone markings.
6. Explain how you identified the right humerus from the left humerus. Be sure to refer to the bone markings.
Activity 3: Bone Markings of the Lower Limb
Materials:
- disarticulated skeleton
- laminated sticky terminology labels
Background:
Now to review the bones of the lower limb and make sense of the patient’s radiographs.
Pelvis (Os coxae or Coxal): (Figures 7 & 8)
The hip bone, or coxal bone, forms the pelvic girdle portion of the pelvis. The hip is formed by three fused bones (ilium, ischium, and pubis). The ilium is the fan-shaped superior bone, the pubis is anteroinferior (lower bone in front), and the ischium is posteroinferior.
Figure 7: Bone markings of the hip.
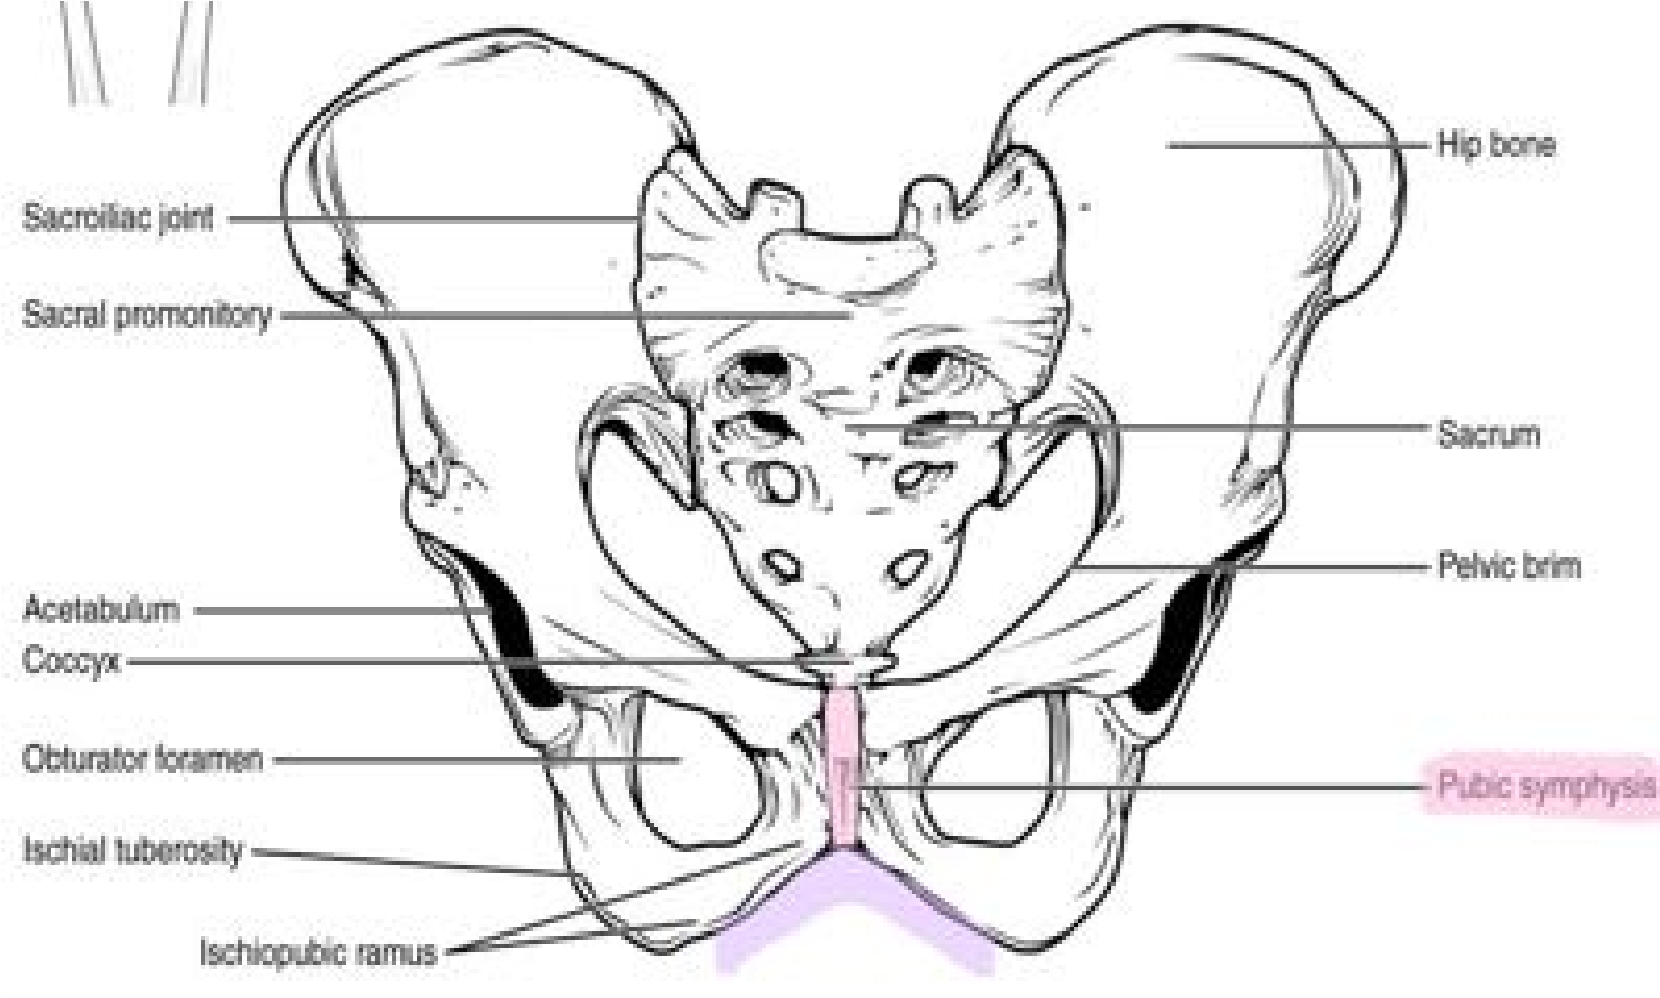
Figure 8: Bone markings of the hip.
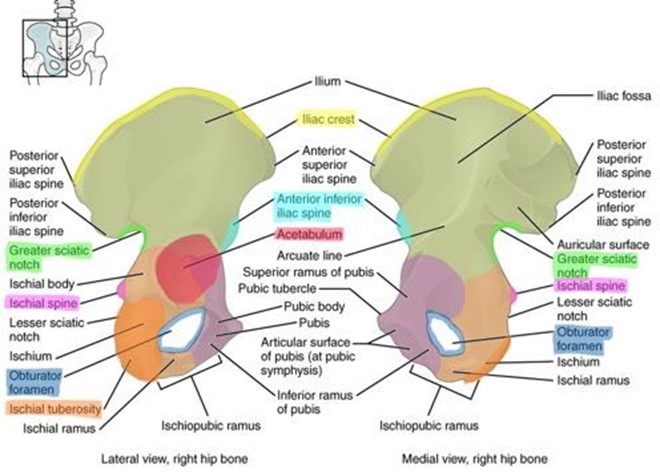
The ilium articulates with the sacrum forming the sacroiliac joint. The flared, fan-shaped portion of the ilium is the iliac crest which is where you would place your hands on your hips. The rounded, anterior end of the iliac crest is the anterior superior iliac spine and posterior end of the iliac crest is the posterior superior iliac spine. Just inferior to the anterior iliac spine is a rounded protuberance called the anterior inferior iliac spine. The deep, inverted U-shaped indentation located on the inferior posterior aspect of the ilium is called the greater sciatic notch.
The ischium is the densest of the three bones of the pelvis. The large, rough projection is the ischial tuberosity which is what you sit on when seated. Just superior to the ischial tuberosity is the lesser sciatic notch. The ischial spine separates the lesser and greater sciatic notches.
The pubis or pubic bone is the smallest and most anterior and inferior of the three bones of the hip. The right and left pubic bones join to form a fibrocartilaginous joint called the pubic symphysis. The angle formed by this joint is called the pubic arch. One way to identify a female versus a male hip bone is to measure the angle of the pubic arch; in females, the pubic arch is wider (90o- 100o), and in males the angle is much narrower (60o-70o).
The acetabulum is a large cup-shaped depression on the lateral aspect of the hip and articulates with the head of the femur to form the hip or coaxal joint. The acetabulum is the site where all three bones, ilium, ischium, and pubis, converge and fuse. This deep depression forms the hip joint, one of the two versatile ball and socket joints in your body.
The obturator foramen is found on the anterior aspect of the pelvic bone. This is the largest foramen in the skeleton and is formed by the fusion of the pubis and ischium. Trick: Hold the ilium in your hand and place the greater sciatic notch between your thumb and pointer finger. Then use your pointer finger to wrap anteriorly on the ilium to locate the anterior inferior iliac spine. The palm of your hand should end at the ischial spine.
Figure 9: Bone markings of the femur and patella.
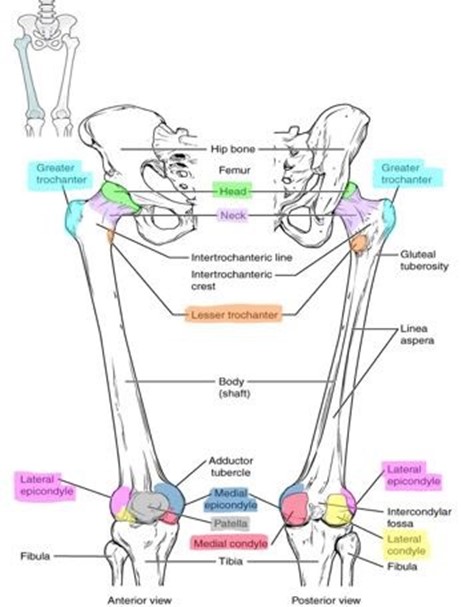
Femur: (Figure 9)
The femur (thigh bone) is the longest bone of the body. The head of the femur articulates with the acetabulum of the coxal bone to form the ball-and-socket- joint of the hip. This is the location of the hip replacement surgery. The head of the femur has a shallow pit named the fovea capitus which serves as the attachment site for a ligament between the femur and pelvis. The neck of the femur projects from the head medially. The neck is narrower than the head and femur shaft, allowing for a greater range of motion, but is also a frequent site of fractures. Lateral to the neck of the femur is a large projection named the greater trochanter. The smaller and more distal and medial projection is the lesser trochanter. (Note: The trochanters are only found on the femur. Do not confuse trochanter with greater and lesser tubercles found on the humerus.) The trochanters are major sites for muscle attachments. The distal end of the femur has two large condyles, the medial and lateral condyles, which articulate with the proximal head of the tibia to form the knee joint. The anterior portion of the condyles that articulate with the patella form a V-shaped depression called the patellar surface. Proximal to the condyles are the smaller projections called epicondyles, the non-articulating surface of the condyles. The medial and lateral epicondyles are not part of the joint but serve as the attachment sites for the knee’s collateral ligaments.
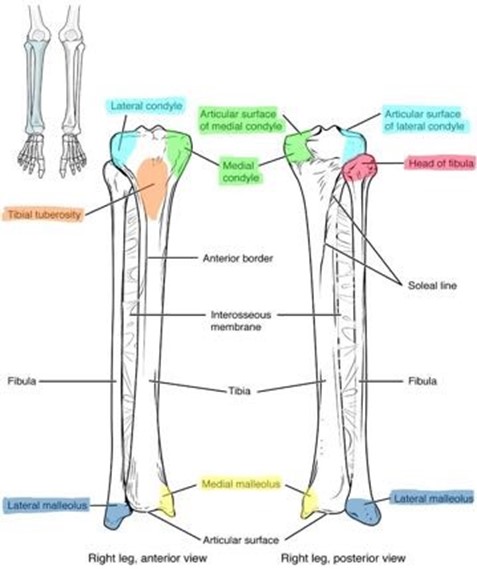
Figure 10: Bone markings of the tibia and fibula.
Patella: (Figure 10)
The patella or kneecap is the largest sesamoid bone in the body. This bone is formed within the tendon of a muscle and changes the direction of tension over a joint. The patella is triangular and can be found in the tendon of the quadriceps femoris muscle. The patellar ligament is a continuation of this tendon. It inserts into the proximal tibia. The patella articulates with the patellar surface of the femur.
Tibia: (Figure 10)
The tibia or shin bone is the medial and much larger of the two bones found in the lower leg. On the proximal surface of the tibia are two large depressions named the medial and lateral condyles. These condyles articulate with the femoral condyles to form the knee joint. Just distal to the condyles is a large, rough projection named the tibial tuberosity. This is where the patellar ligament attaches to the tibia. The distal end of the tibia contains a sharp projection on the medial side called the medial malleolus. The medial malleolus articulates with the talus bone of the ankle joint and forms one of the bony protuberances visible on your ankle.
Fibula: (Figure 10)
The fibula is the lateral, non-weight-bearing bone of the leg. It is thinner than the tibia. The proximal end is called the head, and the distal end of the fibula forms a point called the lateral malleolus. The lateral malleolus is the lateral stabilization of the ankle joint and articulates with the talus. The lateral malleolus forms the more lateral bony protuberance visible on your ankle.
Trick: “Tough Tibia, Fragile Fibula” The tibia is medial, so its process is called the medial malleolus, and the fibula is lateral so its process is called the lateral malleolus.
Figure 11: Bone markings of the foot and ankle.
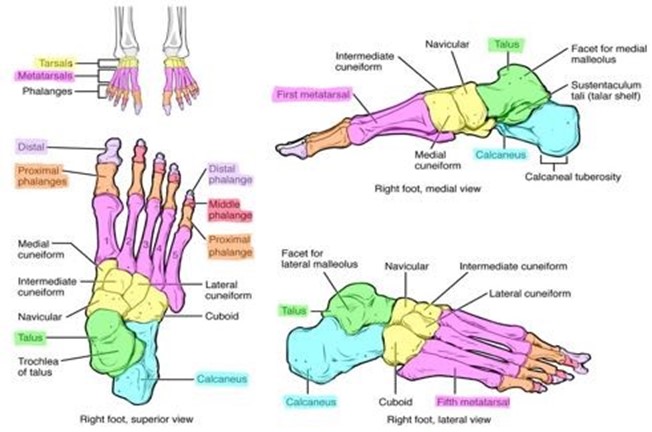
Tarsal bones: (Figure 11)
There are seven (7) tarsal bones in the ankle. They are arranged into proximal, intermediate, and distal groups. The proximal row contains two large bones, the talus, and the calcaneus. The talus is the rounded bone that articulates with the tibia and fibula. The calcaneus is distal to the talus and supports it. It forms the heel of the foot and is the site of the insertion of the calcaneal (Achilles) tendon. The intermediate row consists of one bone: the navicular. The distal row contains the cuboid and three cuneiform bones.
Metatarsals: (Figure 11)
The five metatarsal bones are numbered I-V medially to laterally. Just like the metacarpals of the hand, each metatarsal (foot bone) has a proximal base, a middle shaft, and distal head.
Phalanges: (Figure 11)
Just like the fingers, the toes collectively consist of 14 phalanges. Each toe, except the first, has three phalanges: a proximal, middle and distal phalanx. The first toe, the hallux, like the thumb, only has the proximal phalanx and distal phalanx.
Procedure:
1. Take out the following bones: femur, patella, tibia, fibula, and articulated tarsus (ankle) and foot.
2. Label the markings on each bone.
3. Instructor check of labeled bone.
Instructor’s Initials: _____________
4. You also need to be able to identify left from right bones. Look at the right and left femur on the articulated skeleton and then try to correctly identify the right and left femur of the disarticulated skeleton.
5. Explain how you identified the right femur from the left femur. Be sure to refer to the bone markings.
6. Look at the right and left tibia on the articulated skeleton and then try to correctly identify the right and left tibia of the disarticulated skeleton.
7. Explain how you identified the right tibia from the left tibia. Be sure to refer to the bone markings.
Review the patient’s radiographs below. Label the following parts of the femur and os coxa using the following word bank: greater trochanter, head, neck, acetabulum, medullary cavity.
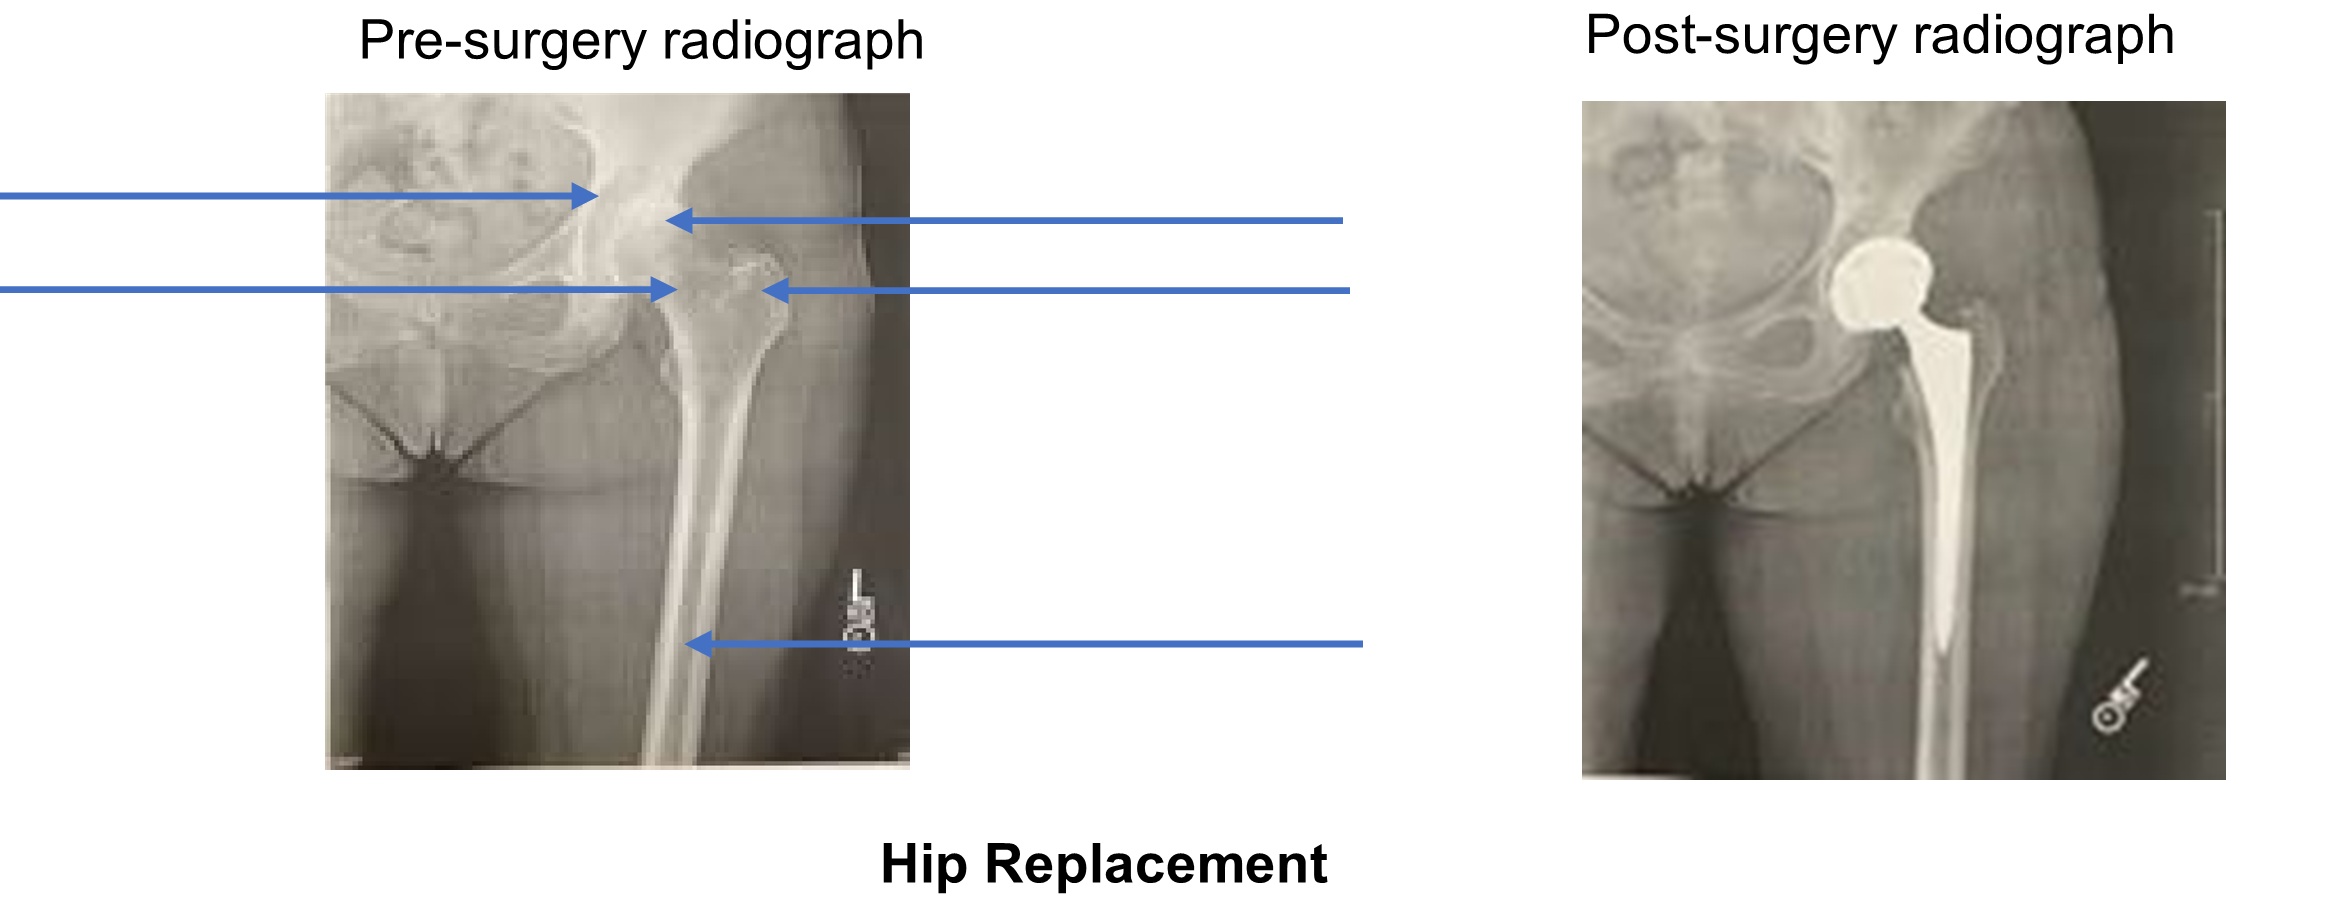
8. Compare the post-surgery radiograph on the right to the pre-surgery radiograph on the left. Using proper bone terminology, describe what specific part(s) was/were replaced in the hip joint replacement surgery?
9. Identify 3 ways that you can distinguish between the humerus and femur.
Putting It All Together
Now that you have reviewed the bones of the appendicular skeleton, let’s put it all together. Your instructor has set up a quiz on the back table. Answer the following ten questions.
- ____________________________________________
- ____________________________________________
- ____________________________________________
- ____________________________________________
- ____________________________________________
- ____________________________________________
- ____________________________________________
- ____________________________________________
- ____________________________________________
- ____________________________________________
Now that you have learned the appendicular skeleton bones, you can discuss the proper rehabilitation plan for this patient with the physical therapist. You compared the pre-surgery and post-surgery radiographs to identify that the joint capsule between the acetabulum and the head of the femur had little joint space prior to surgery—the head of the femur caused friction with the inside of the acetabulum, causing intense pain upon walking. The hip replacement involved providing the patient with an entirely new femur head and that to do so, the surgeon had to insert a long steel shaft into the femur, drilling past the greater and lesser trochanter into the diaphysis. This invasive procedure damaged tendons, ligaments, and muscles. These must be rehabilitated now. You will work with the physical therapist to develop appropriate rehabilitative exercises to strengthen the ligaments, tendons, and muscles that surround the acetabulum and femur so she will eventually be able to run and even ski again!
Creative Commons Citations:
- Appendicular Skeleton lab. Case Based OER Lab Manual for A&P I. © 2022 by G. Backus, H. Wangerin, and P. Rodgers is licensed under CC BY-NC-SA 4.0.
- Figures 1- 11 © 2023 OpenStax Anatomy and Physiology 2e is licensed under CC BY 4.0 with color shading added by H. Wangerin.
- Upper Limb, Lower Limb, Clavicle to Color, Humerus to Color, Radius and Ulnar to Color, OS Coxae to Color, Femur to Color, Tibia and Fibula to Color, Foot to Color, Radius and Ulna to Color © 2022 by H. Wangerin, using the Anatomage Table, is licensed under CC BY-NC-SA 4.0.
- Hip Replacement © 2022 by H. Wangerin, obtained with permission from patient, is licensed under CC BY-NC-SA 4.0.
