
8 Axial Skeleton Lab
"The magnificence of my skeleton is hidden by the weight of my flesh." -Vera Caspary, Laura
Gillian Backus; Heidi W. Wangerin; and Paula Rodgers
Objectives
- Define and apply the bone marking terminology to describe bones of the skeleton.
- Identify the bones and markings on the terminology checklist for the axial skeleton.
- Apply what you have learned: evaluate why the features of the fetal skull are different from an adult skull.
- Apply what you have learned: Given bone marking descriptions, properly identify a bone.
Terminology Checklist
Bone and Bone Markings of the Skull
|
Bones and Bone Markings of the Vertebral Column
|
Regions and Specific Bone Markings of the Vertebral Column
|
Thoracic Cage
|
Bones of the Anterior Neck
|
Outline of Lab
Case Study: “Car Accident Woes”
Activity 1: Bone Marking Terminology
Activity 2: Bones and Bone Markings of the Skull
Activity 3: Bones and Bone Markings of the Vertebral Column
Activity 4: Bone and Bone Markings of the Thoracic Cage
Putting it all Together
Case Study: “Car Accident Woes”
A family friend, Dr. Hernandez, has invited you to come to her office for a day to shadow her and the dental hygienist. The patient sustained a fractured jaw following a car accident when the air bag in the passenger seat where he was sitting failed to deploy. Thankfully, he was wearing a seat belt, which probably saved his life. His neck, chest, and face are all sore. His jaw appears disfigured. You are studying bones in your A&P class and pull out your notes to review which bones might be involved. You think that the jaw might be correctly termed the mandible, but the maxillae could also be involved. Dr. Hernandez confirms that the mandible is involved in the fracture, but the zygomatic and temporal bones are as well. She describes the fractured processes of the bones and discusses possible nerve damage. She asks you what a general term is for a bony passageway for nerve and blood vessels. You quickly answer, “a meatus.” She replies, “you are very close! But a better term would be ‘foramen’”. Slightly embarrassed, you decided it might be a good time to review general bone marking terms!
- Given the information in the case study, list the bones that are likely fractured.
Activity 1: Bone Marking Terminology
Materials:
- 4 unlabeled bones (A, B, C, D) per table with three markings on each (1, 2, 3)
Background:
Our skeleton is divided into two sections, axial and appendicular. The axial skeleton includes the bones of the head and trunk while the appendicular skeleton includes bones of the upper and lower limbs and their attachments, the pectoral and pelvic girdles, respectively.
When inspecting bones, you will notice holes, bumps, depressions, sharp surfaces, and smooth surfaces. These bone markings are categorized as projections, passageways, and articulations (Table 1). Projections bear various names like tubercles, tuberosities, epicondyles and trochanters, depending on their size and shape. Generally, these projections are attachment points for muscles and have a rough texture. You can feel the roughness. Bones may also contain passageways for blood vessels and nerves; common passageway terms are canal, fissure, foramen, or sulcus. When bones touch other bones, as in the jaw (temporomandibular joint, TMJ) the resulting articulation (or joint) surfaces are usually smooth. Facet, fossa, and condyle are a few terms used to describe the smooth areas where bones meet. Knowing these terms will help you remember and understand the specific bone marking for the bones of the skeleton (Table 1).
Table 1: Bone marking descriptions.
| Marking Classification | Marking | Description | Example |
| Articulation | Articulation | Where two bones meet | Knee joint |
| Facet | Shallow convex or concave surface where two bones meet | Costal facet | |
| Fossa | Indentation in a bone into which another bone fits into | Mandibular fossa | |
| Fovea | Shallow pit | Fovea capitis on the head of the femur | |
| Marking Classification | Marking | Description | Example |
| Passageway | Fissure | Narrow slit in a bone or between bones | Auricular fissure |
| Foramen | Hole through bone | Foramen magnum in the occipital bone | |
| Meatus | Opening into canal | External auditory meatus | |
| Notch | A v-like depression in the margin or edge of a flat area | Greater sciatic notch | |
| Sinus | Air-filled space in bone | Nasal sinus | |
| Sulcus or Groove | Indentation for a narrow structure | Sigmoid sulcus of the temporal bones | |
| Projection | Condyle | Rounded protuberance | Occipital condyle |
| Crest | Ridge or projection | Iliac crest | |
| Epicondyle | Small projection usually proximal to a condyle | Medial epicondyle of the tibia | |
| Head | Prominent rounded surface of a bone’s epiphysis | Head of femur | |
| Line | Elongated ridge | Linea aspera | |
| Process | Prominence bony projection | Transverse process of vertebra | |
| Projections | Raised markings | Spinous process of the vertebrae | |
| Protuberance | Protruding from the bone | Chin | |
| Spine | Sharp process | Ischial spine | |
| Trochanter | Large projection only found on the femur | Greater trochanter | |
| Tubercle | Small, rounded process | Tubercle of humerus | |
| Tuberosity | Large, rough bony projection | Deltoid tuberosity |
Procedure:
1. Distribute the 4 bones to different members of the table: Bone A, B, C, D.
2. Use Table 1 (above) to select appropriate bone marking terms to label the bone you were given at the sites provided (1, 2, 3), and fill in the chart below. Please use the terms provided to make a prediction on what the appropriate term is, rather than looking it up.
- Bone Letter: ________
- Marking #1:
- Marking #2:
- Marking #3
Instructor Initials for competition of activity: ________________
Activity 2: Bones and Bone Markings of the Skull
Materials:
- adult skull
- fetal skull
- laminated terminology labels with sticky tack
Background:
The skeleton is divided into axial and appendicular sections. The axial skeleton includes 80 bones on the longitudinal axis of the body and includes bones of the skull, vertebral column, and thoracic cage. The appendicular skeleton will be covered in the next lab and includes the arms and legs and their attachment sites to the axial skeleton. The function of the axial skeleton is to protect the vital organs of the body as well as to provide a rigid attachment point for muscles.
Bones of the cranium
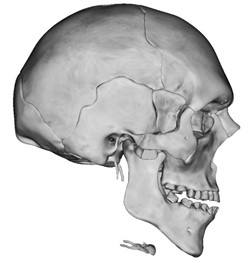
There are 22 bones of the skull, excluding the three ossicles (small bones) of the ear. The skull bones can be divided into the cranium and the facial bones (Figure 1). The cranium is composed of 8 bones, and they enclose the brain. The 14 facial bones form the nasal cavity, orbit, and the upper and lower jaw (Figure 2, boxed areas are bone markings). The bones of the skull are connected to each other by joints. Most bones of the cranium are connected by immovable fibrous joints called suture joints. Sutures are formed when ossified skull bones are connected by dense regular connective tissue. The mandible, which forms the lower jaw, is part of the temporomandibular joint (TMJ), and is the largest freely mobile (synovial) joint in the skull.
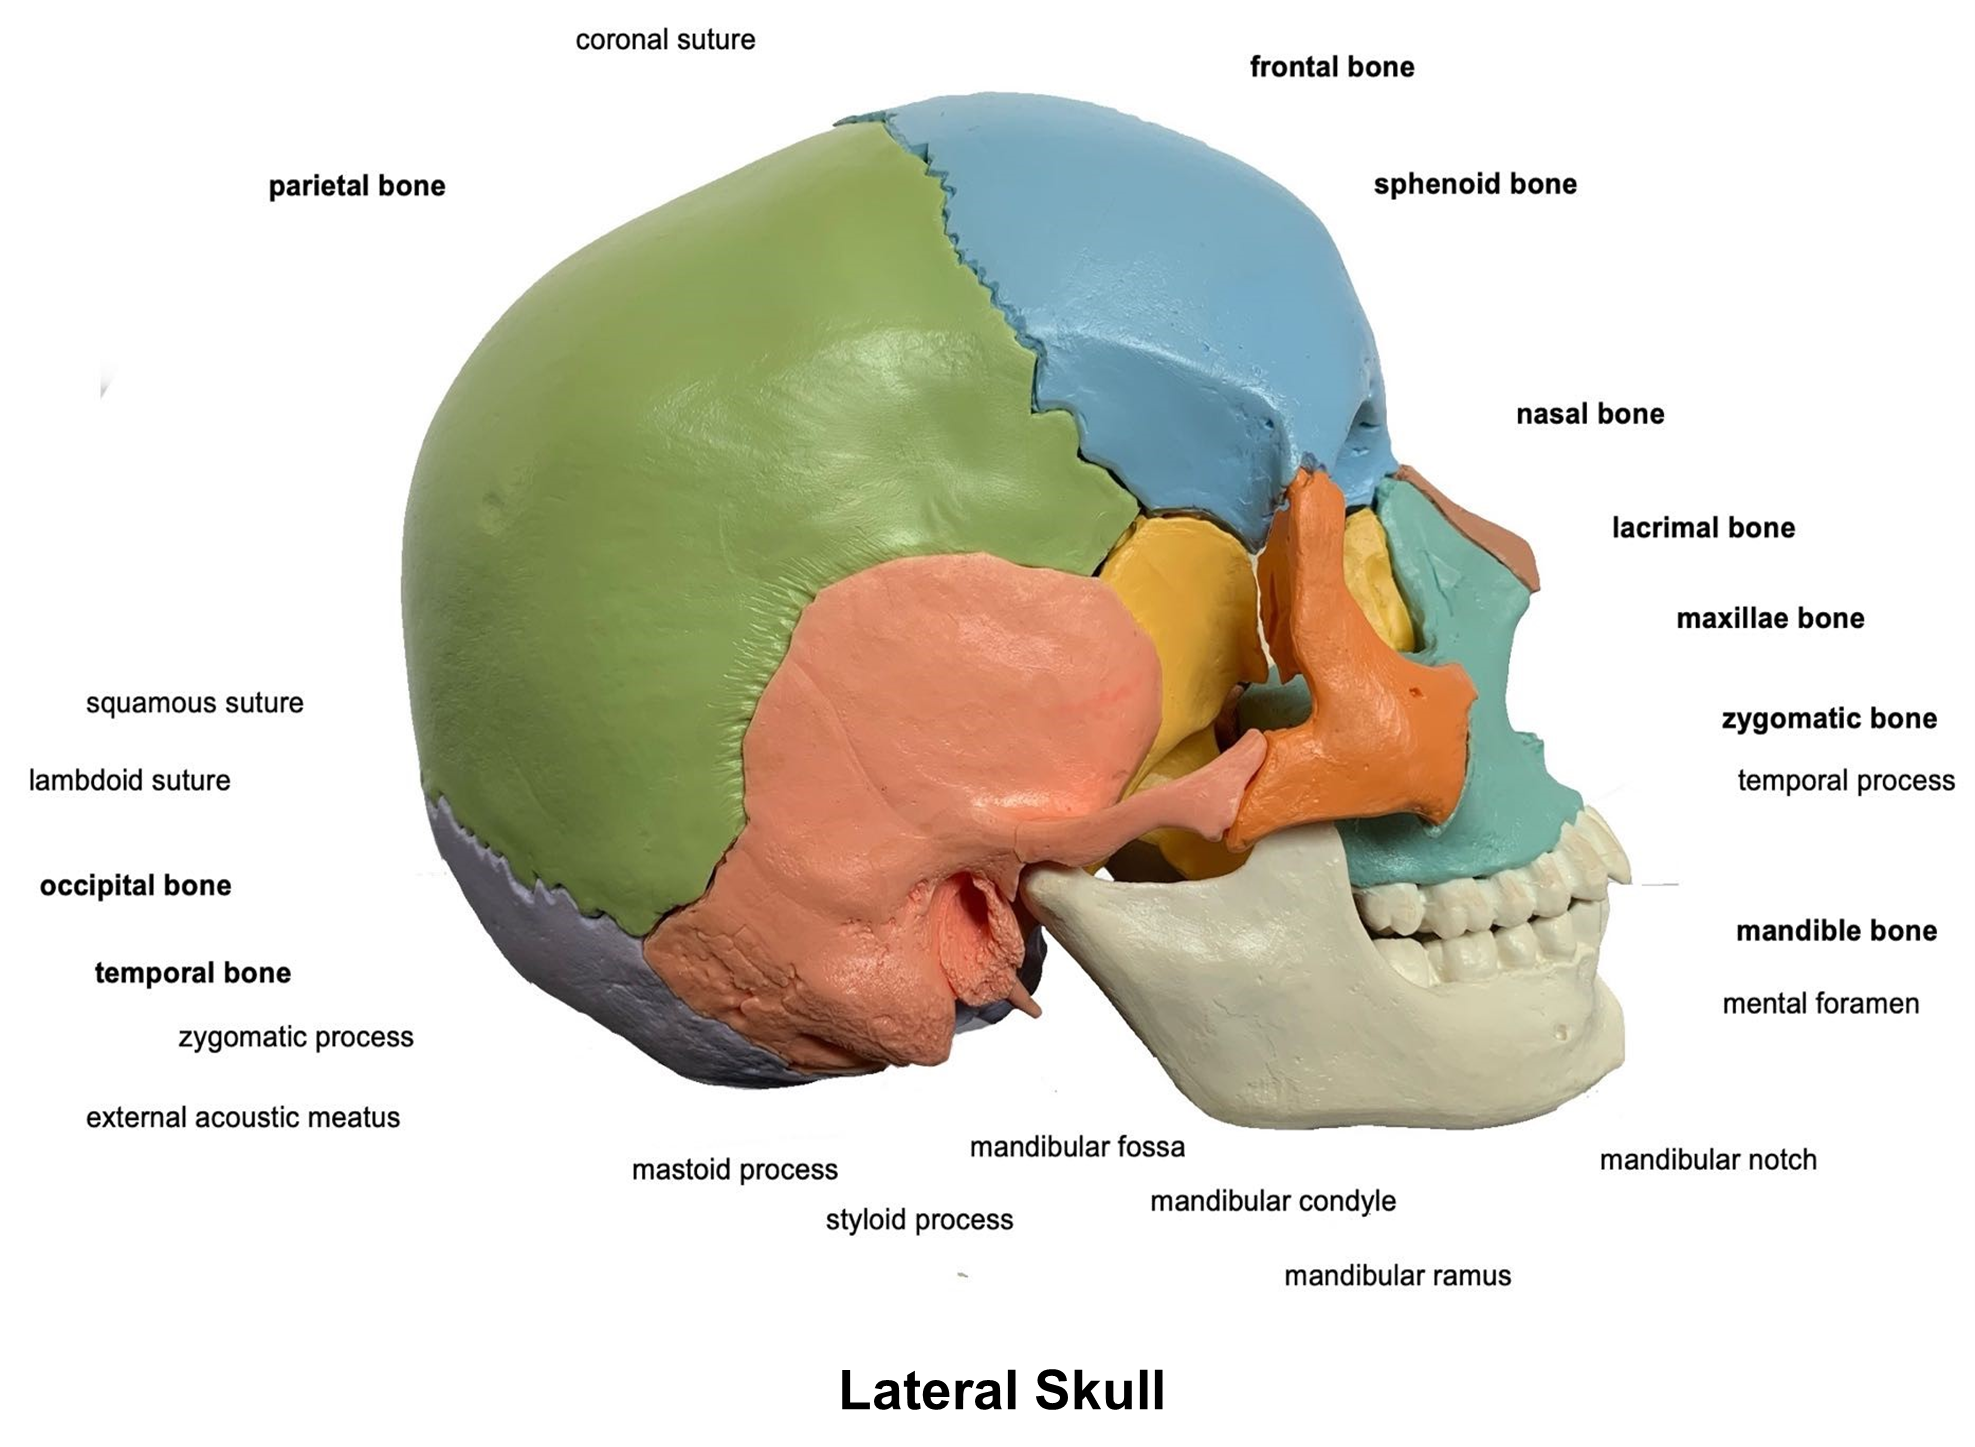
Figure 1: Lateral view of the skull showing the cranial and facial bones.
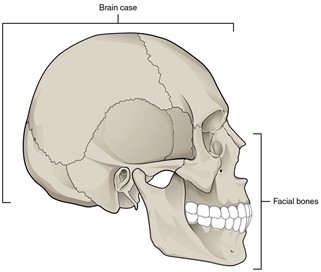
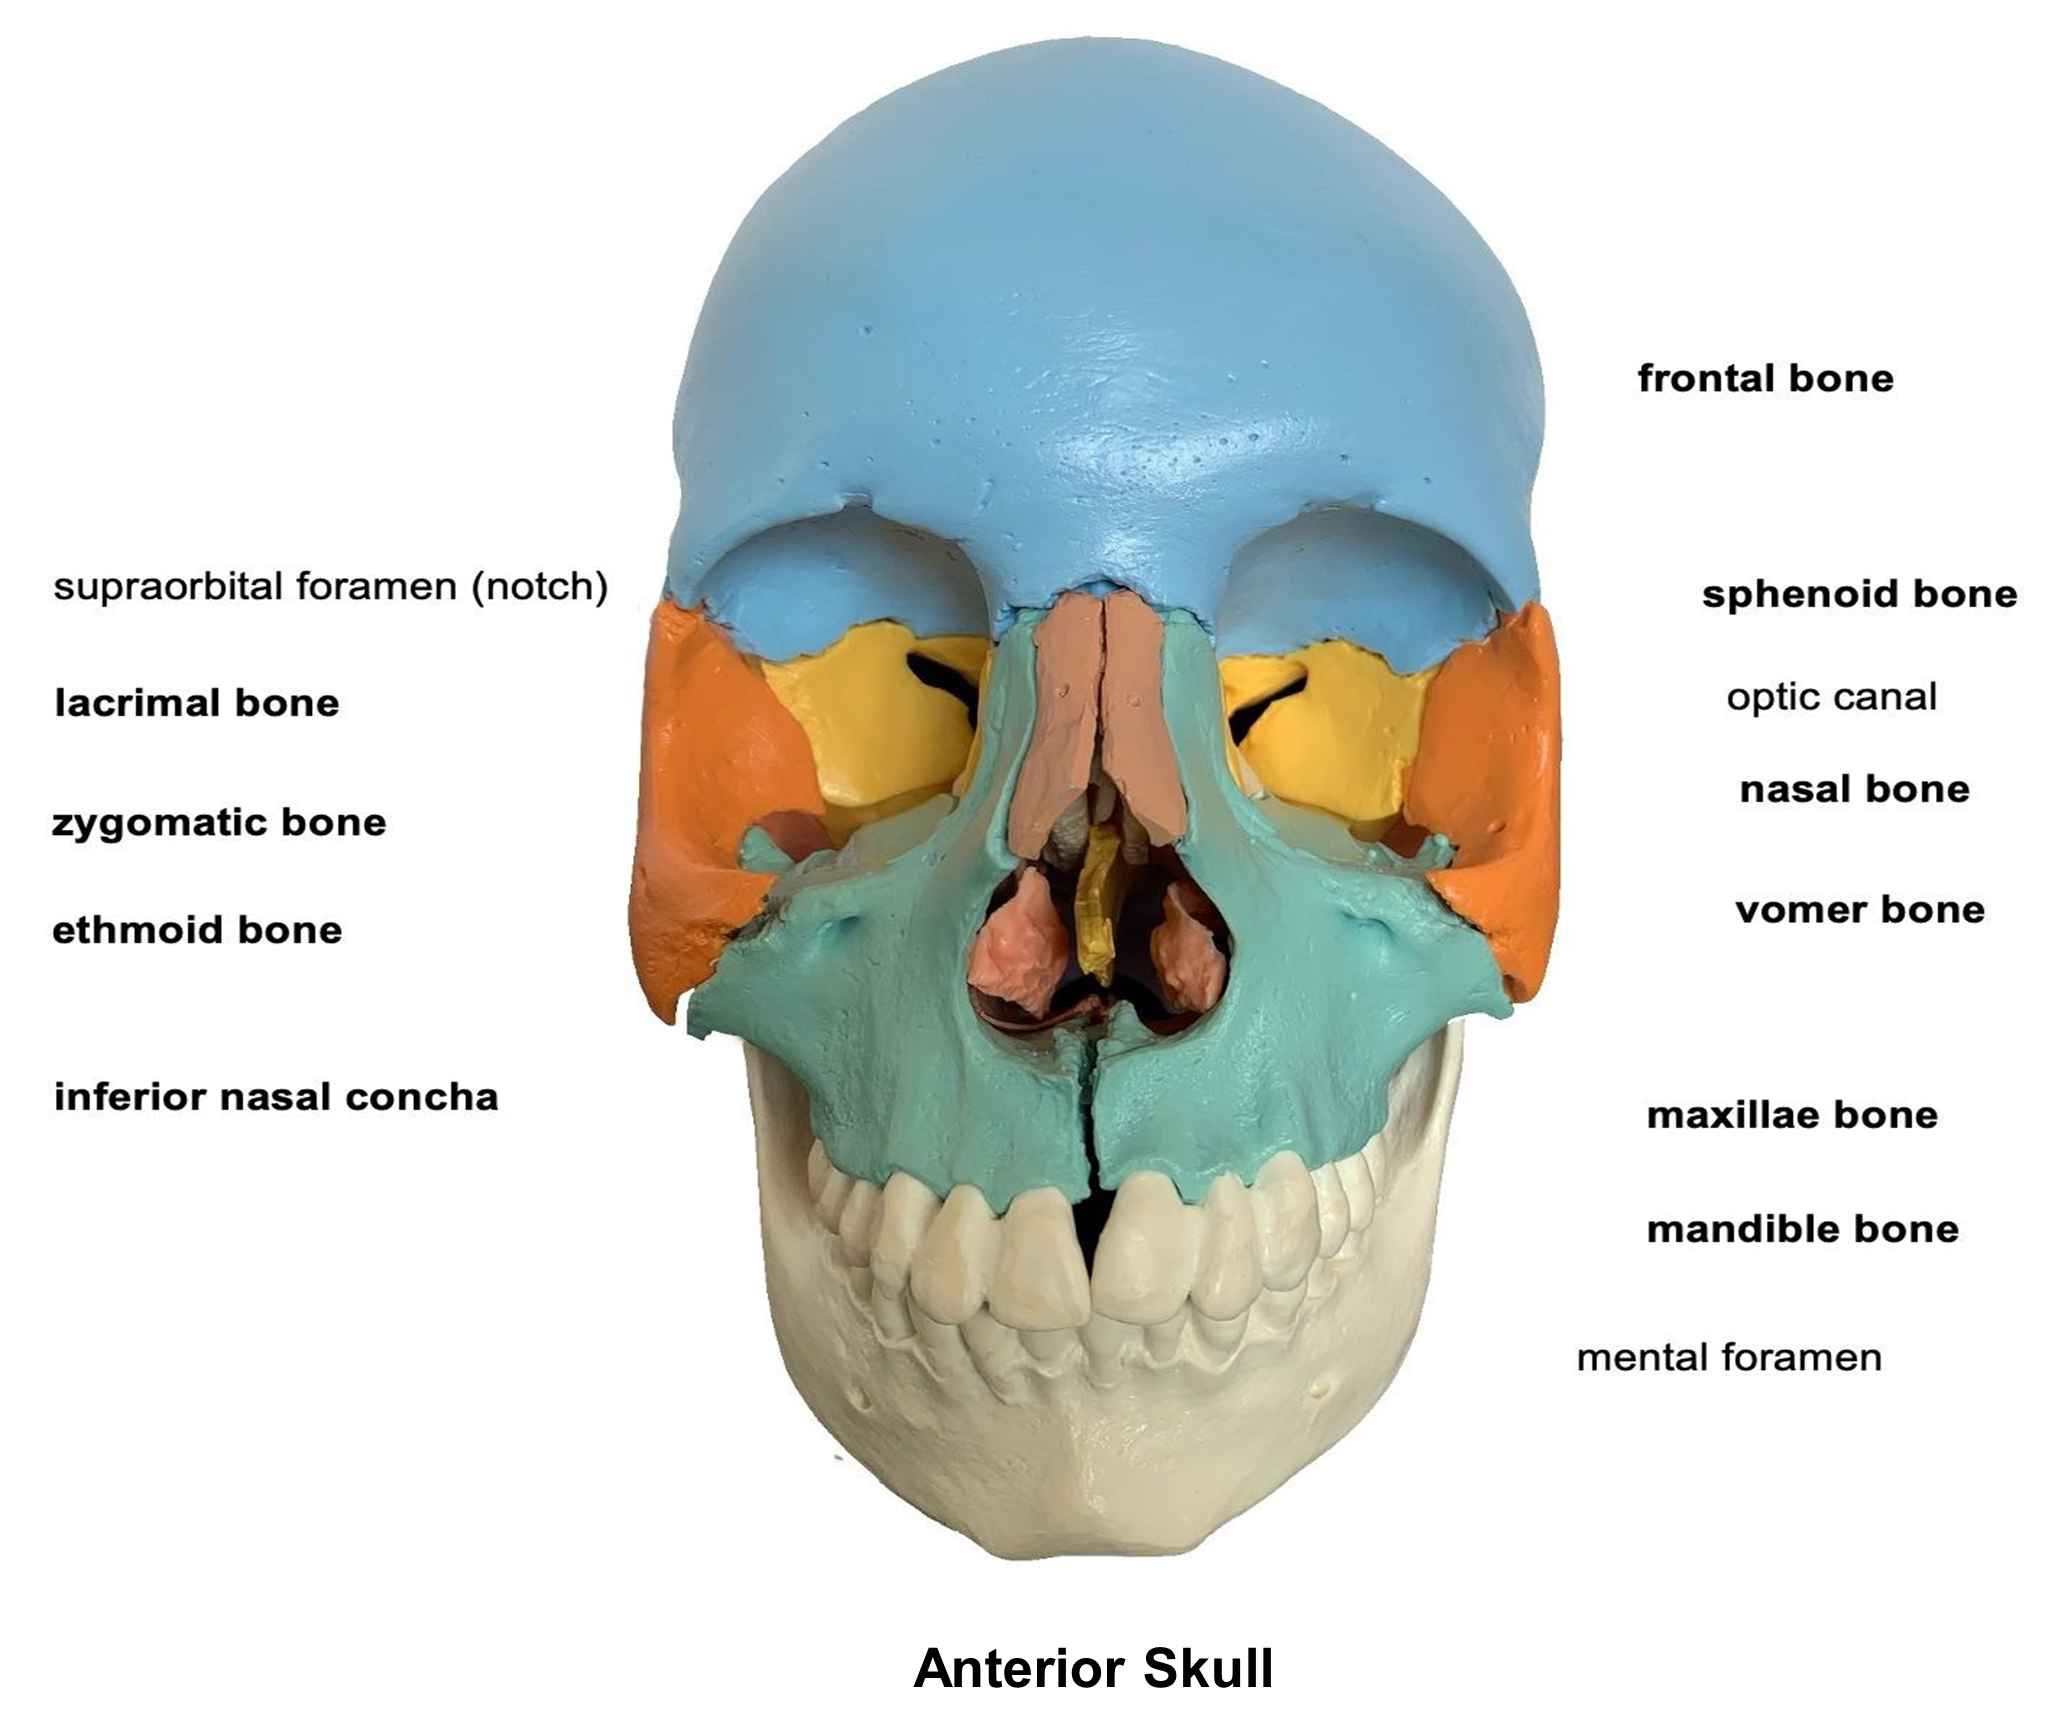
Figure 2: Anterior view of the skull.
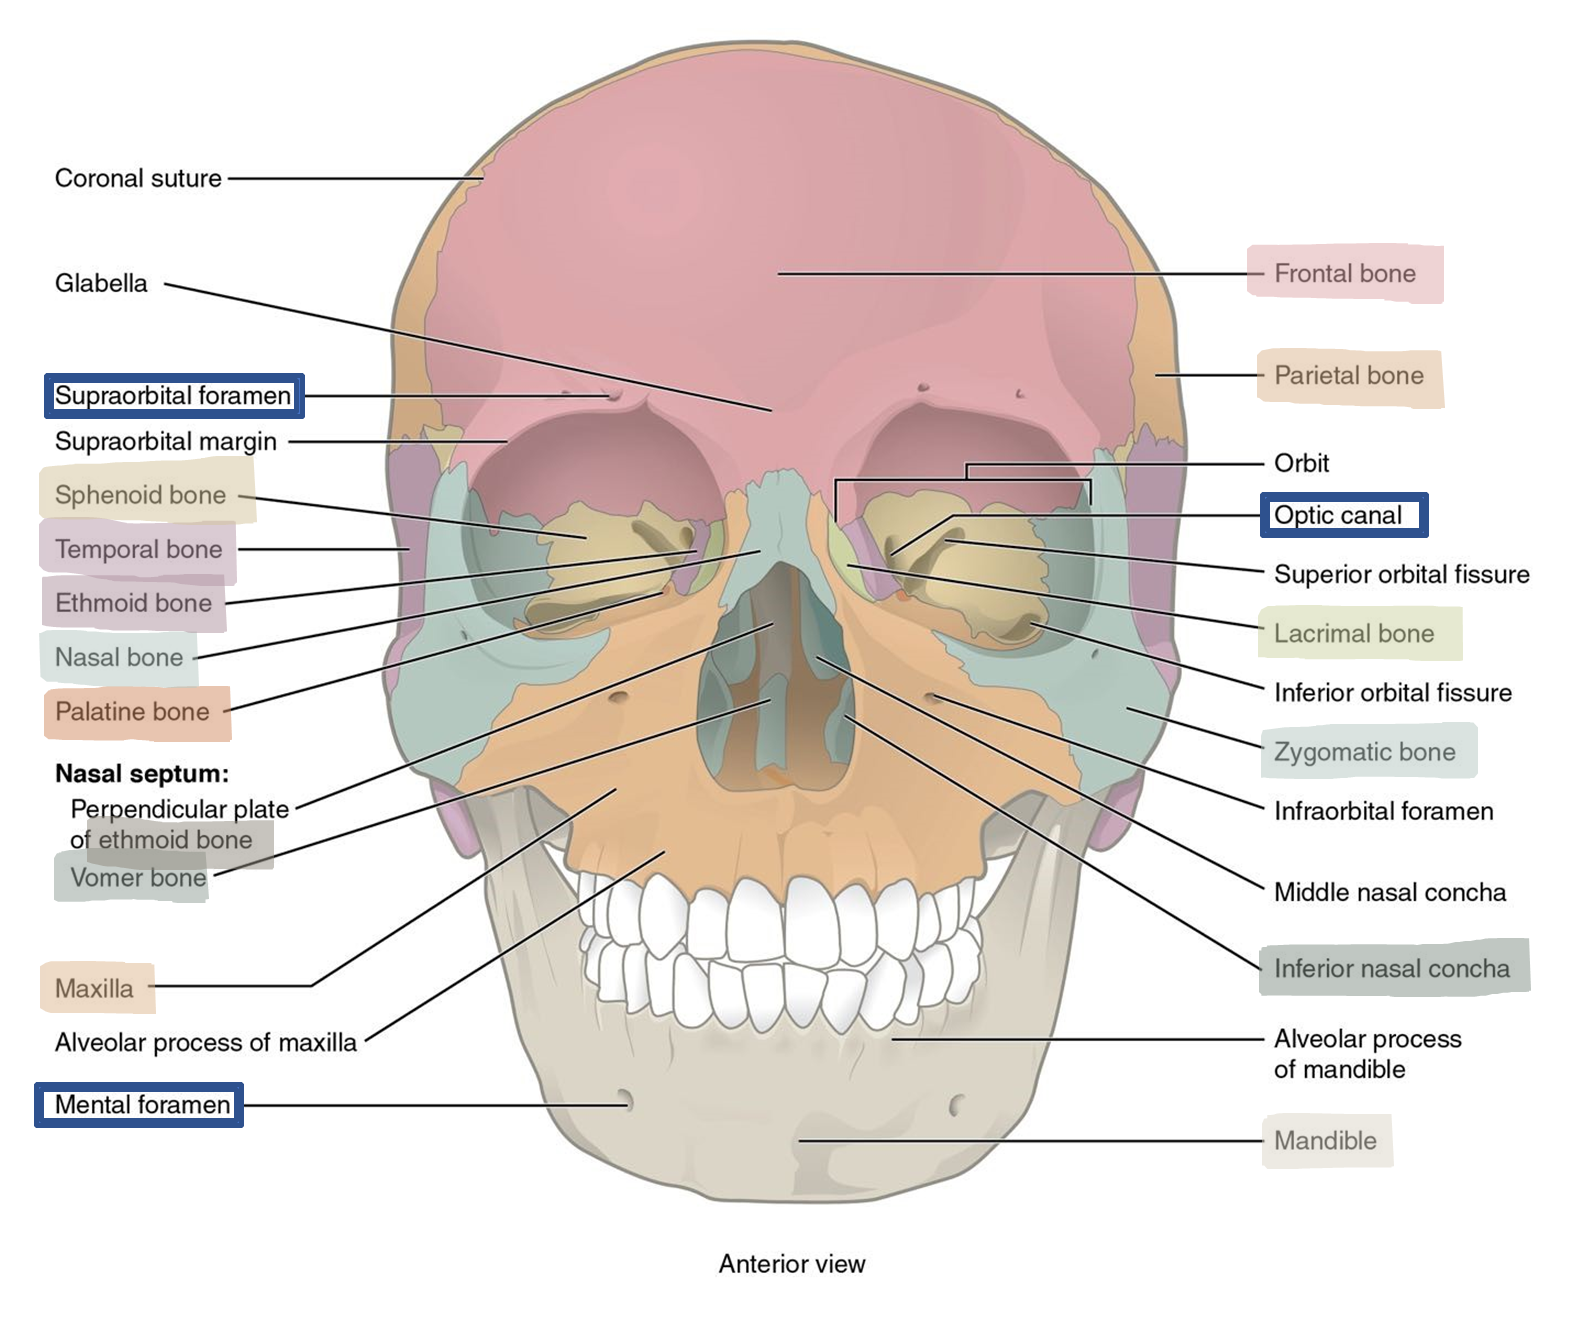
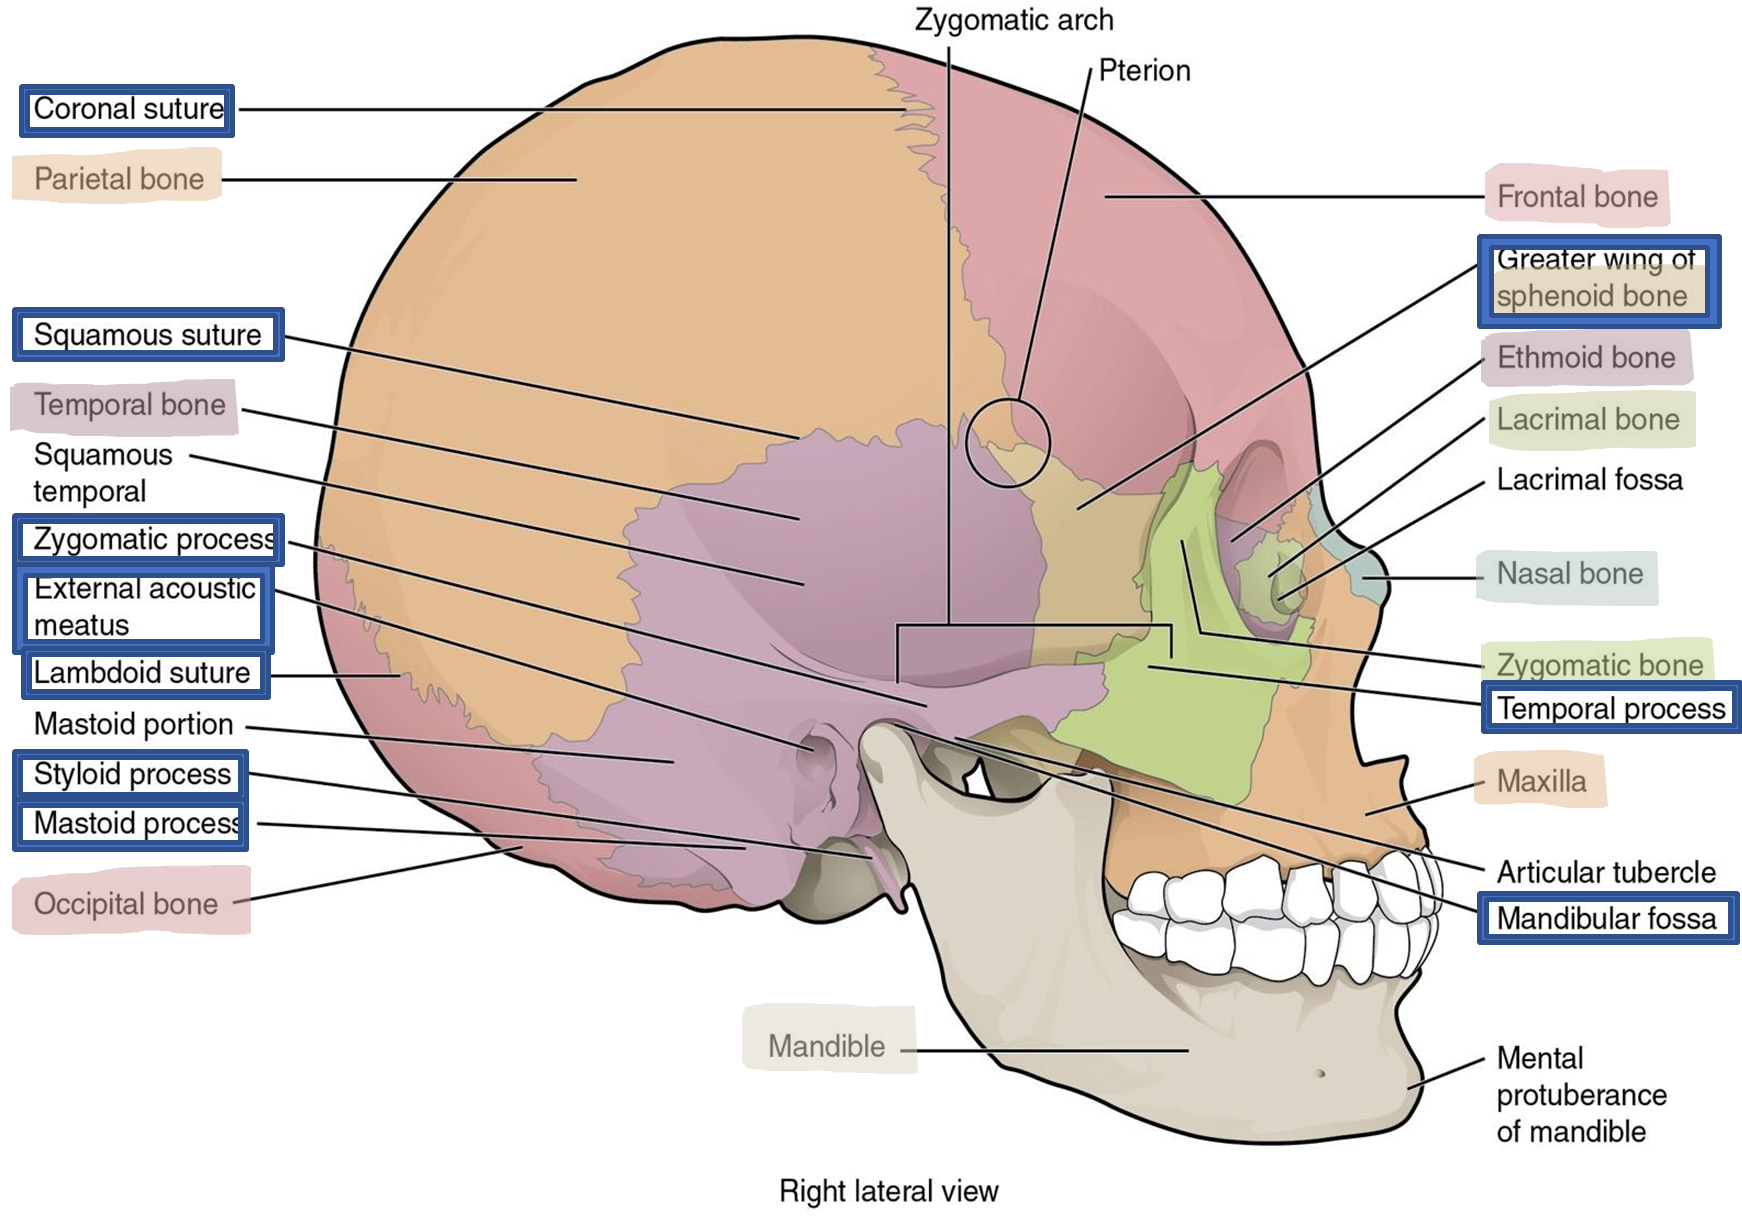
Figure 3: Lateral view of the skull.
Frontal Bone: (Figure 2)
The frontal bone is a large flat bone that forms the forehead on the superior part of the anterior skull. The frontal bone contains the frontal sinus and part of the paranasal sinuses. Sinuses are air-filled, mucus-lined cavities that are part of the nasal cavity and decrease the weight of the skull. They also serve to warm and clean inhaled air. The frontal bone also contains the supraorbital margin, the bony prominence of the eyebrow and part of the orbit, which houses the eyes. In the middle of this margin is the supraorbital foramen (notch) which forms a passageway for blood vessels and nerves of the forehead.
Parietal Bones: (Figure 3)
The paired parietal bones form the superior and lateral walls of the cranium. The right and left parietal bones connect at the sagittal suture which extends posteriorly from the coronal suture and divides the skull in the midsagittal plane (Figure 3). The parietal bones meet the frontal bone at the coronal suture which divides the skull in the coronal plane of section.
Temporal Bones: (Figures 3 and 4)
The paired temporal bones form the lower, lateral wall of the cranium. The parietal bone and temporal bone meet at the squamous suture; the superior part of the temporal bone is called the squamous portion (Figure 3). The temporal bone has many bony processes (Figure 4). One prominent process is the zygomatic process which is formed by a bony projection from the anterior aspect and projects laterally. It articulates with the temporal process of the zygomatic bone to form the zygomatic arch (cheekbone). Just inferior to the origin of the zygomatic process is an opening called the external acoustic meatus, commonly called the ear canal, which conducts soundwaves toward the tympanic membrane (eardrum). The mandibular fossa is anterior to the external acoustic meatus and is the site of the articulation with the mandible as part of the temporomandibular joint (TMJ). The styloid process, named for the sharp needle-like projection, is inferior and medial to the external acoustic meatus and projects anteriorly. The mastoid process is a rounded, thick projection that is posterior and lateral to the styloid process. The mastoid process can be felt just behind your ear and is a point of attachment for several muscles that are involved in movement of the jaw.
Figure 4: Markings of the temporal bone.
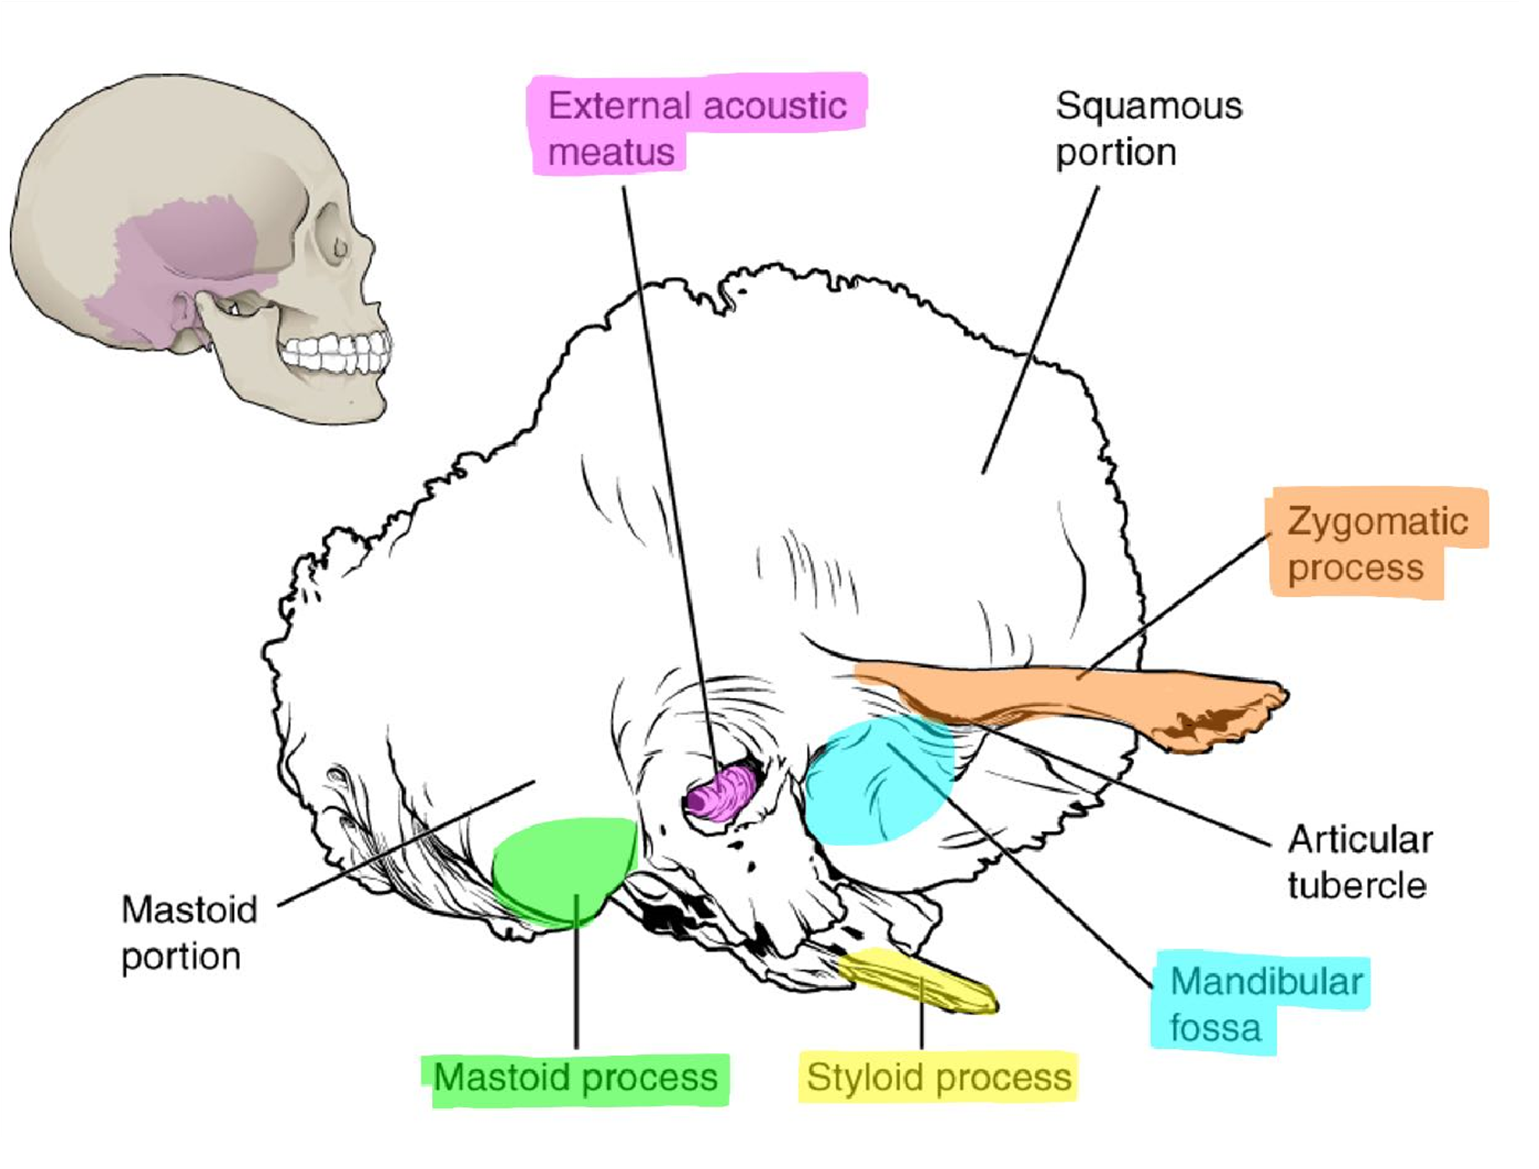
Figure 5: Posterior view of the skull.
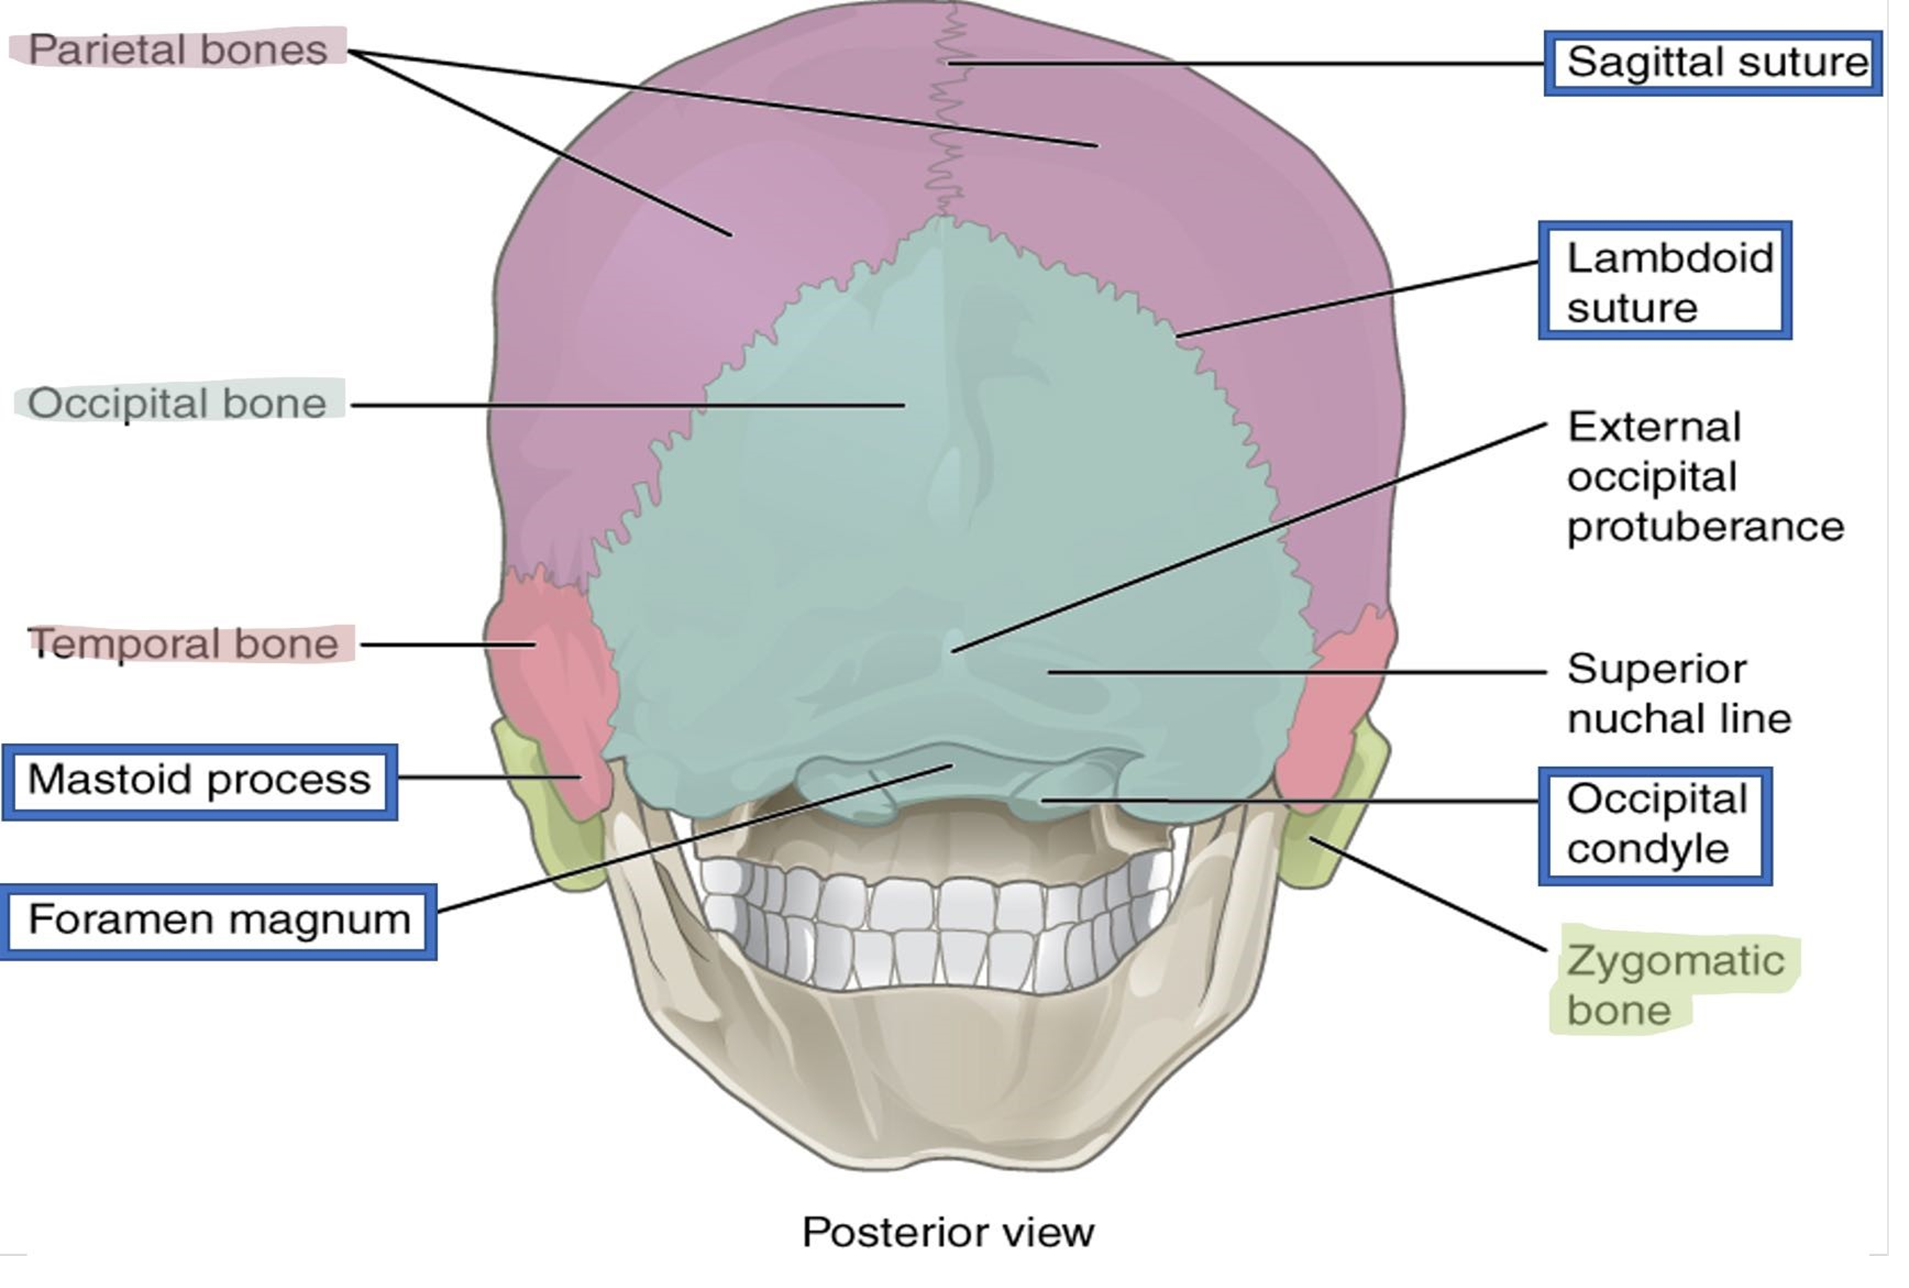
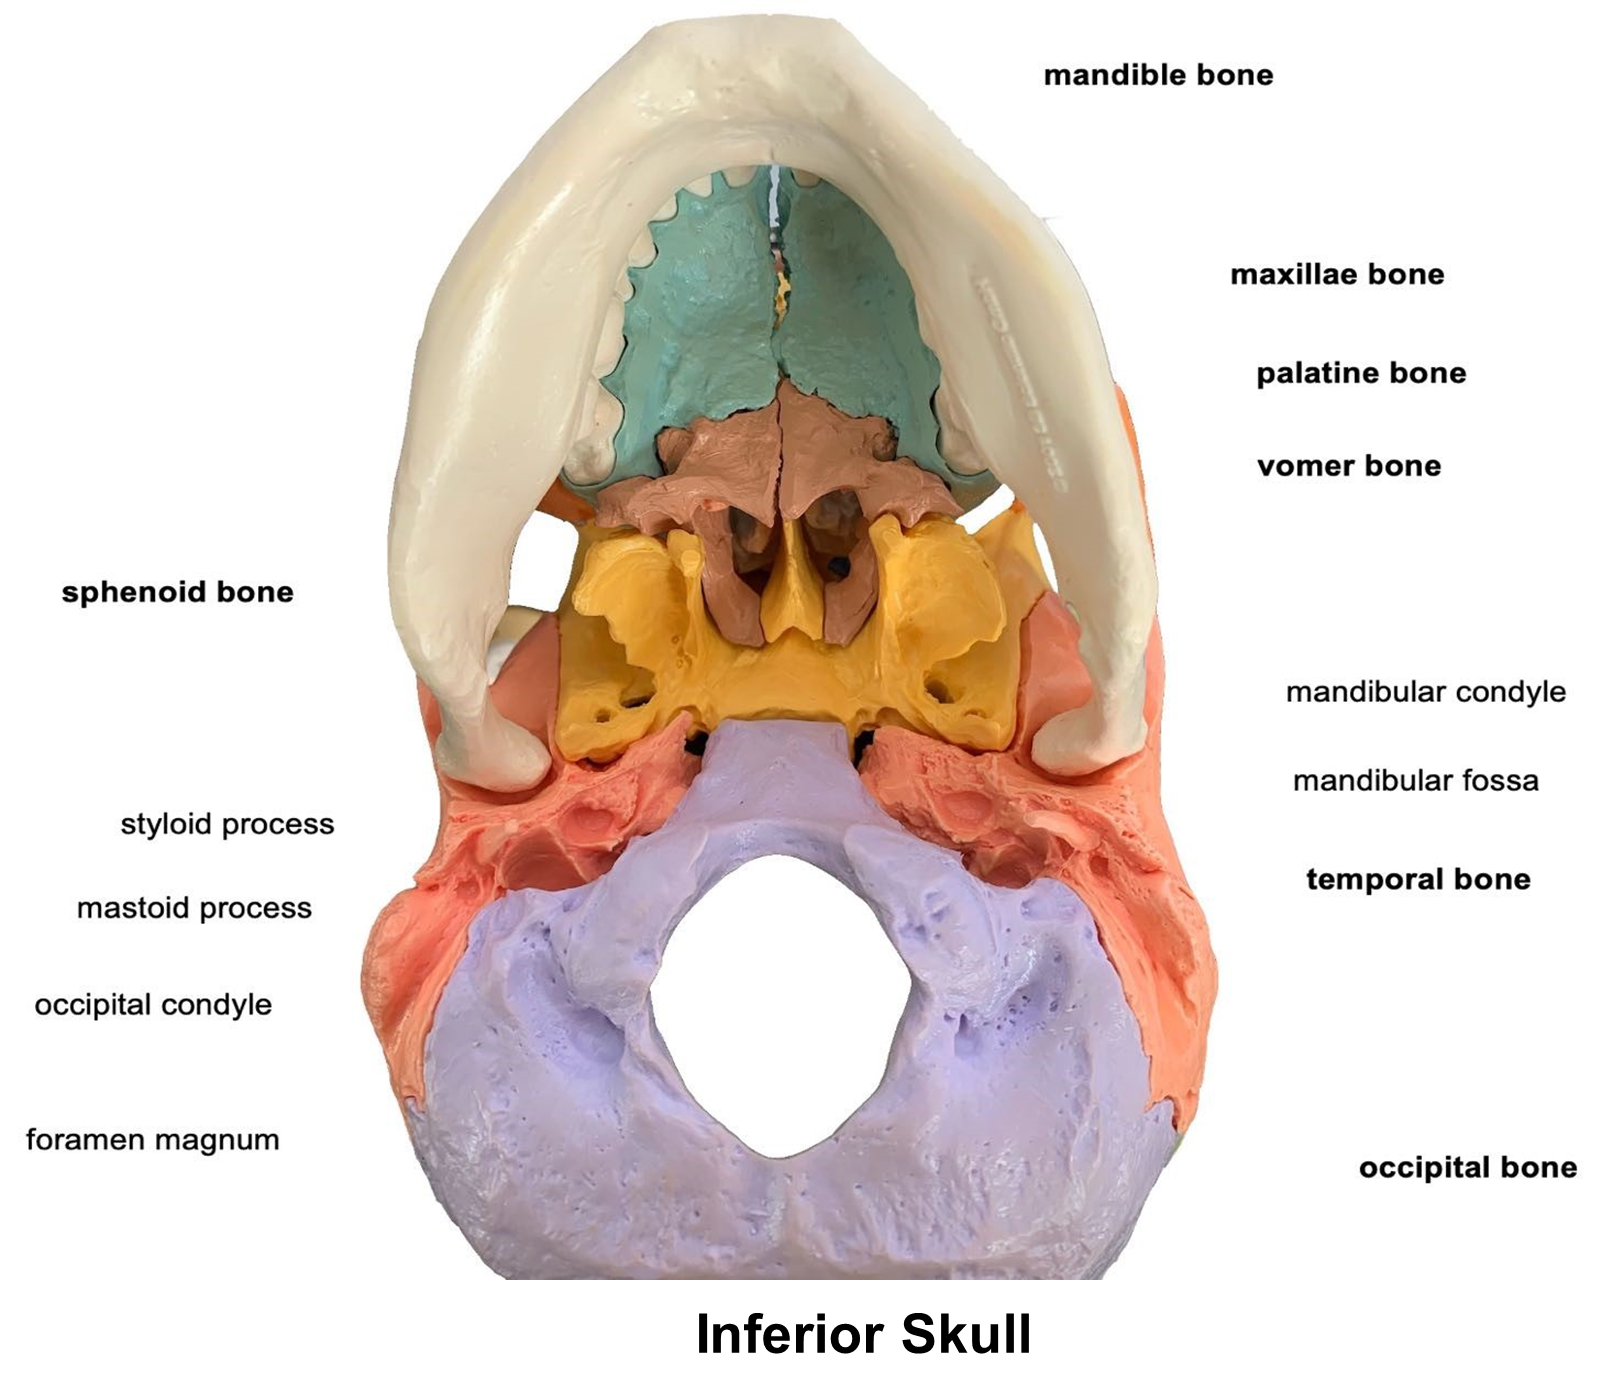
Figure 6: Inferior view of the skull.
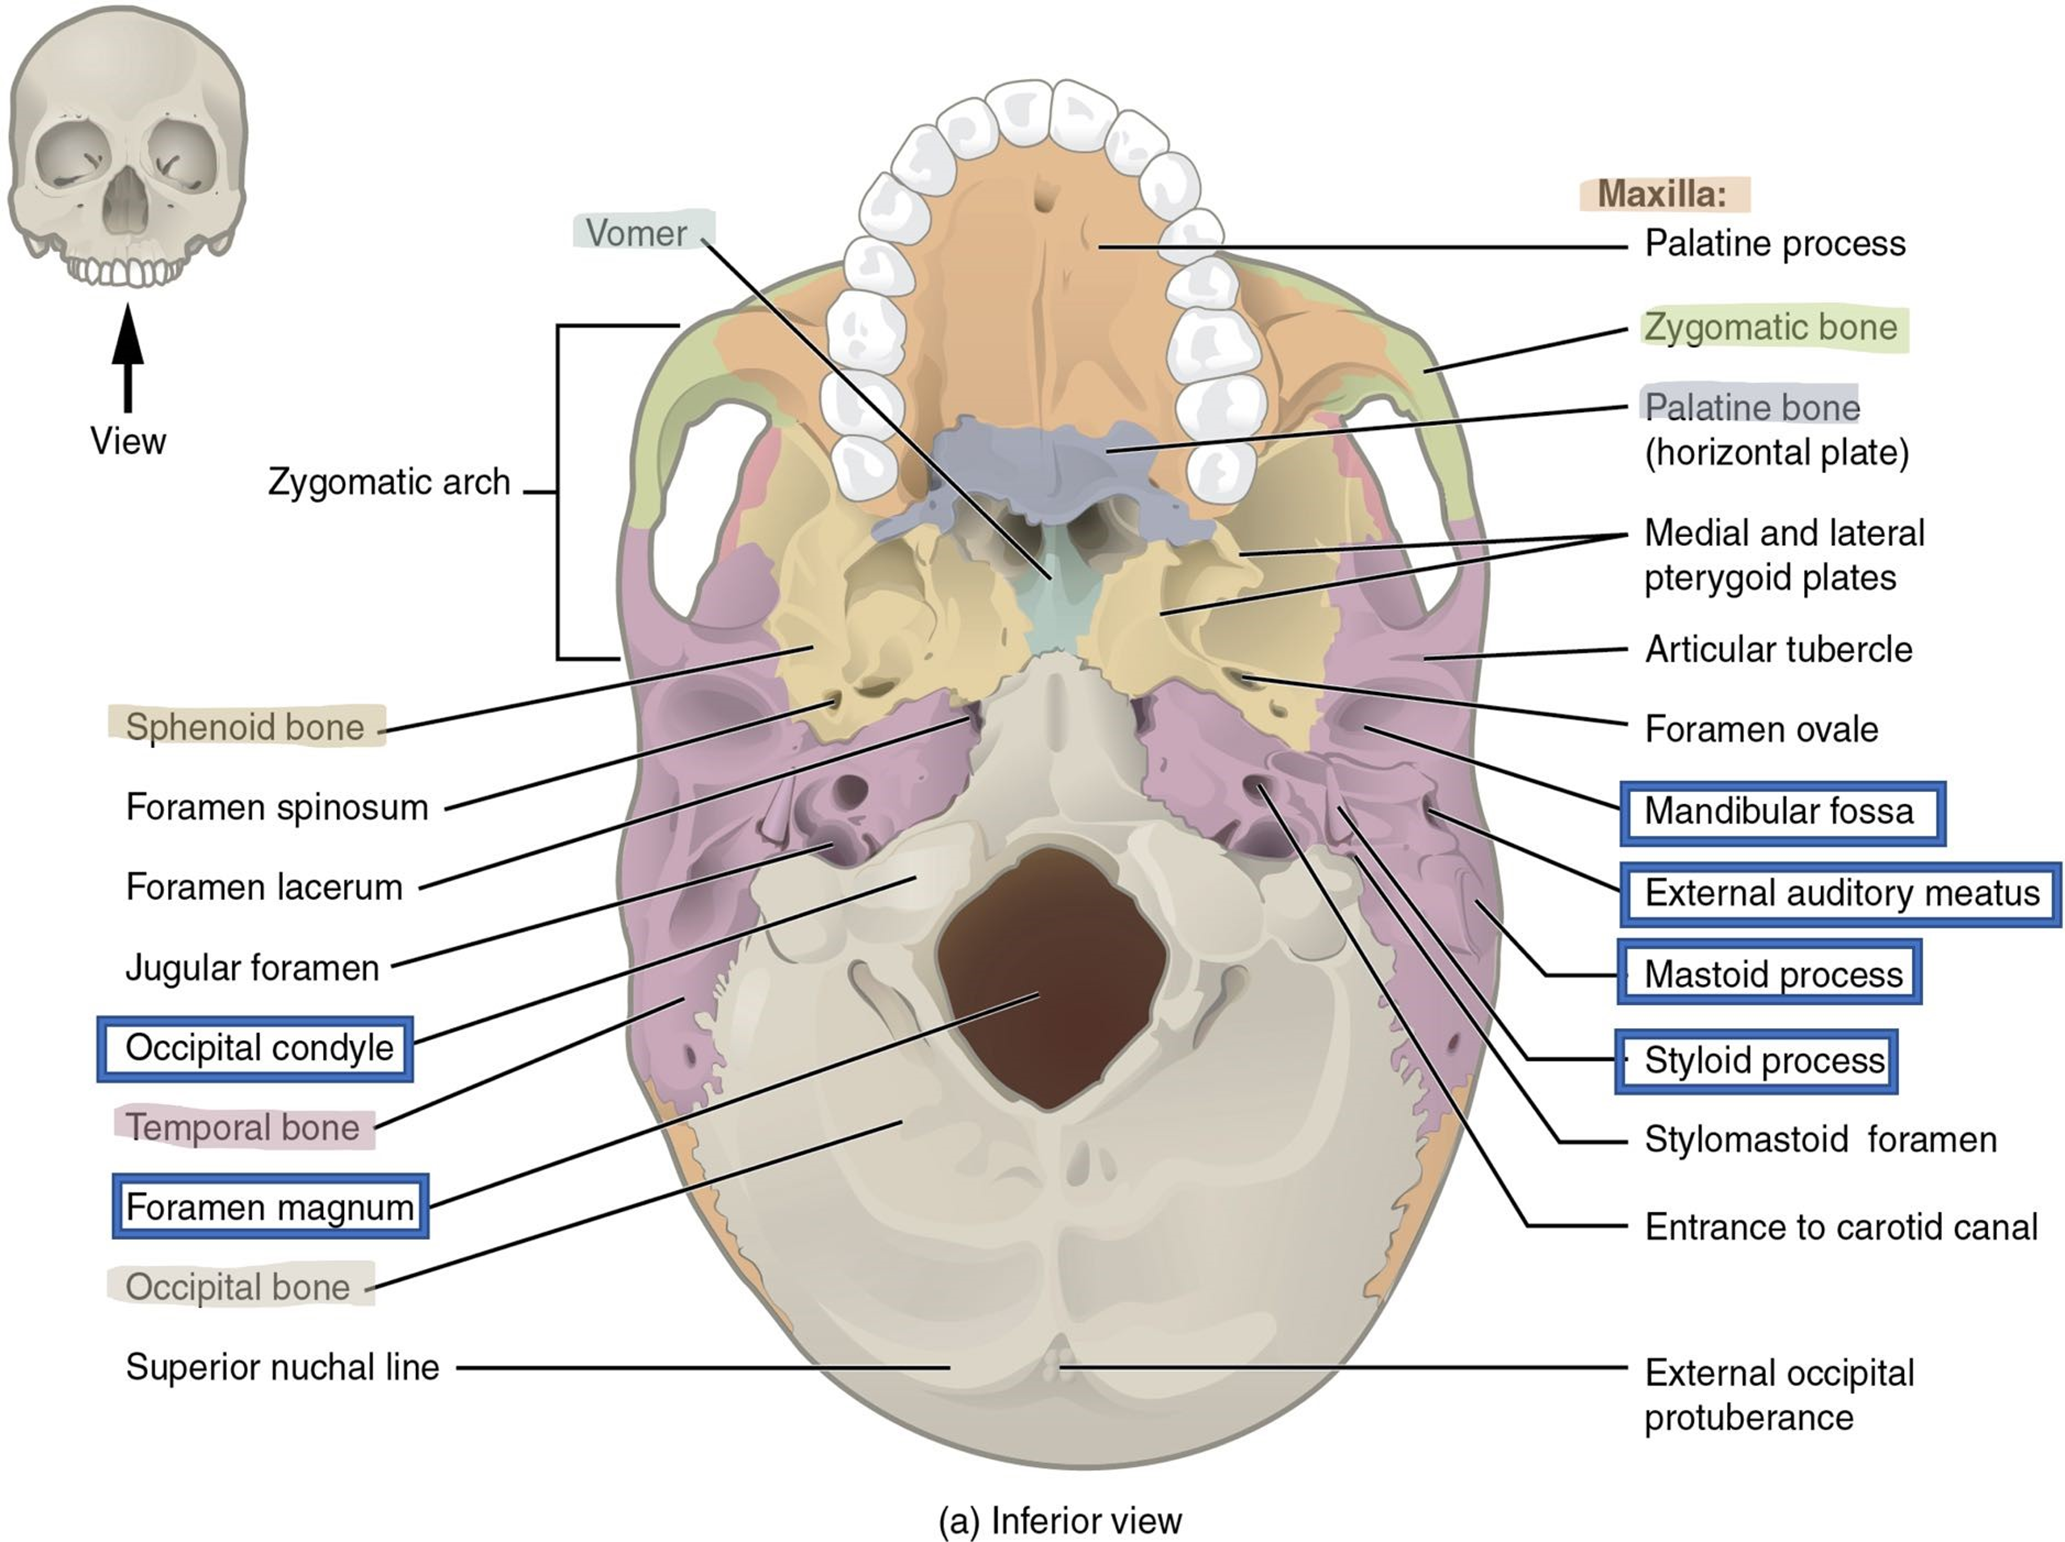
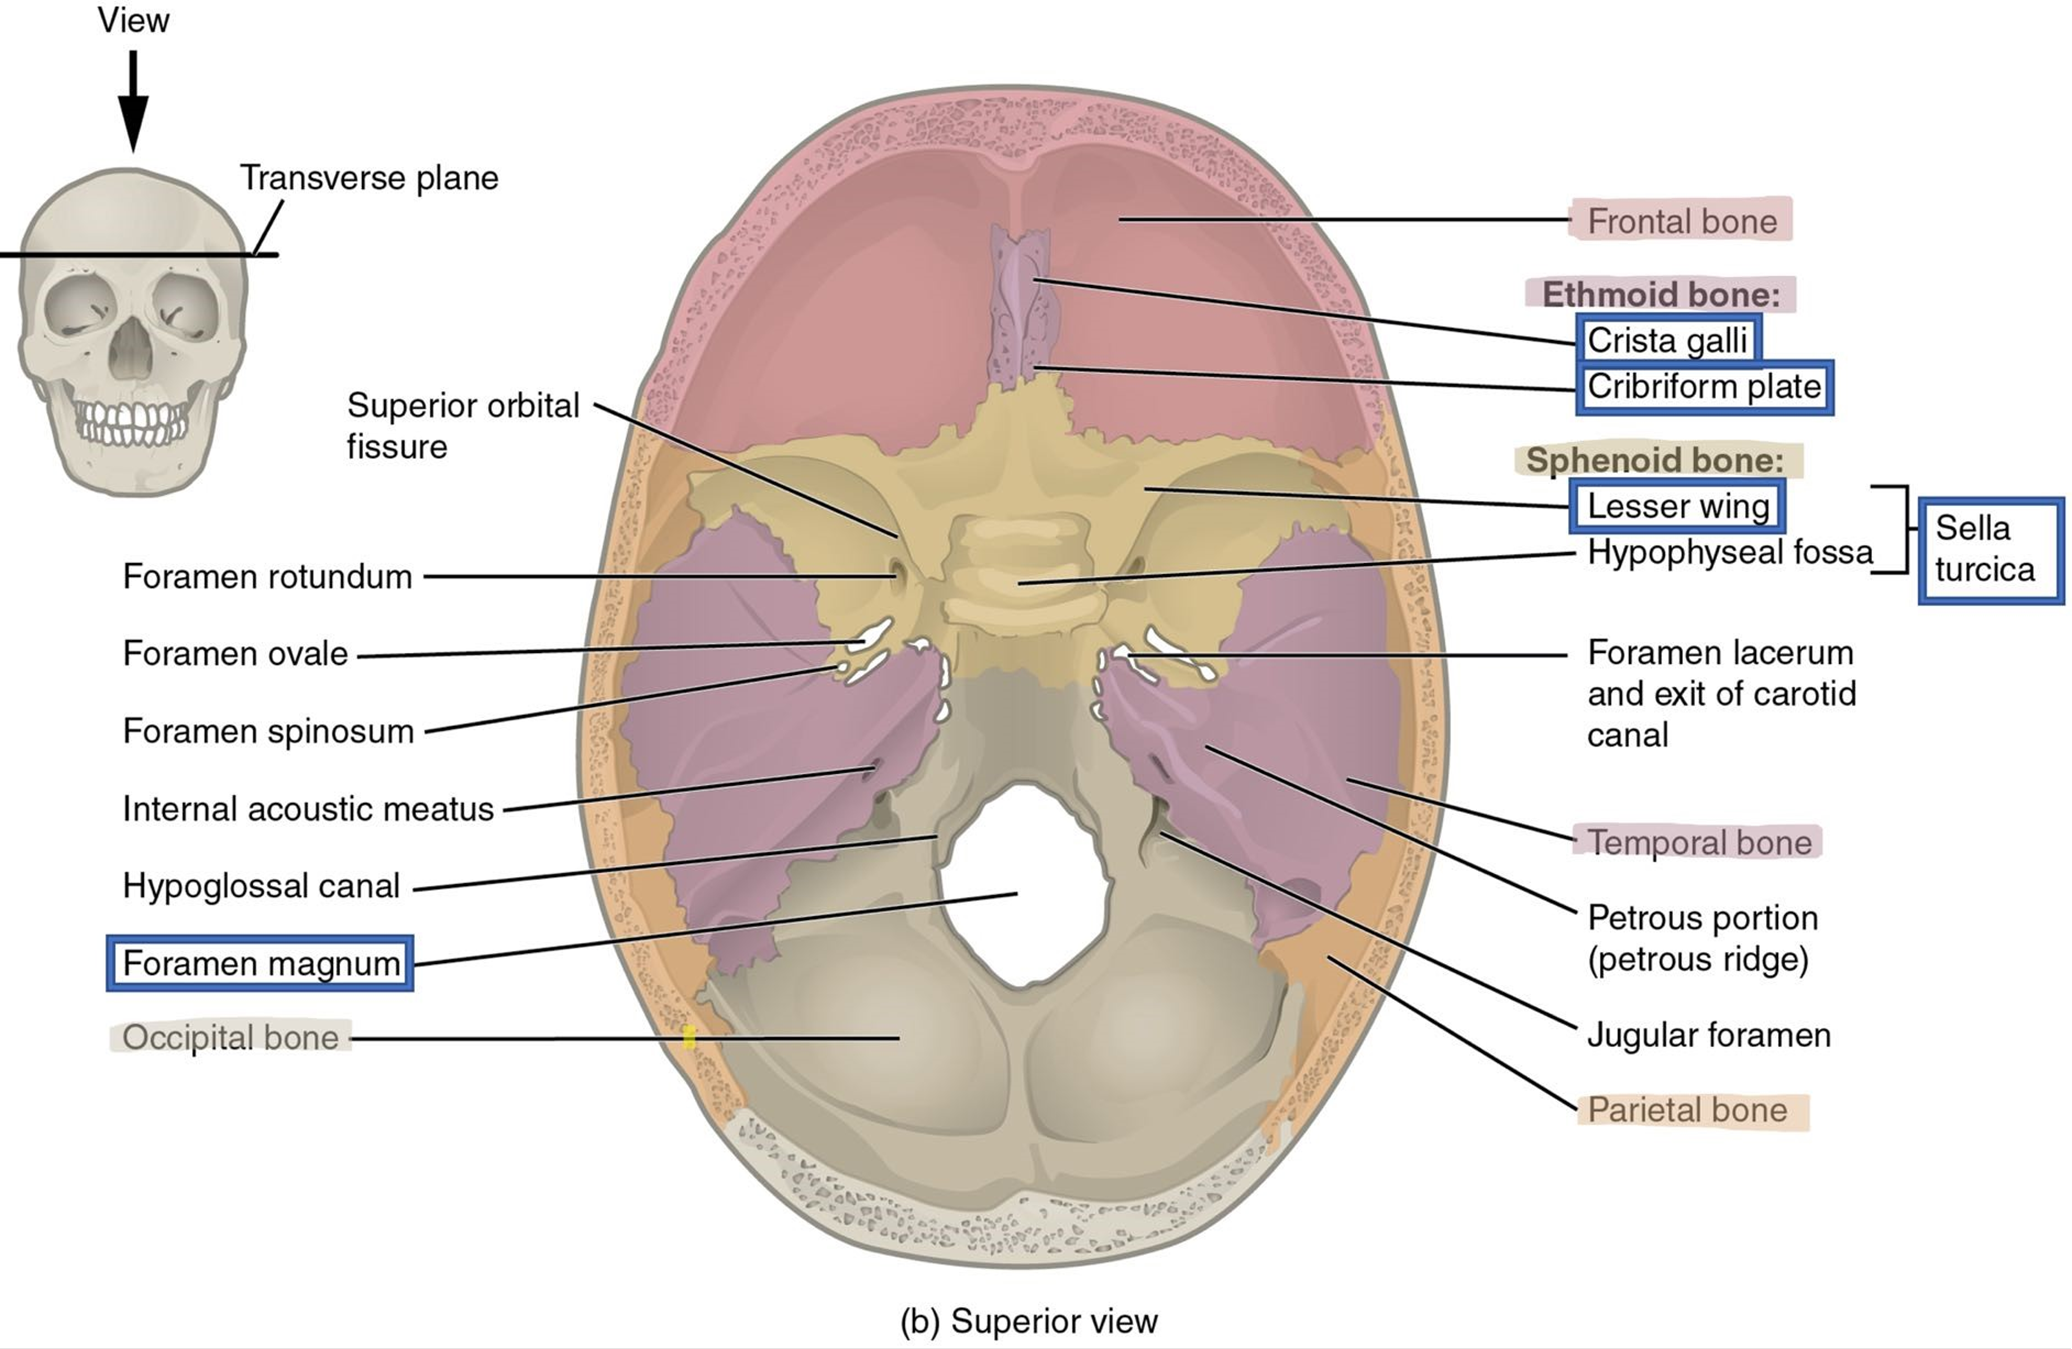
Figure 7: Superior view of the skull through the transverse plane.
Occipital Bone: (Figures 6 and 7).
The occipital bone forms the most posterior part of the cranium and meets both the temporal and parietal bones to form the lambdoid suture (Figure 5). On the base of the skull is a large opening in the occipital bone called the foramen magnum (“big hole”) which allows the spinal cord to exit the skull. On either side of the foramen magnum are two smooth, curved structure ridges called the occipital condyles that articulate with the atlas, the first cervical vertebra, to form the atlanto-occipital joint.
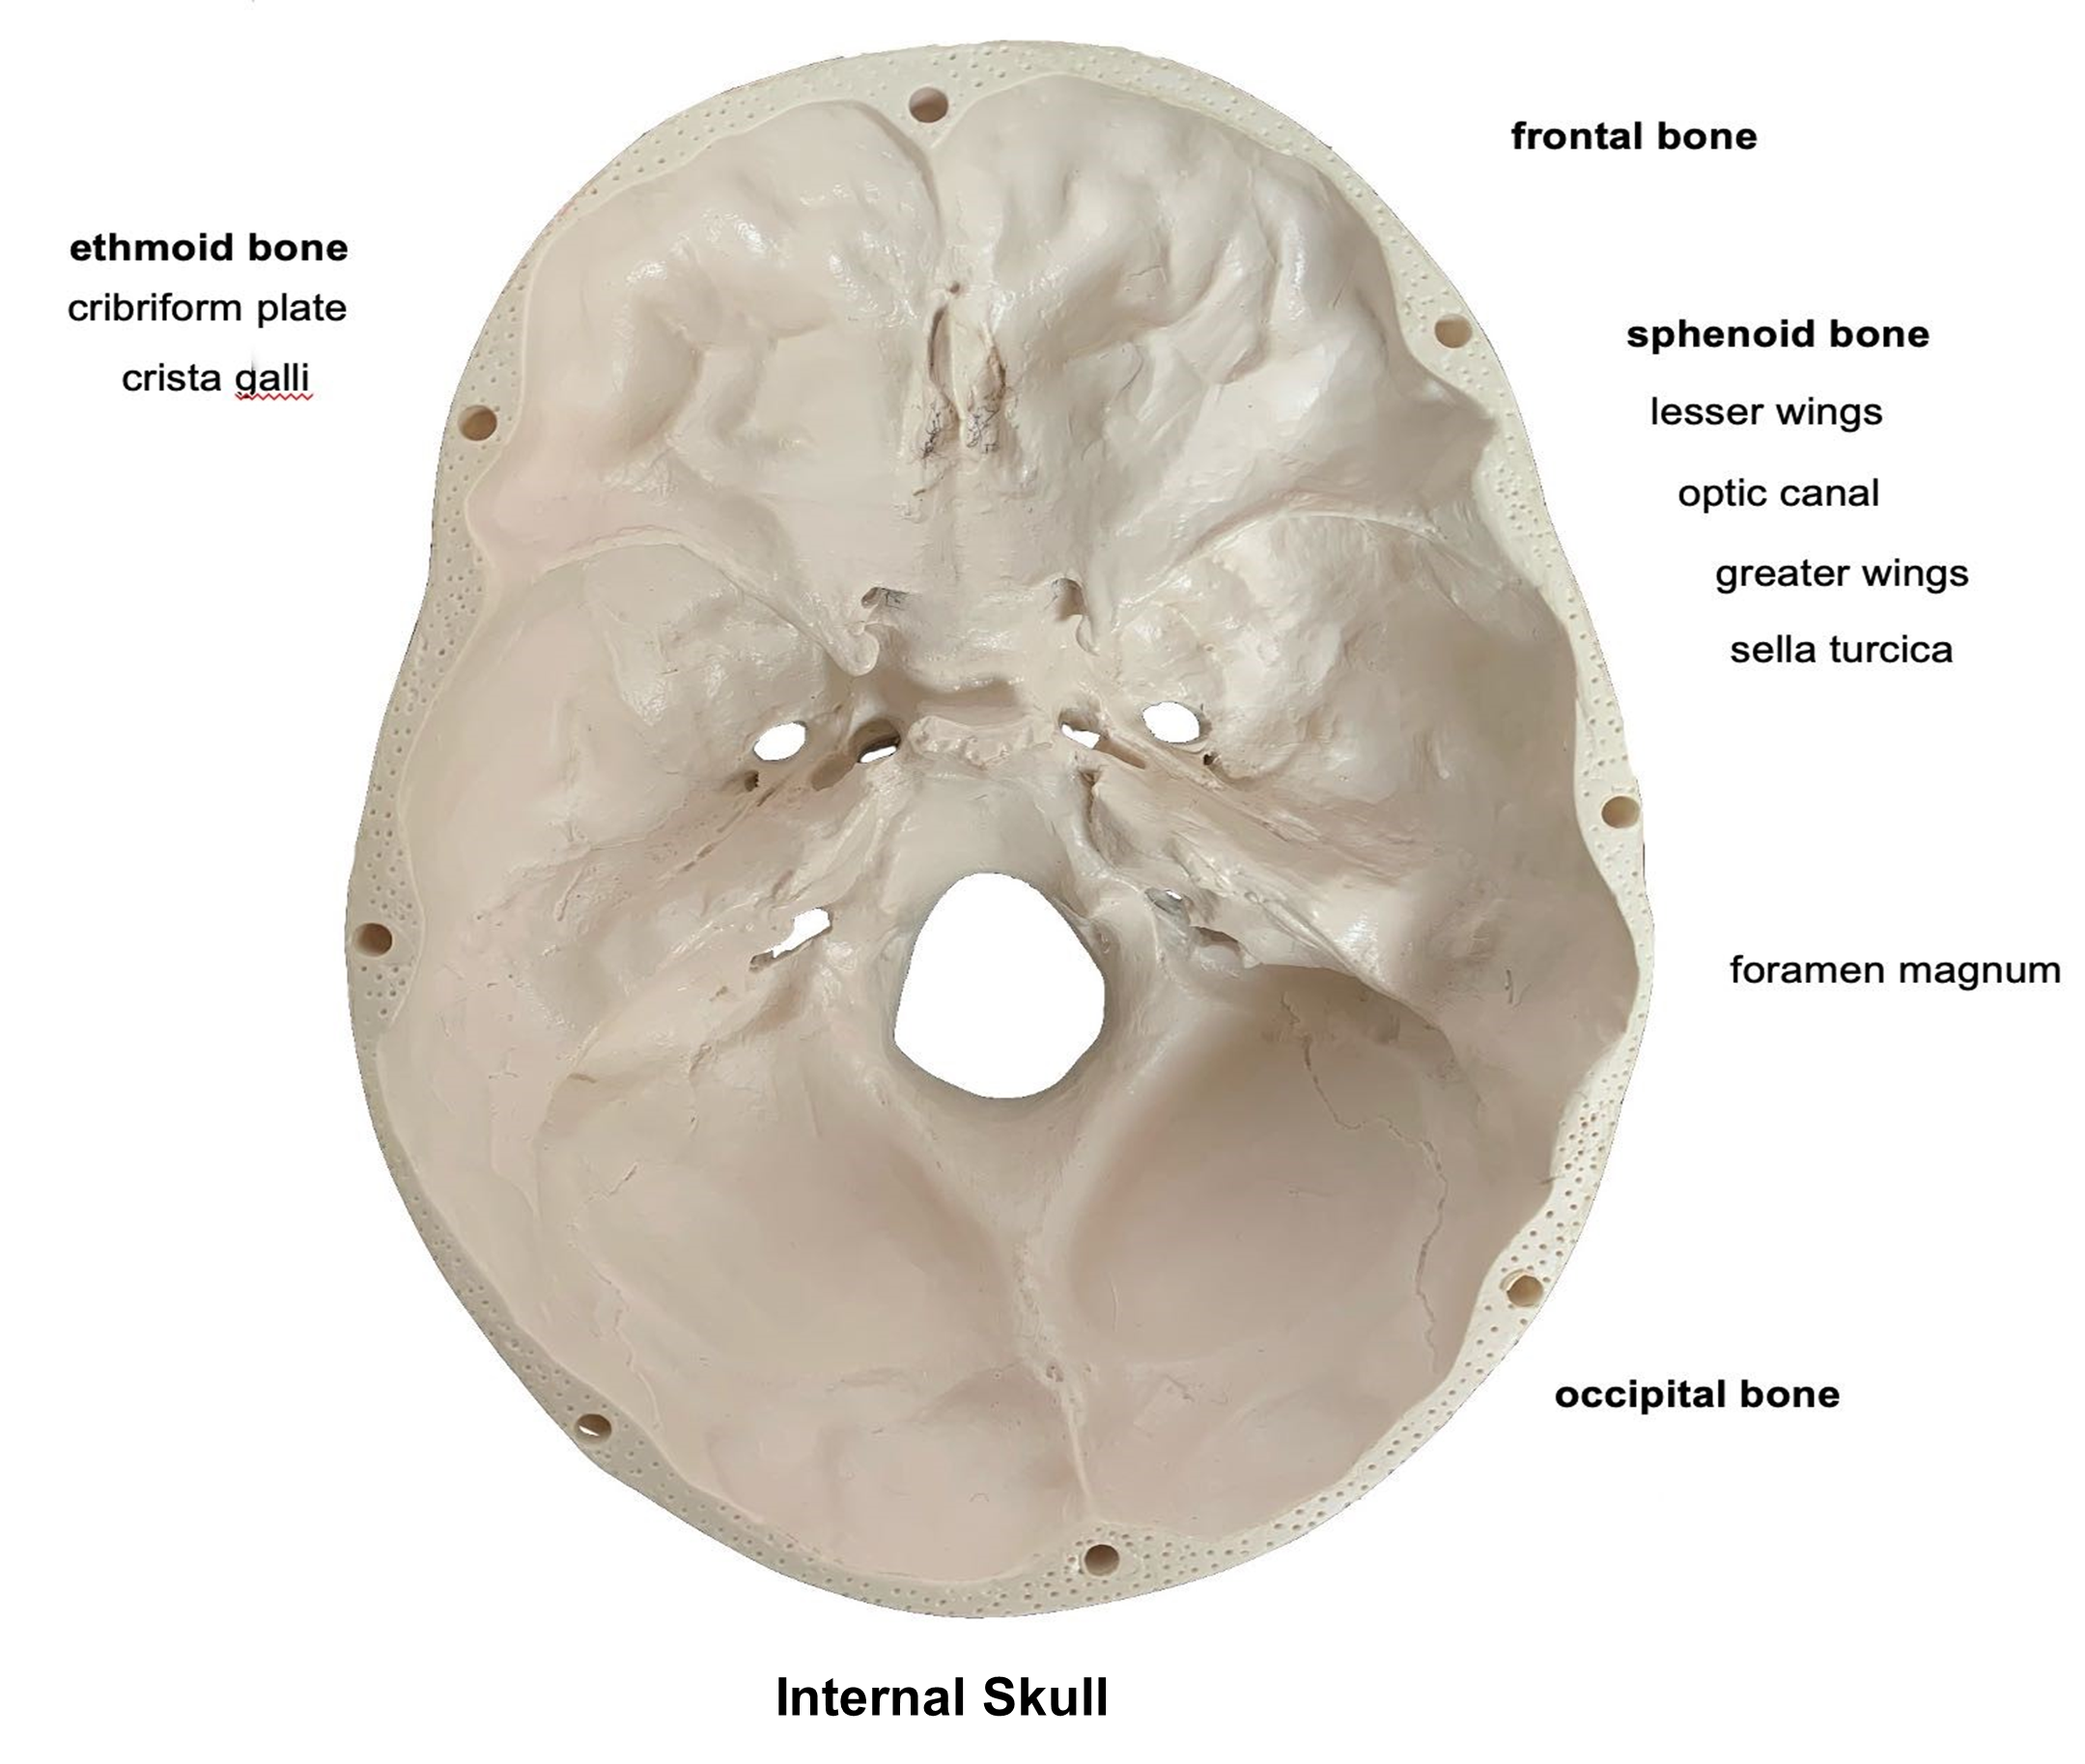
Sphenoid Bone: (Figures 7 and 8)
The sphenoid bone is a single bone that is the “keystone” of the inferior cranial skull. It is shaped like a bat with its wings extended. The bone is best viewed from the superior, interior view (Figure 7). The right and left lesser wings form a prominent ridge anteriorly. The optic canal serves as the passageway for the optic nerve (cranial nerve 2) and can be found at the base of the lesser wings (Figure 8). Just posterior to the lesser wings and optical canal is a rounded depression located medially that resembles a saddle, the sella turcica (literally Turkish saddle). The pituitary gland sits in this depression The greater wings extend laterally right and left from the sella turcica.
Figure 8: Markings of the sphenoid bone.
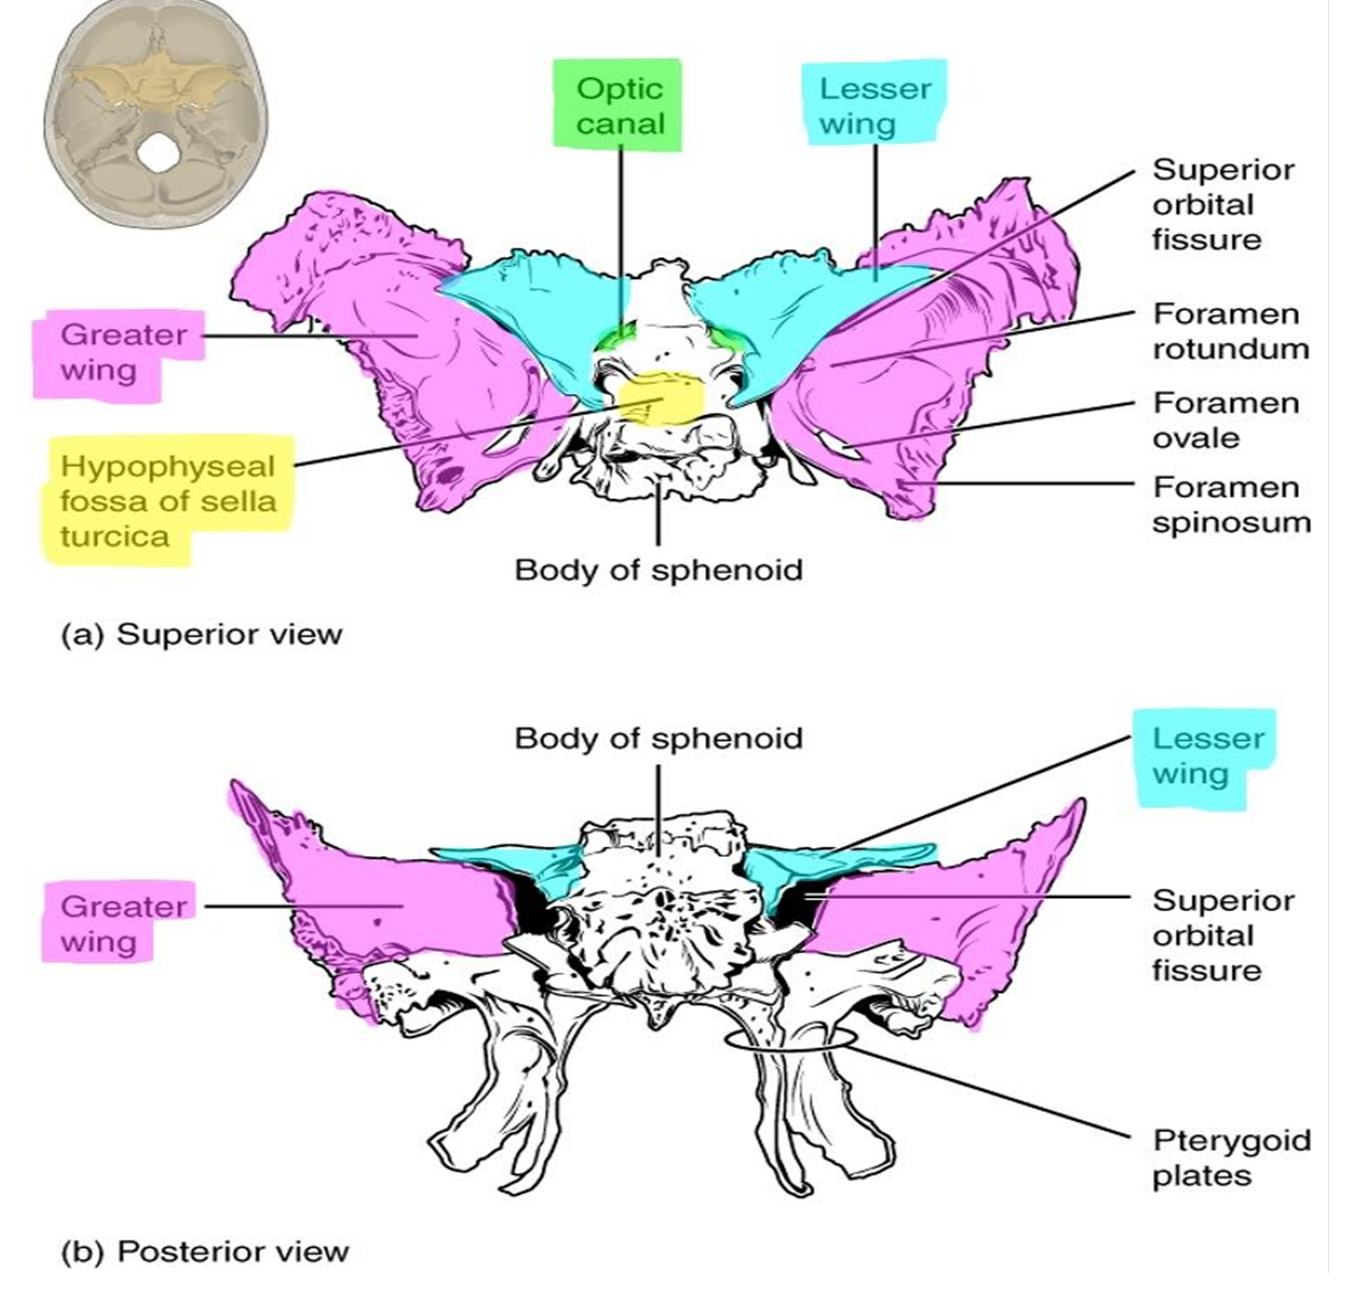
Figure 9: Markings of the ethmoid bone.
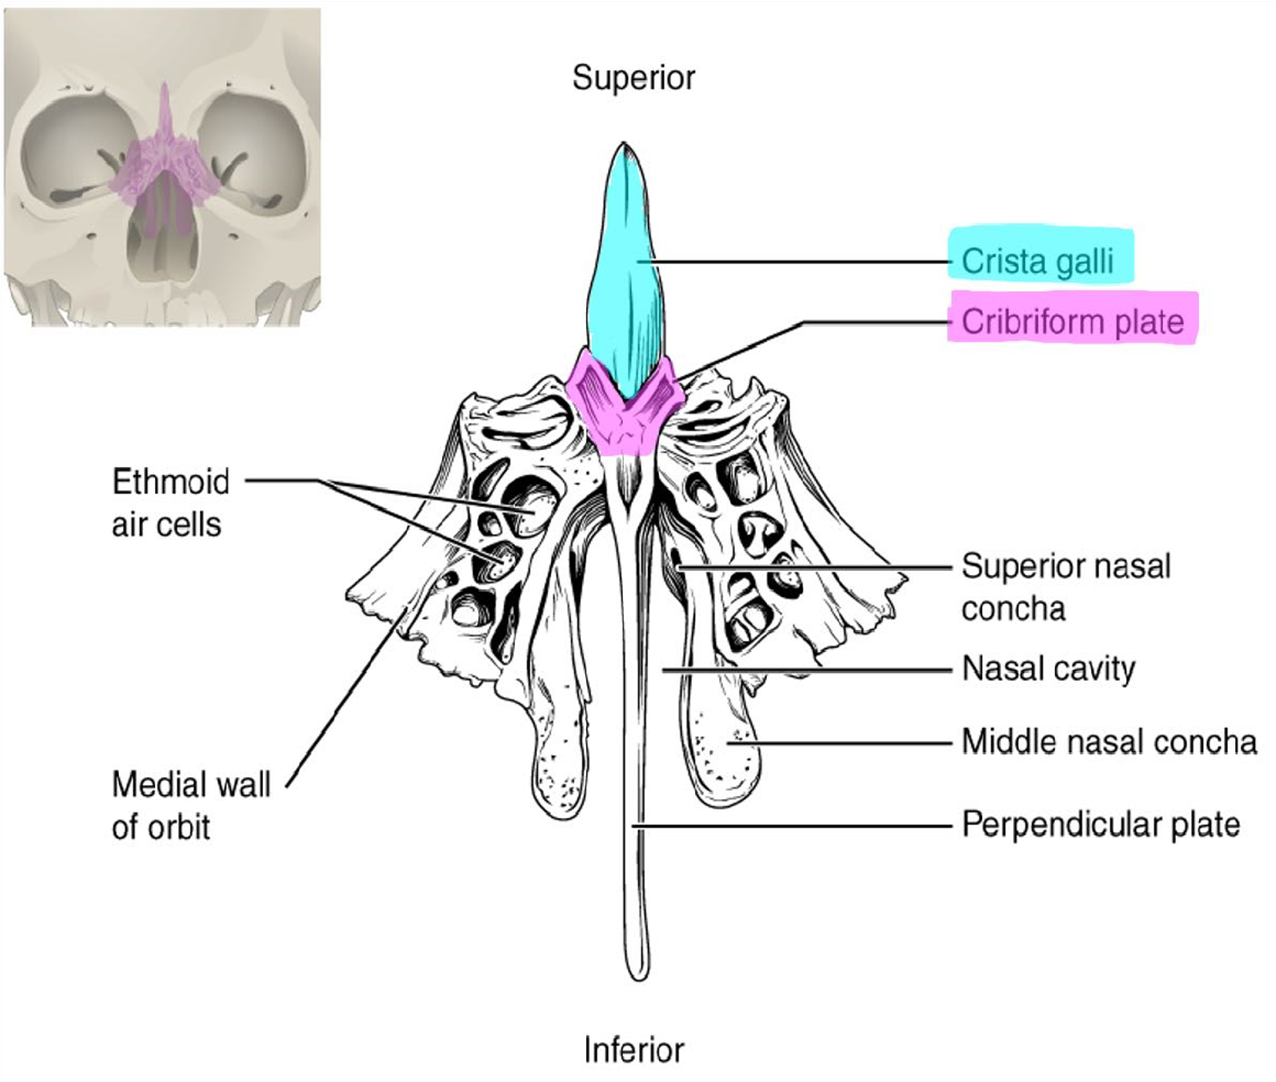
Ethmoid Bone: (Figure 9)
The ethmoid bone is a single bone found on the anterior skull at the midline just posterior to the nasal bones. When viewed from the superior, interior view, the ethmoid bone is located anterior to the sphenoid bone. The cribriform plate forms the roof of the nasal cavity. On either side of the cribriform plate tiny holes can been seen that allow the olfactory nerves to leave the nasal cavity and enter the cranial cavity to the brain. The cribriform plate has a superior projection called the crista galli, which helps anchor the meninges of the brain in the cranial cavity.
Figure 10: Markings of the mandible.
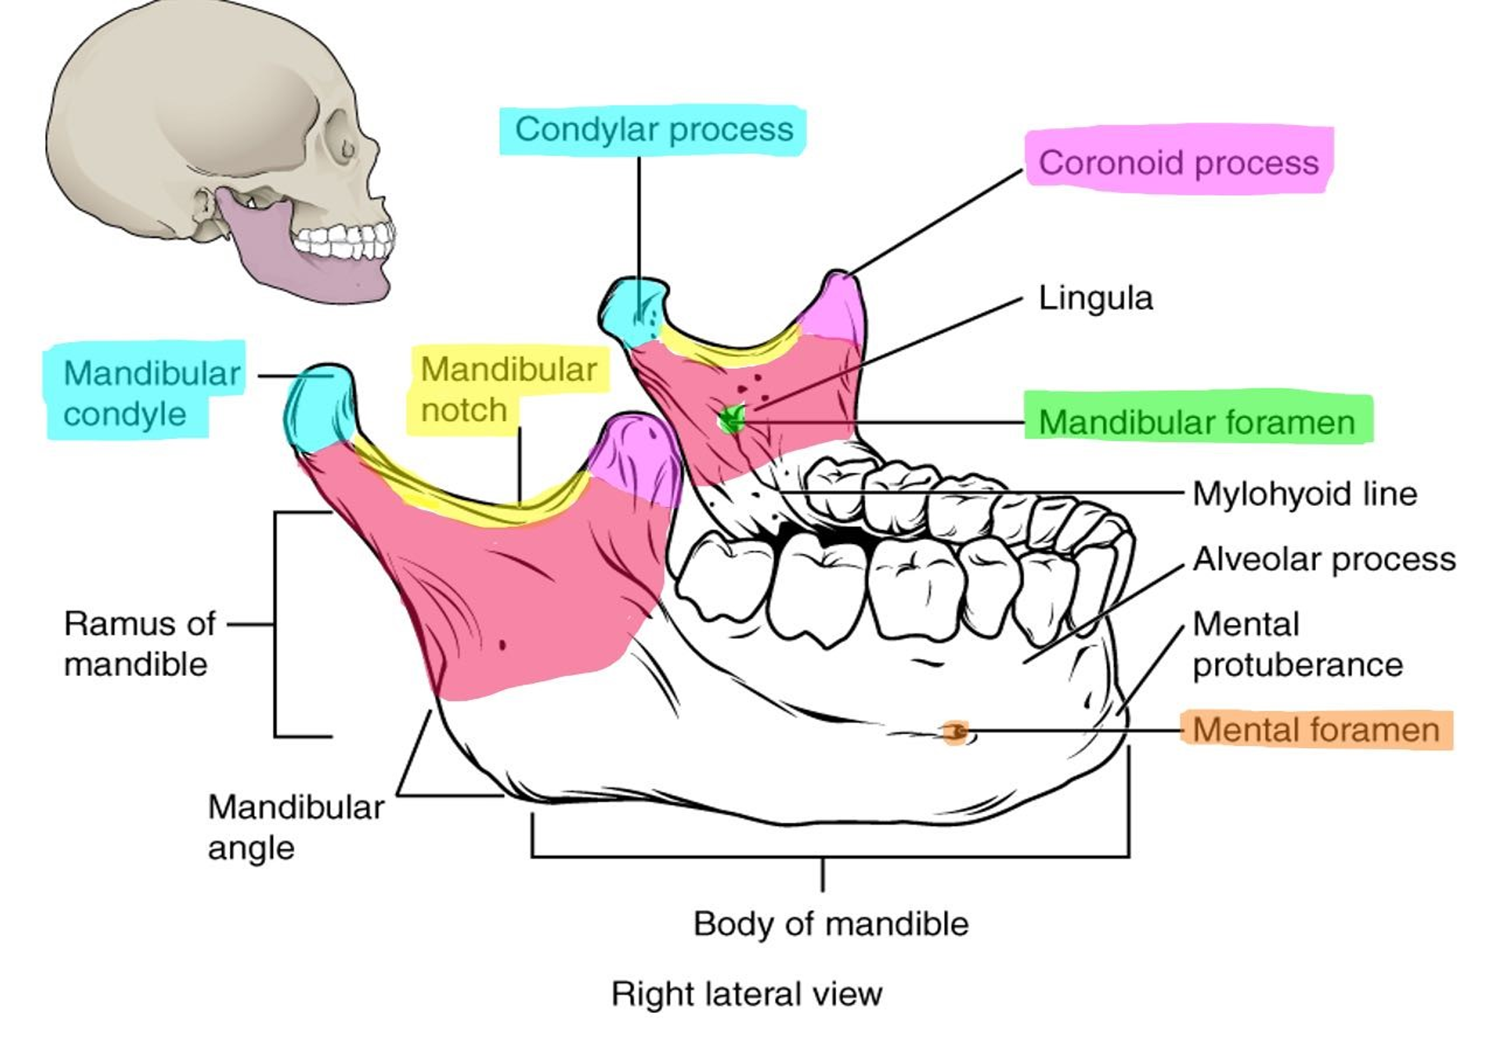
Mandible: (Figure 10)
The mandible is a single bone that forms the inferior jaw and is the only moveable bone in the adult skull. The mandible is located horizontally, except for a vertical upturn on the posterior surface called the ramus. The superior part of the ramus has two bony projections separated by the mandibular notch. The anterior projection is called the coronoid process and the more rounded posterior process is called the mandibular condyle. The mandibular condyle fits into the mandibular fossa of the temporal bone to form the temporomandibular joint (TMJ). Just inferior to the mandibular notch on the lingual side of the mandible is the mandibular foramen. The mental foramen is found on the lateral body of the mandible.
Figure 11: Lateral view of the skull through the midsagittal plane.
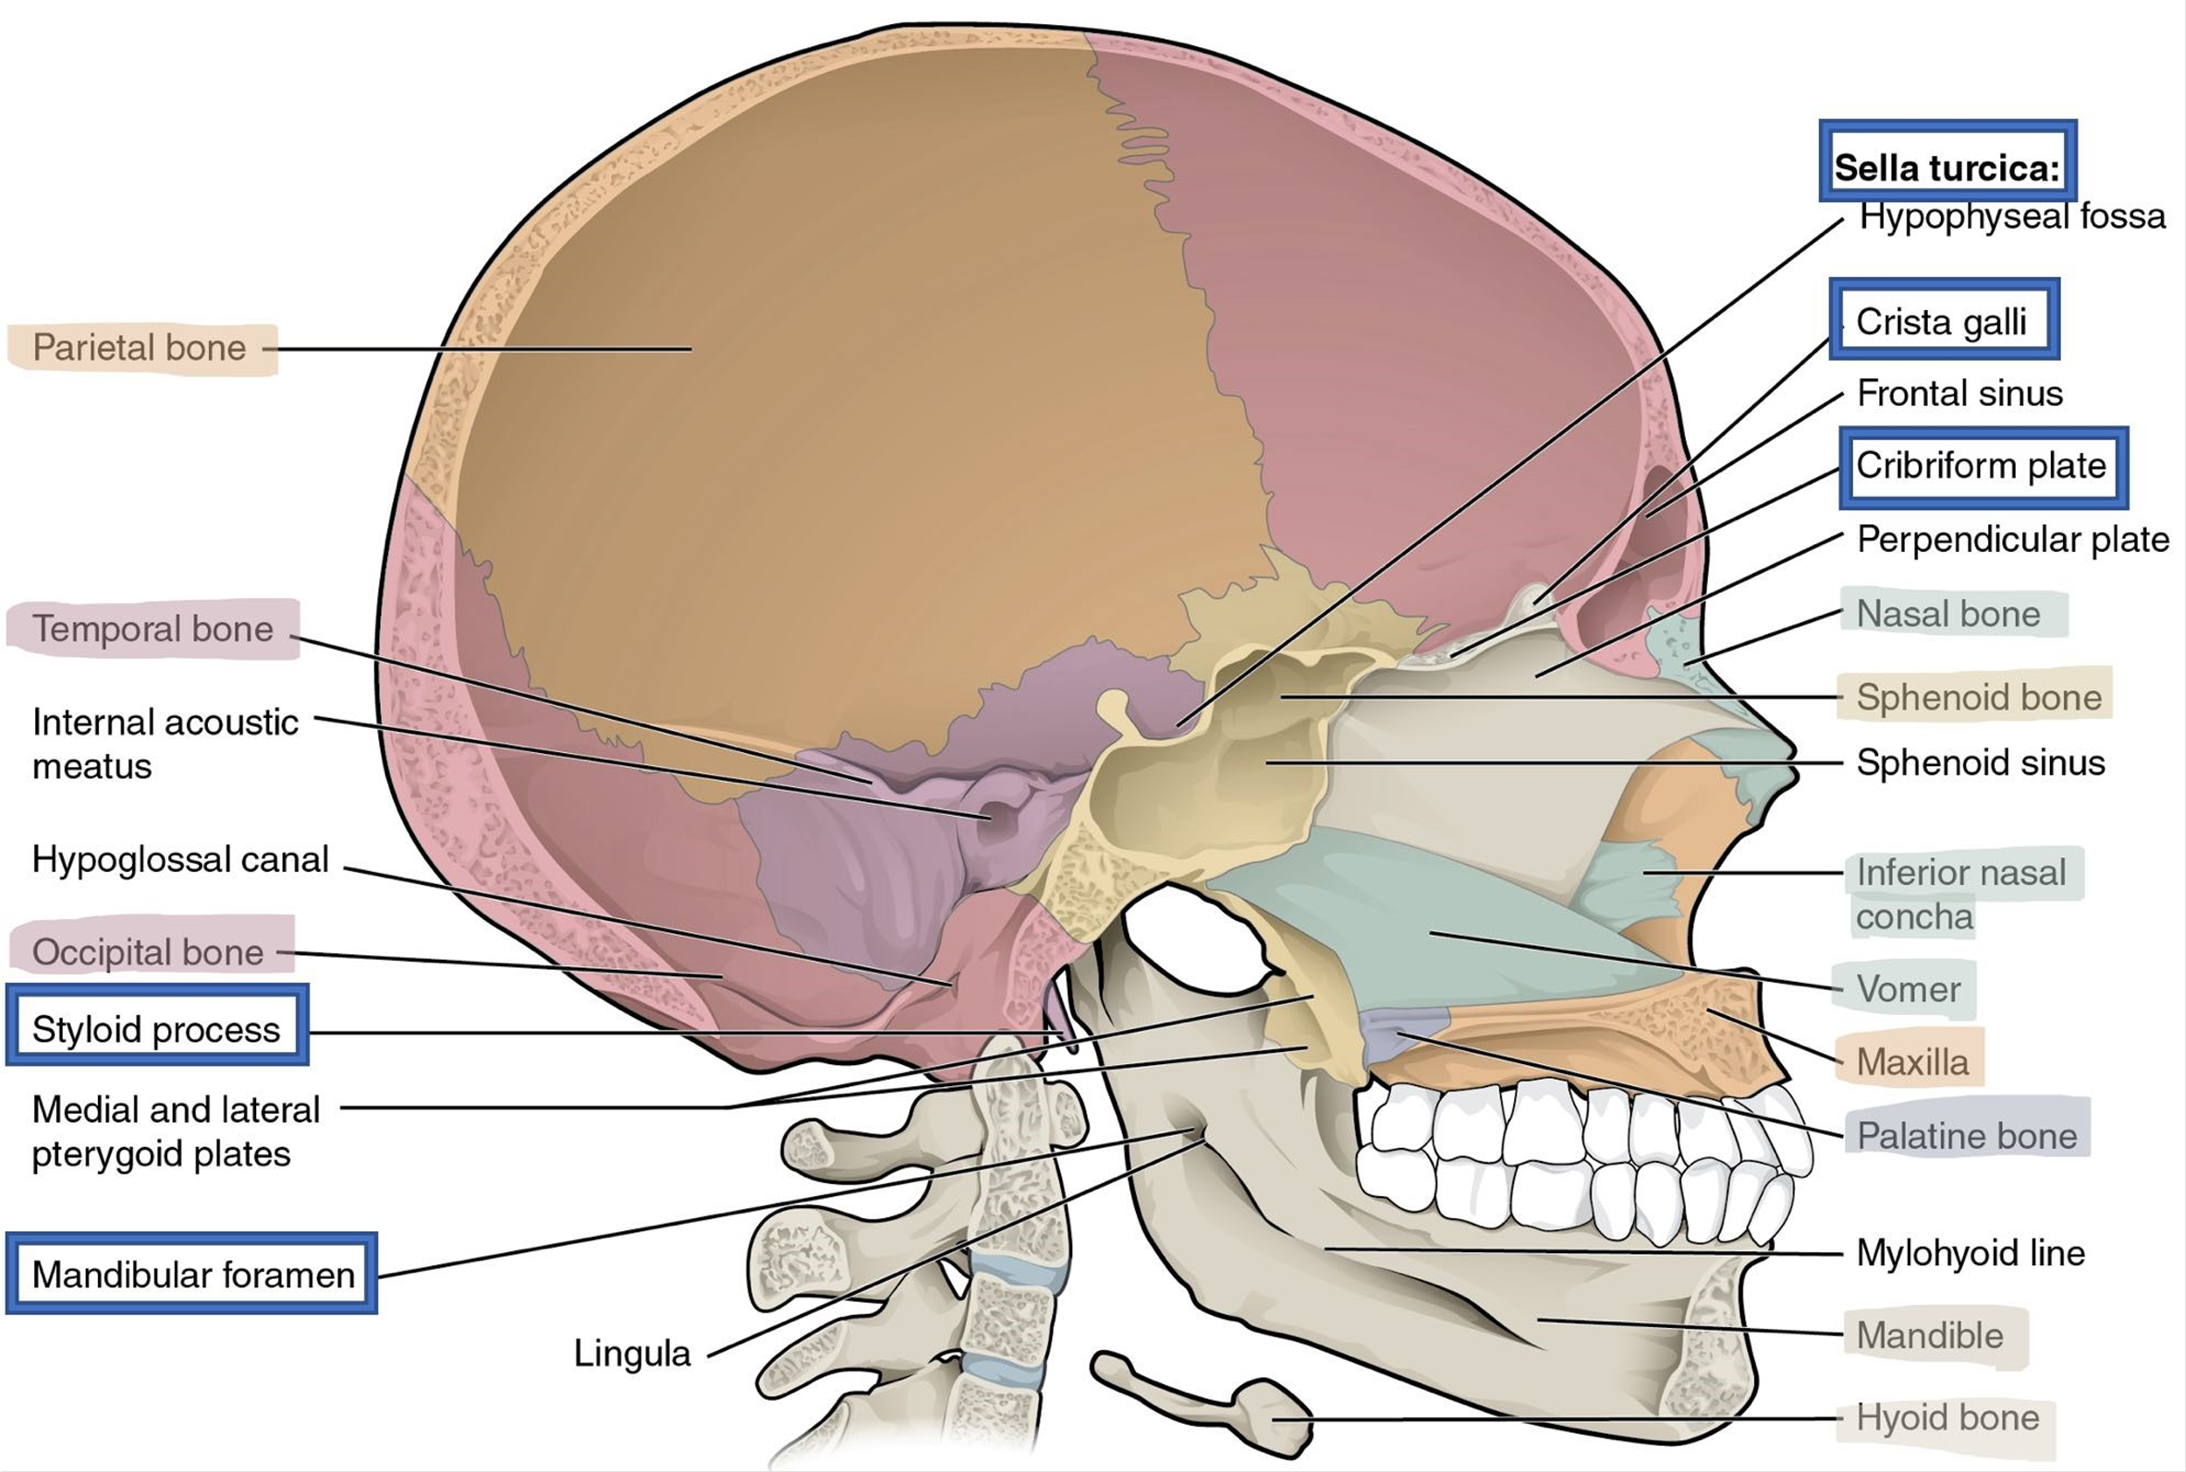
Maxillae: (Figure 11)
The pair of maxillae form the upper jaw inferiorly and lower orbit superiorly. It also forms a wall of the nasal cavity.
Palatine: (Figure 11)
The hard palate of the oral cavity is formed by a pair of L-shaped palatine bones. They can be found in the posterior nasal cavity between the maxilla and sphenoid bone.
Nasal: (Figure 11)
The two nasal bones form the anterior bridge of the nose. They articulate with hyaline cartilage that is the framework for the nose.
Vomer: (Figure 11)
The thin, flat vomer is a single bone that forms the inferior portion of the bony nasal septum.
Lacrimal: (Figure 3)
The pair of lacrimal bones are small bones that can be found in the medial part of the orbit. They are named for the lacrimal fossa which allows tears to drain.
Figure 12: Medial view of the skull showing the inferior nasal conchae.
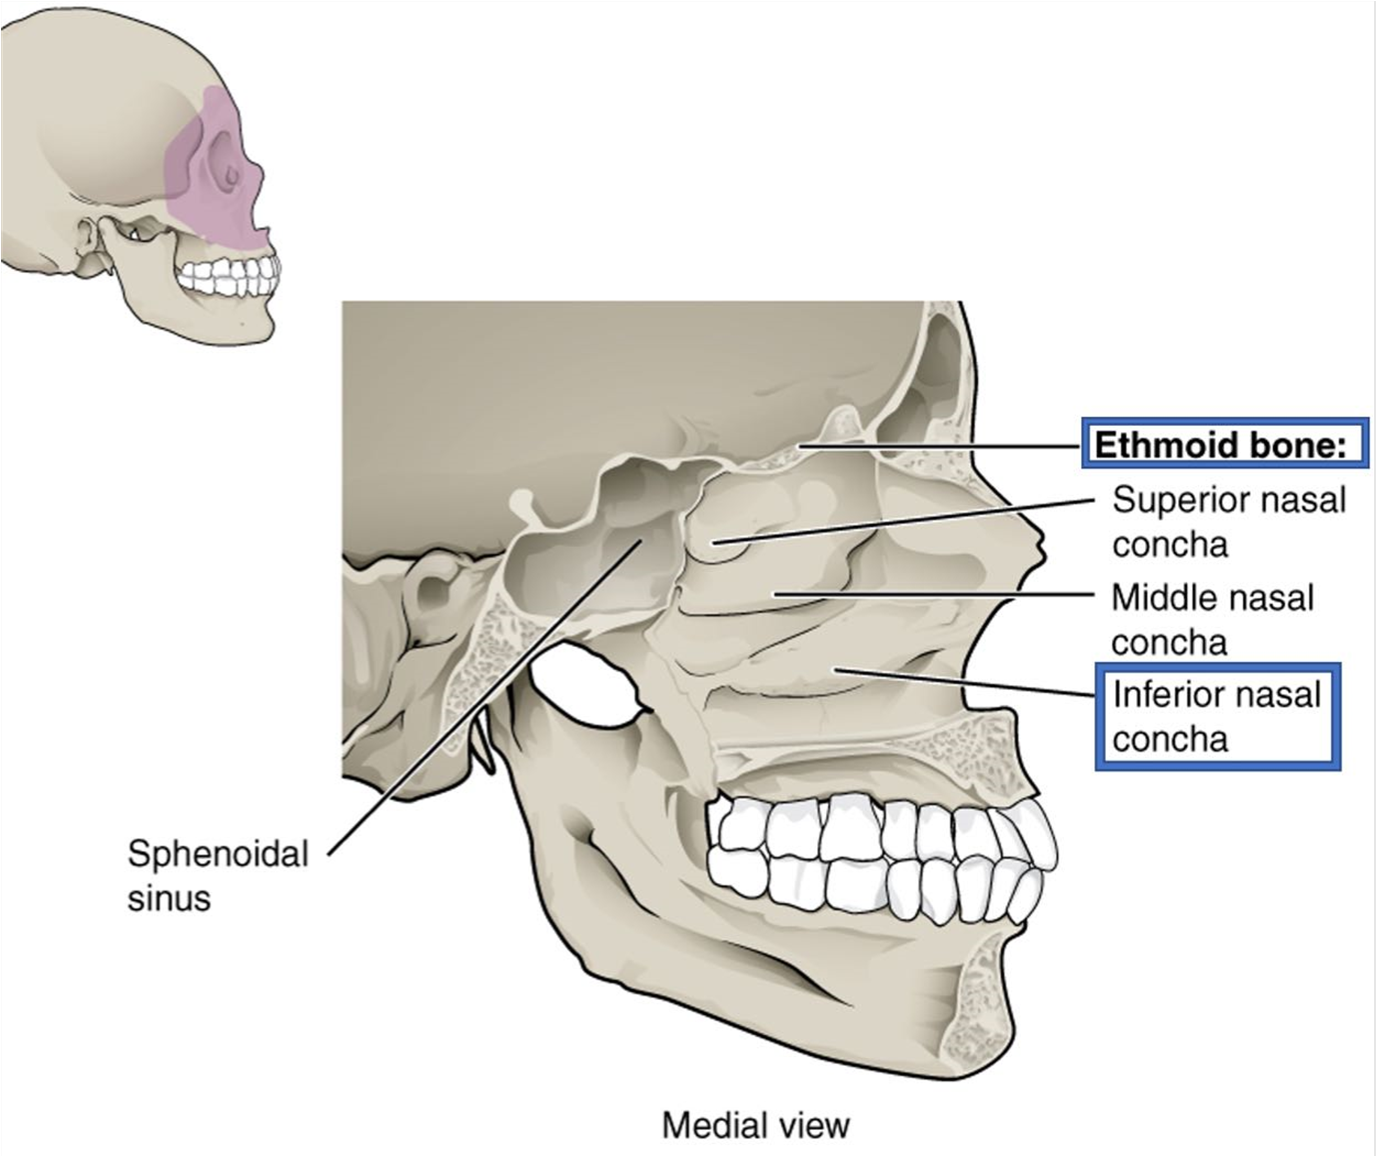
Inferior Nasal Conchae: (Figure 12)
The two inferior nasal conchae are located in the lateral walls of the nasal cavity. They can be seen inferior to the middle nasal conchae of the ethmoid bone.
Zygomatic Bone: (Figures 2 and 3)
The two zygomatic bones articulate with the zygomatic process of the temporal bone via the temporal process to form the zygomatic arch, commonly called the cheek bone.
Figure 13: Superior (left) and lateral (right) views of the fetal skull.
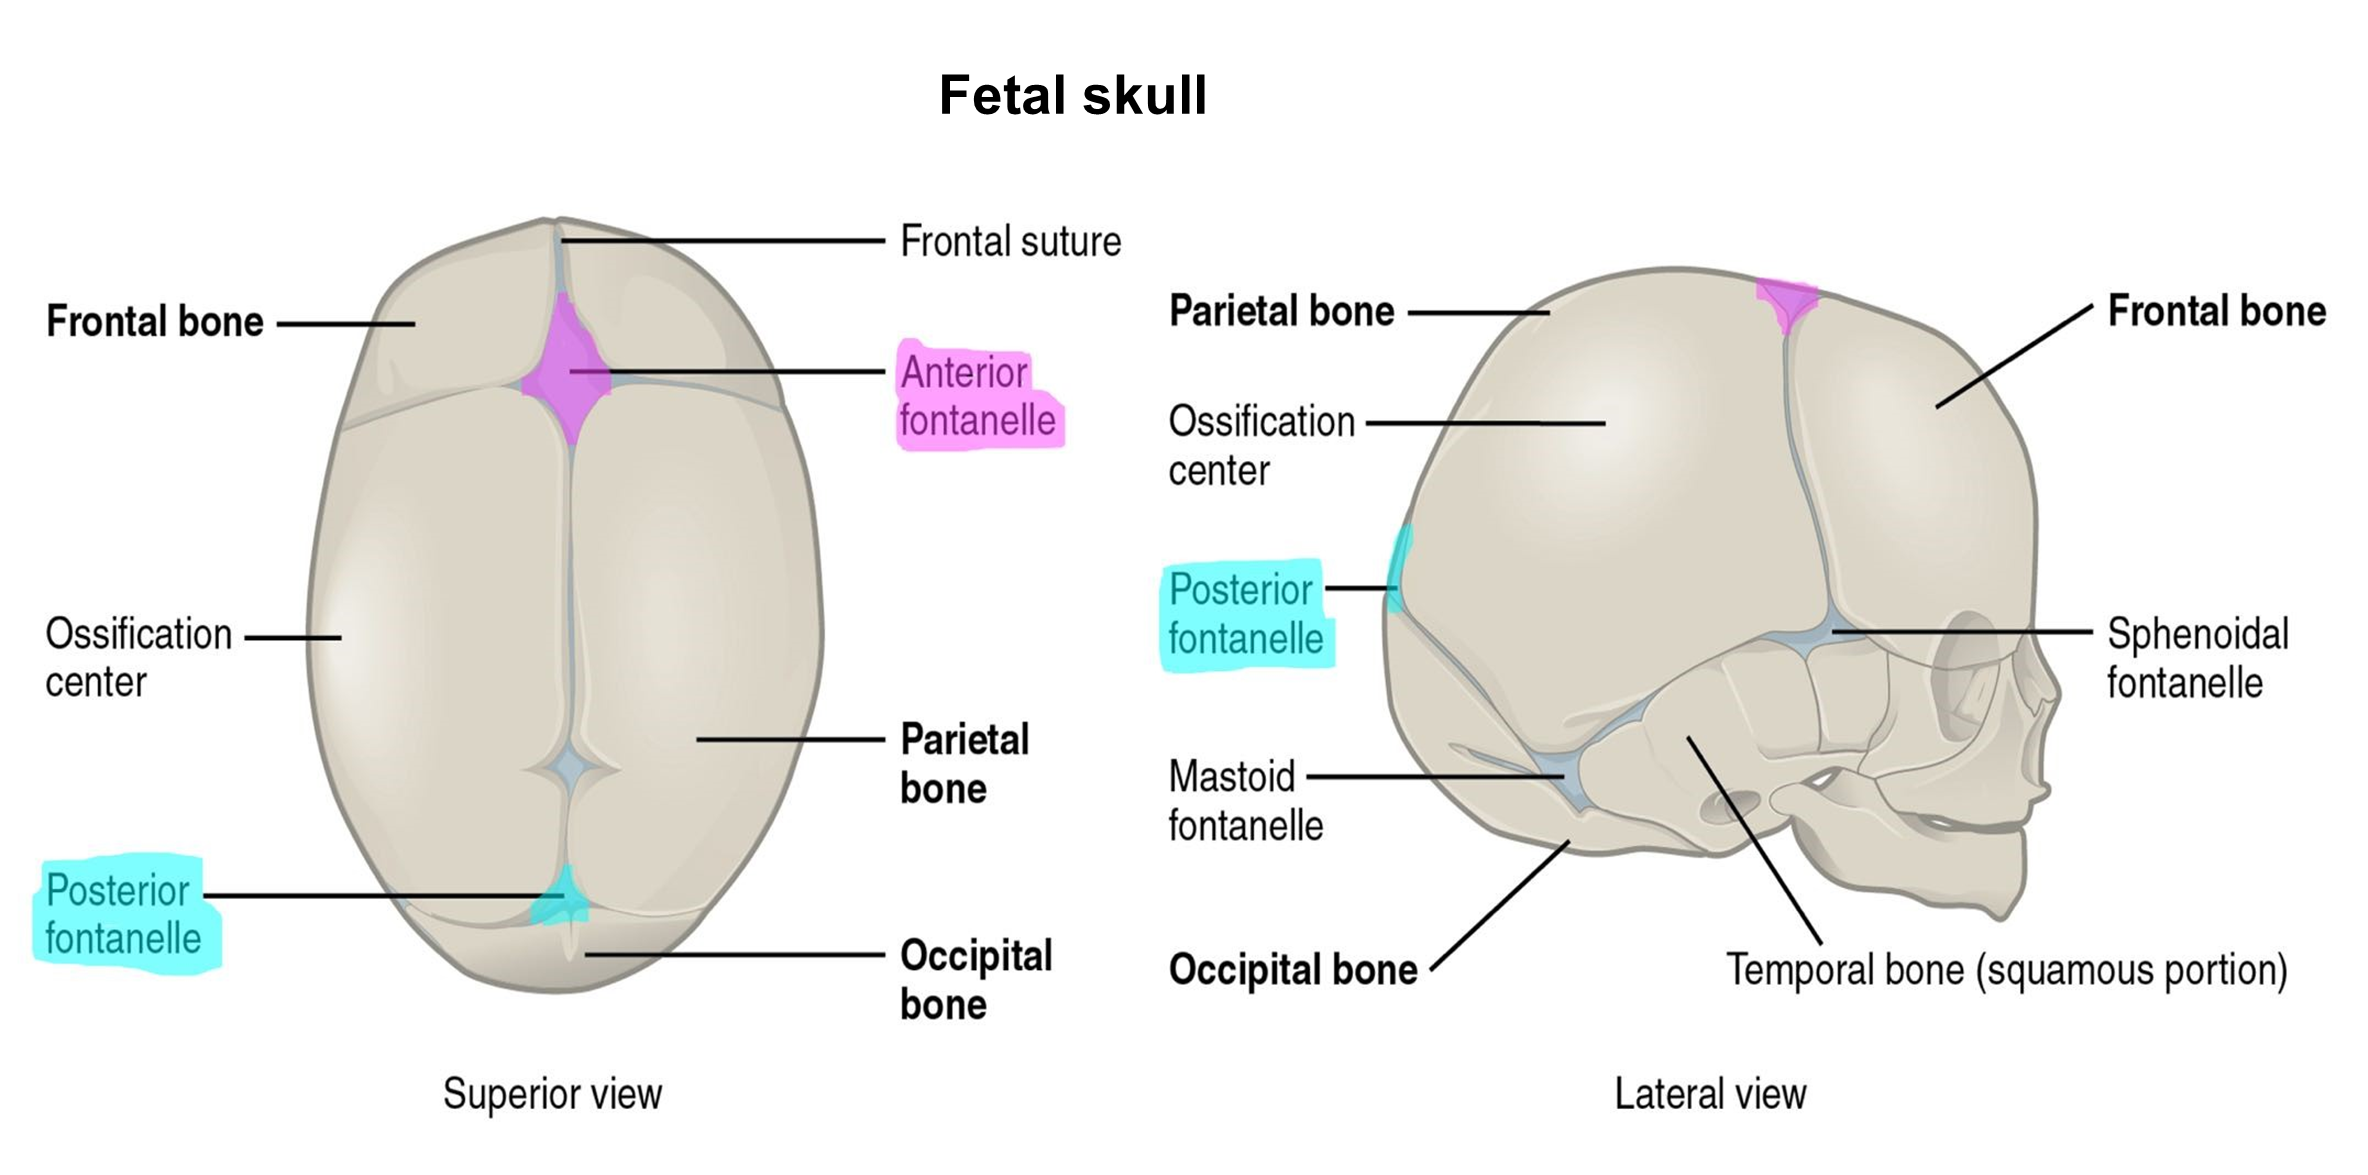
Until the age of 18-24 months, infants and young children have “soft” spots in their skull, called fontanels (Figure 13). These are areas where the cranial bones have not yet ossified. Instead, there are regions of fibrous connective tissue that, while tough, are relatively soft. These fontanels are places where intramembranous ossification has not been completed. They are found between the major bones of the skull. The fontanels allow the skull to flex enough to pass through the pelvic canal during birth. The fontanels also allow the cranial cavity to expand as the brain grows and develops. The largest fontanel is the anterior fontanel, found between the frontal and parietal bones where the coronal and sagittal sutures meet. The posterior fontanel is between the parietal and occipital bones where the sagittal and lambdoid sutures meet.
Figure 14: Anterior view of head and neck showing the position of the hyoid bone.
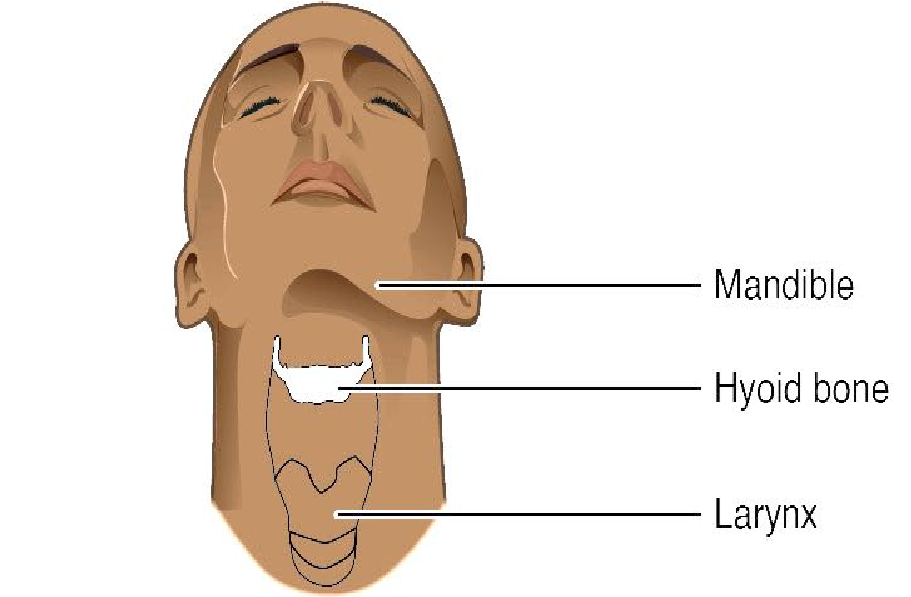
Hyoid (Figure 14)
The hyoid is a small, C-shaped bone that does not articulate with any bones in the body. The bone is suspended in the superior neck and anchored to the styloid process of the temporal bone and to the larynx.
Procedure:
1. Use the laminated terminology labels to label the bones of the adult skull. The bones of the skull are the bolded terms on the terminology sheet.
2. Remove the bone labels and return them to the terminology sheet. Quiz each other. Each pair places the laminated numbers 1-5 on the models. Then switch with the other group and take the quiz. (Optional: record a video of you and your lab group reviewing the bones before you remove the labels or as you remove the labels.)
3. Now label the bone markings of the adult skull using the non-bolded terminology labels. Note: Some markings are found inside the skull.
4. Have your instructor check your labeled adult skull bone markings and initial below.
Instructor’s initials for labeled skull model: ____________
5. On the following images below, add the lines from the term to its location on the skull model image.
6. Label the fontanels of the fetal skull using the laminated terminology labels.
7. Name the bones which articulate at the posterior fontanel.
Activity 3: Bones and Bone Markings of the Vertebral Column
Materials:
- articulated skeleton
- disarticulated skeleton
- laminated terminology labels with sticky tack
Background:
The patient was in a severe car crash and is experiencing pain on the left side of the face, the neck, and the thorax. After taking radiographs, Dr. Hernandez shows you the fractures of the left ramus of the mandible and left zygomatic arch. Moreover, the patient complains that he can’t feel any sensation in the lower left jaw and the molars on the left lower jaw are loose. As Dr. Hernandez consults with the patient about wiring the jaw closed to allow for healing, you notice a neck brace around the patient’s neck. Upon glancing at the patient’s chart, you learn that the patient has possible hairline fractures of the 3rd and 4th cervical vertebrae. The dental assistant asks you how many cervical vertebrae are there? Time to grab the book and review the vertebral column.
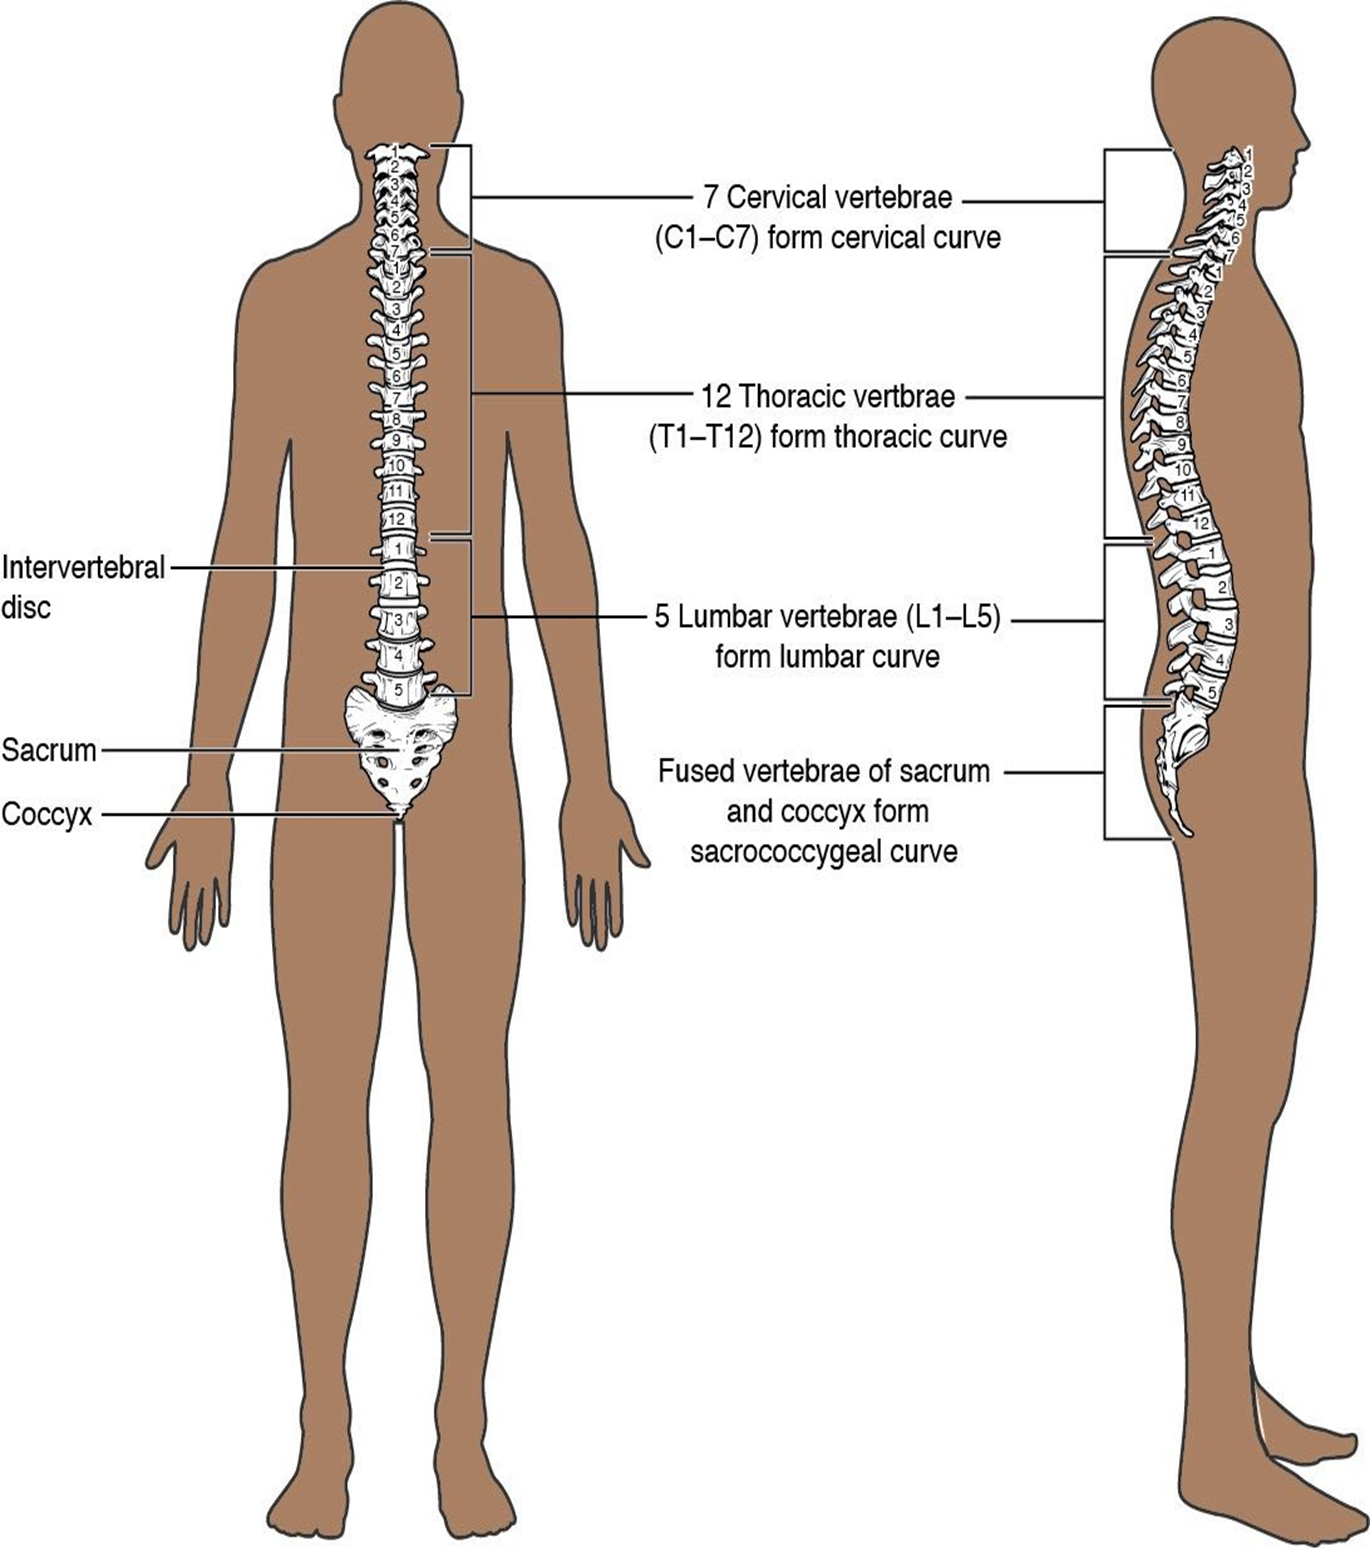
Figure 15: Anterior and lateral view of the spine.
Vertebral Column
The vertebral column or spine consists of an average of 33 bones, 24 of which are unfused. The vertebrae are classified based on shape and location. (Figure 15)
- 7 cervical vertebrae in the neck
- 12 thoracic vertebrae that articulate with the ribs
- 5 lumbar vertebrae in the abdominal region
- 5 sacral vertebrae that are fused and referred to as the sacrum
- 3-4 coccygeal vertebra that are fused and called the coccyx
Vertebrae are named with both a letter and a number starting superiorly. The first group of vertebrae, the cervical vertebrae (C), are labeled C1-C7. The first vertebra, C1 is also called the atlas and C2 is also called the axis. Inferior to the last cervical vertebra, C7, is the first thoracic vertebra (T1). The thoracic vertebrae are numbered T1-T12. Lumbar vertebrae are numbered L1 to L5. Most vertebrae have common features that will vary slightly depending on the location in the vertebral column. They have numerous processes that serve as bony attachment sites for the muscles of the back, and many articulations between the individual vertebral joints.
Helpful hint!
“Breakfast at 7,
lunch at 12,
dinner at 5”
7 cervical, 12 thoracic,
and 5 lumbar vertebrae.
The spinous process can be palpated dorsally at the midline. The lateral projections are called transverse processes, which run in the transverse plane. The lamina connects the spinous and transverse process posteriorly. The transverse processes are attached to the main body of the vertebra via a pedicle. The vertebral foramen is the hole through which the spinal cord travels. Together, the pedicle and lamina form the vertebral arch located at the posterior border of the vertebral foramen (Figure 16). The body is the most anterior structure and is the weight-bearing part of the vertebra. Vertebral disks made of fibrocartilage cushion between adjacent vertebral bodies forming a symphysis joint. Between the pedicle and lamina are the superior articular process and inferior articular process. These are important for forming a synovial joint between adjacent vertebrae. The surfaces of the process are covered with hyaline cartilage and are called facets. The joint is formed by the superior articular facet of the inferior vertebrae and the inferior articular facet of the superior vertebrae. On the lateral side of the articulated spine between the vertebrae in the space between the transverse process is a hole called the intervertebral foramen, which allows spinal nerves to exit the spinal cord and become peripheral nerves. The intervertebral foramina are formed by the inferior vertebral notch on the pedicle of vertebrae above and the superior vertebral notch on the pedicle of the vertebra below (Figure 16).
Figure 16: Markings and articulations of the vertebrae from a superior (left) and transverse (right) view.

The five regions of the vertebral column each have unique features along with the basic structures described above.
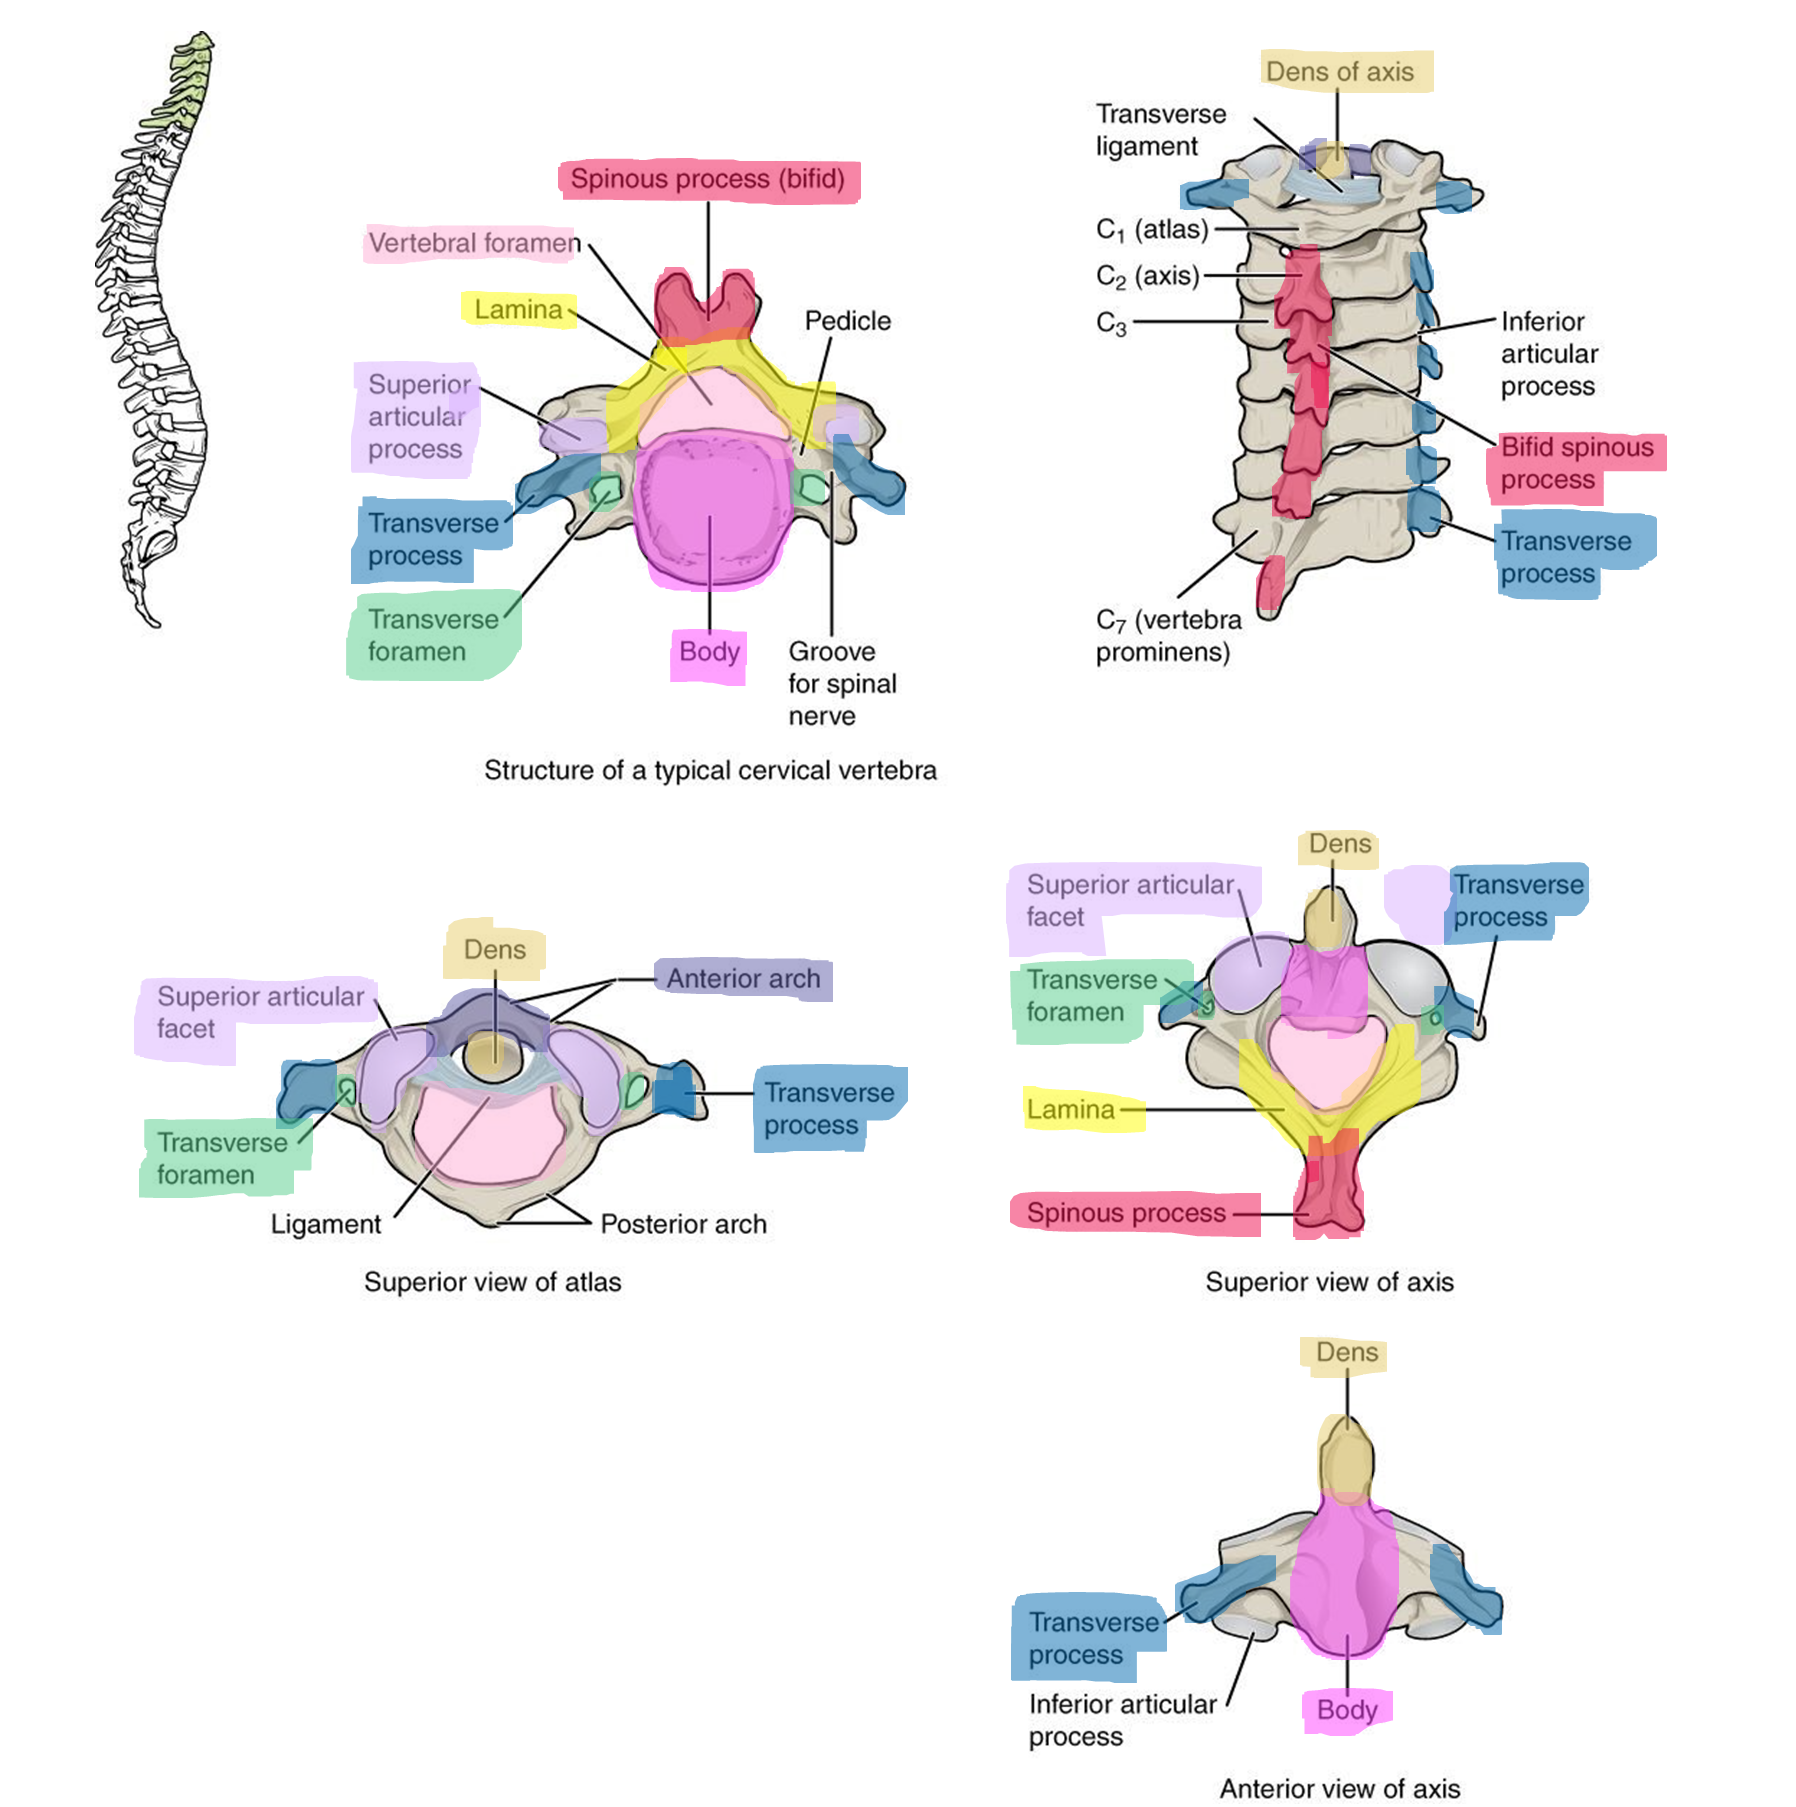
Cervical: (Figure 17)
Found in the neck, the 7 cervical vertebrae are the smallest vertebrae. All cervical vertebrae have a hole in each transverse process called the transverse foramen that allows passage of blood vessels. The first and second cervical vertebrae have specialized features to accommodate the movement of the head. The atlas (C1) is the most superior vertebra. It articulates with the occipital condyles of the skull to form the atlanto-occipital joint and allows the head to nod “yes”. The atlas has a large vertebral foramen, no body, and no spinous process. Where the body would be is the anterior arch. The axis (C2) is the second cervical vertebra. It has a prominent superior projection from the body called the dens. The dens articulates with the anterior arch of the atlas to form the atlantoaxial joint. This joint allows the head to shake “no.”
Helpful Hint: Atlas in Greek mythology held the world on his neck, and axis allows the head to pivot on an axis.
Figure 17: Marking and articulations of the cervical vertebrae.
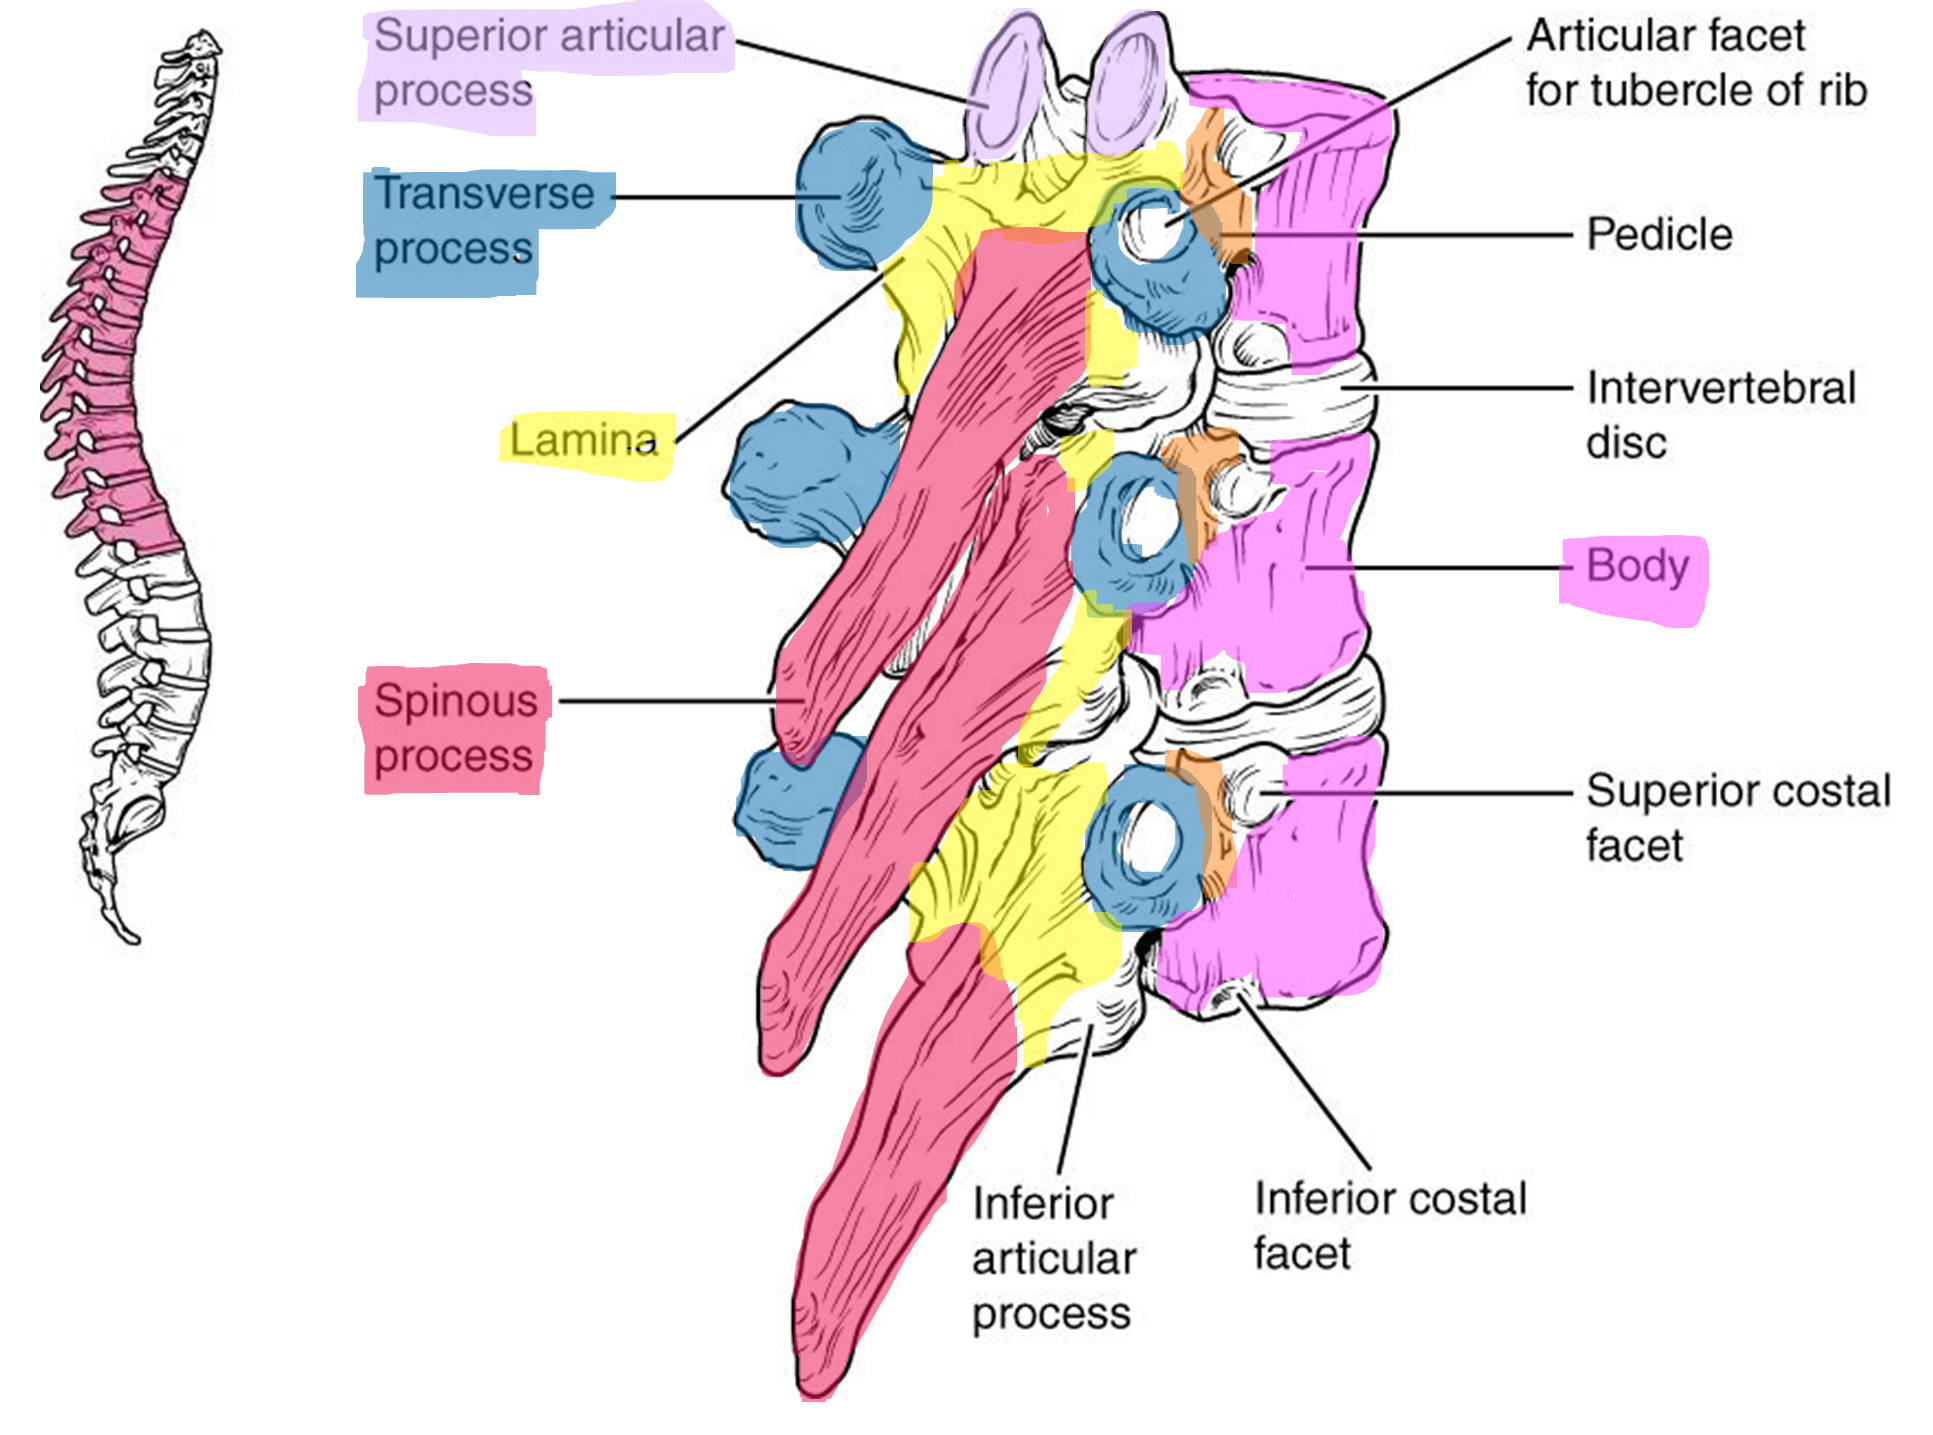
Thoracic: (Figure 18)
The 12 thoracic vertebrae articulate with the ribs of the thorax. They are larger than the cervical vertebrae and have prominent transverse processes, and a long spinous process, making each thoracic vertebra have the appearance of a giraffe’s head (Figure 21). On the lateral sides of most of the thoracic bodies are indentations to allow for the articulation with the rib’s tubercle called superior costal facets and inferior costal facets.
Figure 18: Markings and articulations of the thoracic vertebrae.
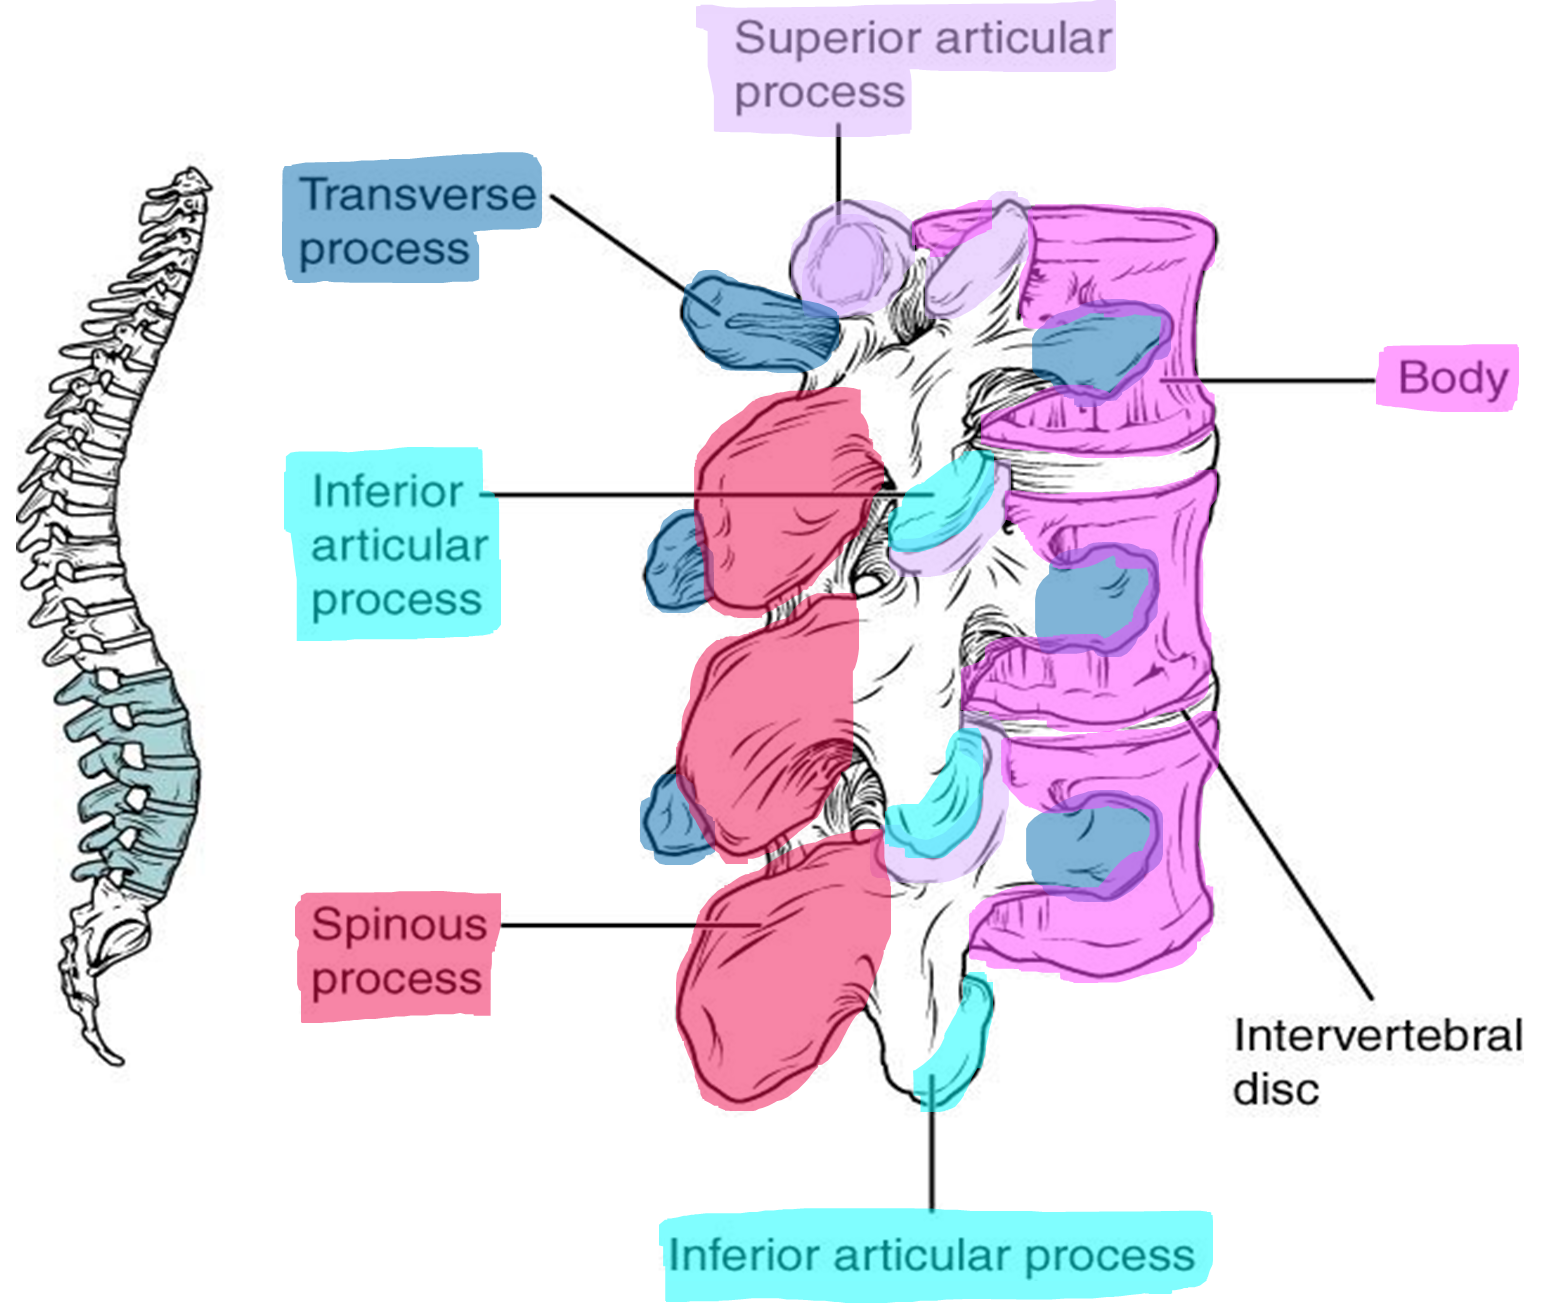
Lumbar: (Figure 19)
The 5 lumbar vertebrae have the largest body and are responsible for supporting the abdominal weight. The spinous process is fat and blunted, compared to the thoracic vertebrae. Each lumbar vertebra has the appearance of a moose head (Figure 21).
Figure 19: Markings and articulations of the lumbar vertebrae.
Sacrum: (Figure 20)
The sacrum is a triangular-shaped single bone that is formed from five fused sacral vertebrae. Fusion of the vertebrae typically starts around age 20. The lateral edges of the sacrum meet with the ilium portion of the pelvis to form the sacroiliac joint of the pelvis. Passing inferiorly through the sacrum is a bony tunnel called the sacral canal which is a continuation of the vertebral canal. The sacral canal terminates at the sacral hiatus near the inferior tip of the sacrum. The sacrum has four paired openings called the sacral foramina that connect to the sacral canal. These openings allow for the sacral spinal nerves to exit the sacrum. The superior base of the sacrum articulates with L5 vertebrae, and the inferior apex of the sacrum articulates with first coccygeal (Co1) vertebra.
Coccyx: (Figure 20)
The coccyx, or tailbone, is a small triangular bone that is formed from three or four fused coccygeal vertebrae. It articulates with the inferior tip of the sacrum. When standing it is not weight bearing but does support some body weight when sitting.
Figure 20: Markings and articulations of the sacrum and coccyx.
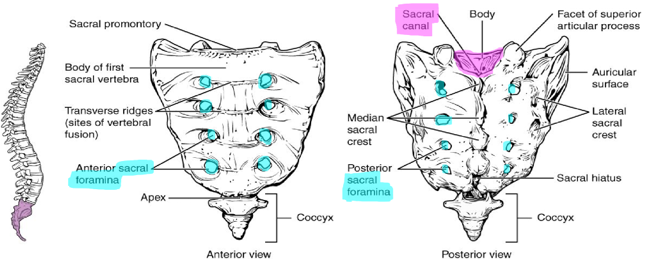
Figure 21: Cervical (top), thoracic (middle) and lumber (bottom) vertebrae.
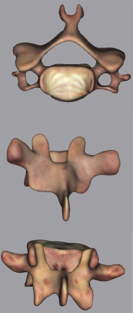
Helpful hints to tell the difference between the vertebrae:
- Only cervical vertebrae have a transverse foramen
- Only the atlas lacks the vertebral body
- Only the axis has a dense process, superior projection.
- Thoracic vertebrae articulate with the ribs and therefore have a costal facet on the sides of the body.
- The spinous process is long and points inferiorly
- Thoracic vertebrae look like a giraffe’s head. The snout of the giraffe is the spinous process. The giraffe’s horns are the superior articulating process, and the ears are the transverse process.
- Lumbar vertebrae have a large body. And they don’t have a transverse foramina and costal facets!
- The angle between the spinous and transverse process makes an “L” shape for lumbar.
- Lumbar vertebrae look like a moose’s head. The snout is the spinous process, and the horns are the superior articulating process.
Procedure:
1. Use the articulated skeleton to identify the five regions of the vertebral column
2. Use the disarticulated skeleton to identify the cervical, thoracic, lumbar, and sacral (with attached coccygeal bones).
3. Divide the vertebrae (2 cervical—select C1 and C2, 1 thoracic, 1 lumbar) among the group members and label the parts of each vertebra.
4. Trade your labeled vertebra with your table mates to thoroughly review the parts of the vertebrae on different vertebral types.
5. Complete the chart below with your observations on the features of the cervical, thoracic, and lumbar vertebrae.
| Cervical | Thoracic | Lumbar | |
| Size of body | |||
| Shape of spinous process | |||
| Shape of transverse process | |||
| Shape of vertebral foramen |
6. Have your instructor check off your labeled bones and initial below.
Instructor’s initials for labeled model: ____________
Activity 4: Bone and Bone Markings of the Thoracic Cage
Materials:
- articulated skeleton
- disarticulated skeleton
- laminated terminology labels
Background:
You notice that the patient is taking very shallow breaths. At first you think it might be because of the jaw fracture, but as you watch the patient move you remember that the thoracic cage surrounds the lungs and other vital organs of the thoracic cavity. A seatbelt saved your patient’s life but caused damage to the thoracic cage, but where?
Figure 22: Markings of the thoracic cage.
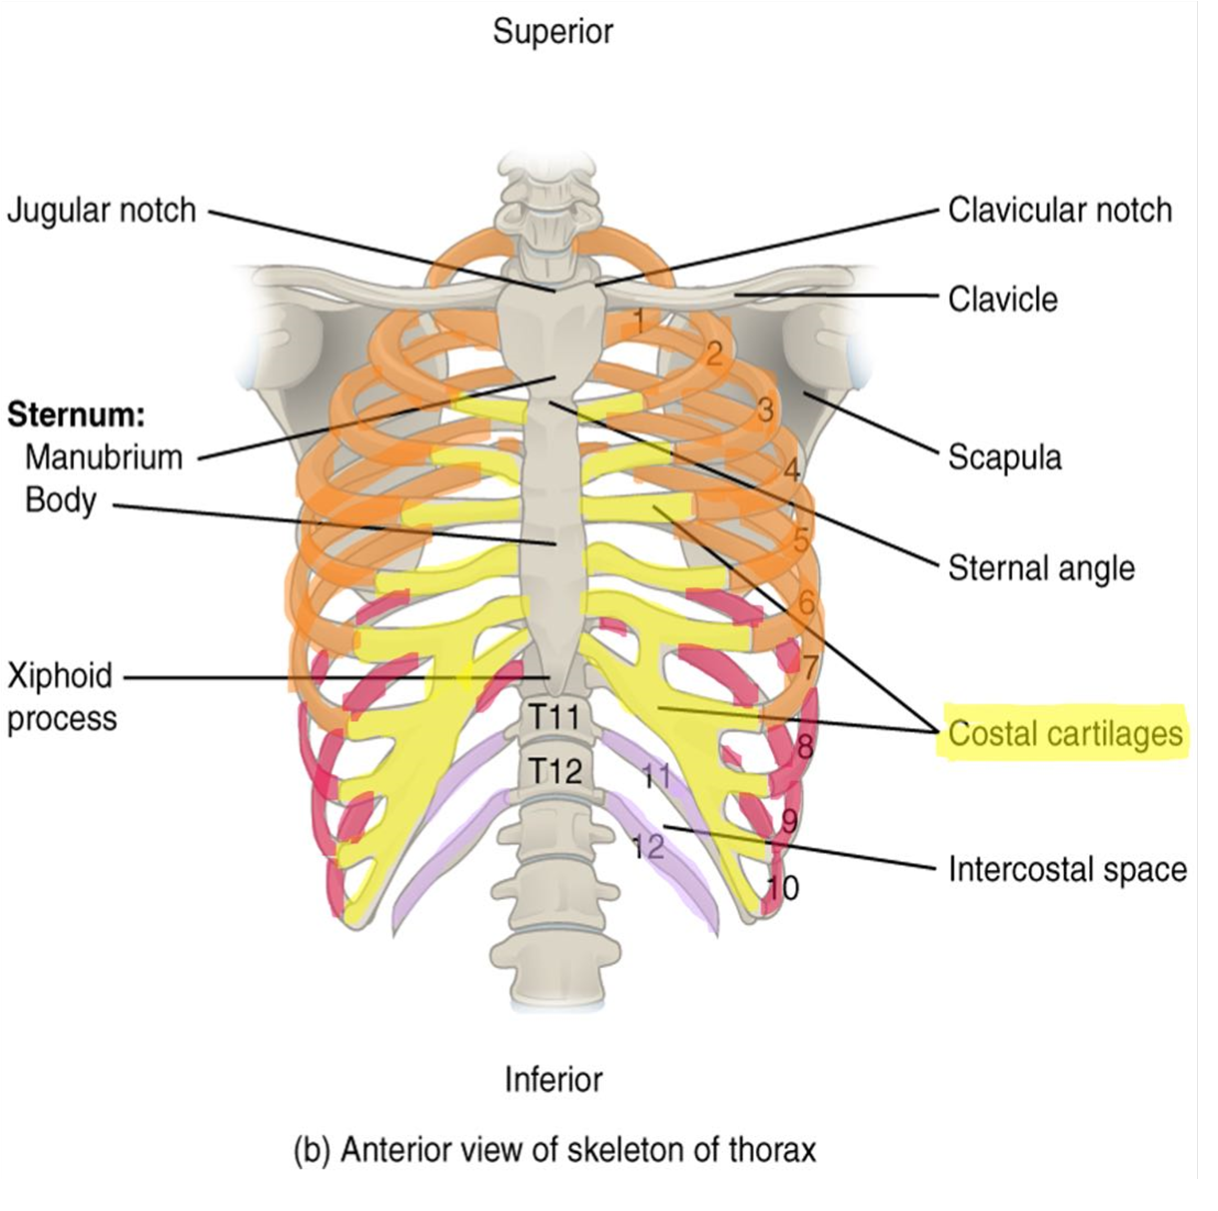
The Thoracic Cage
The thoracic cage is formed by 12 pairs of ribs, the sternum and the 12 thoracic vertebrae.
Figure 23: Articulations between the thoracic vertebrae and the ribs.
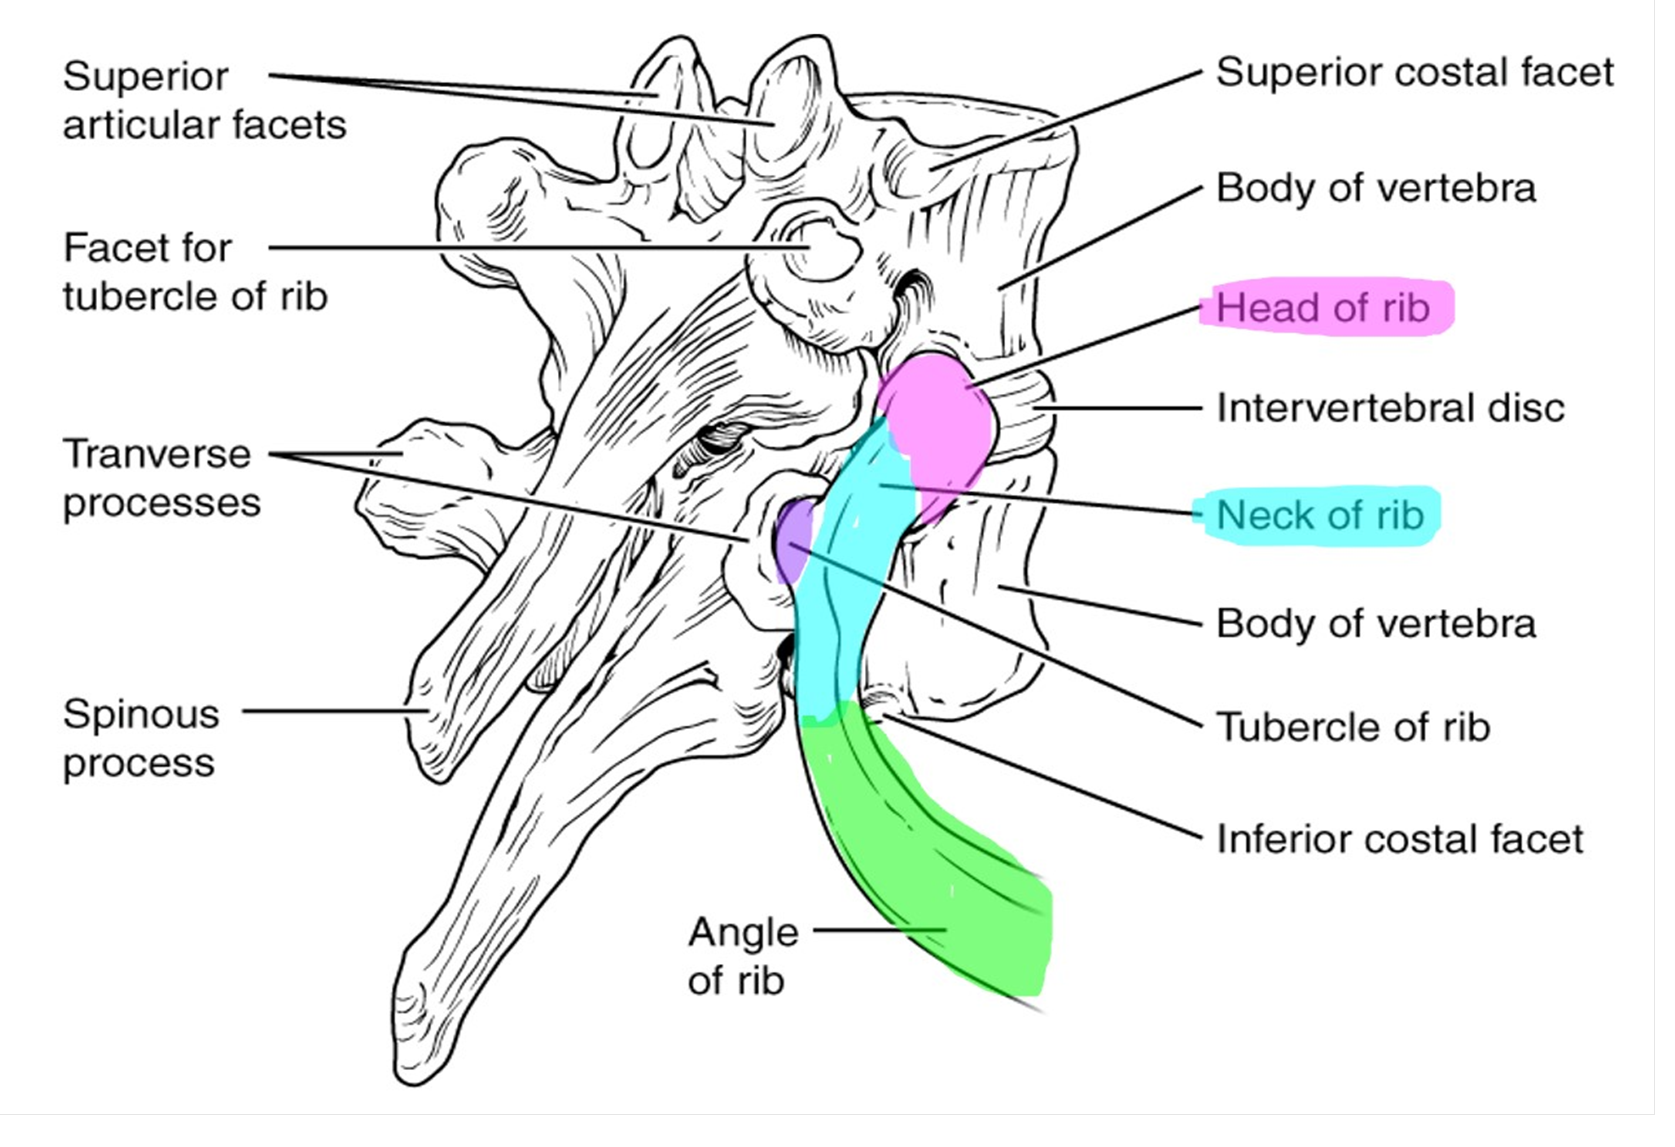
Ribs: (Figure 22 and 23)
There are twelve pairs of ribs that articulate with the twelve thoracic vertebrae. Like the thoracic vertebrae, the ribs are numbered 1-12. Ribs 1-7 are known as true ribs, and directly articulate with the sternum via a hyaline cartilage connection called the costal cartilage. The remaining 5 ribs (ribs 8-12) are false ribs as they do not directly connect to the sternum. Ribs 8-10 share cartilaginous attachments with the cartilage of the seventh rib. Ribs 11 and 12 are special false ribs, called floating ribs, because they do not attach to the sternum at all. The floating ribs provide important posterior protection for the kidneys. A typical rib consists of a curved shaft (body) giving the ribs a “C” shape. Ribs (except for floating ribs) articulate with the sternum anteriorly and the vertebrae posteriorly. The posterior end of the rib has a rounded head that has a superior and an inferior articular facet that articulates with the thoracic vertebrae. The inferior articular facet articulates with the body of the vertebra, which is the same number as the rib. For example, rib 4’s interior articular facet articulates with T4. The superior articular facet articulates with the body of the vertebrae superior to it. For example, rib 4’s superior articular facet would articulate with the body of T3. Lateral to the head is the narrowed neck of the rib. The tubercle projects posteriorly from the neck and articulates with the facet of the transverse process of the same numbered thoracic vertebrae.
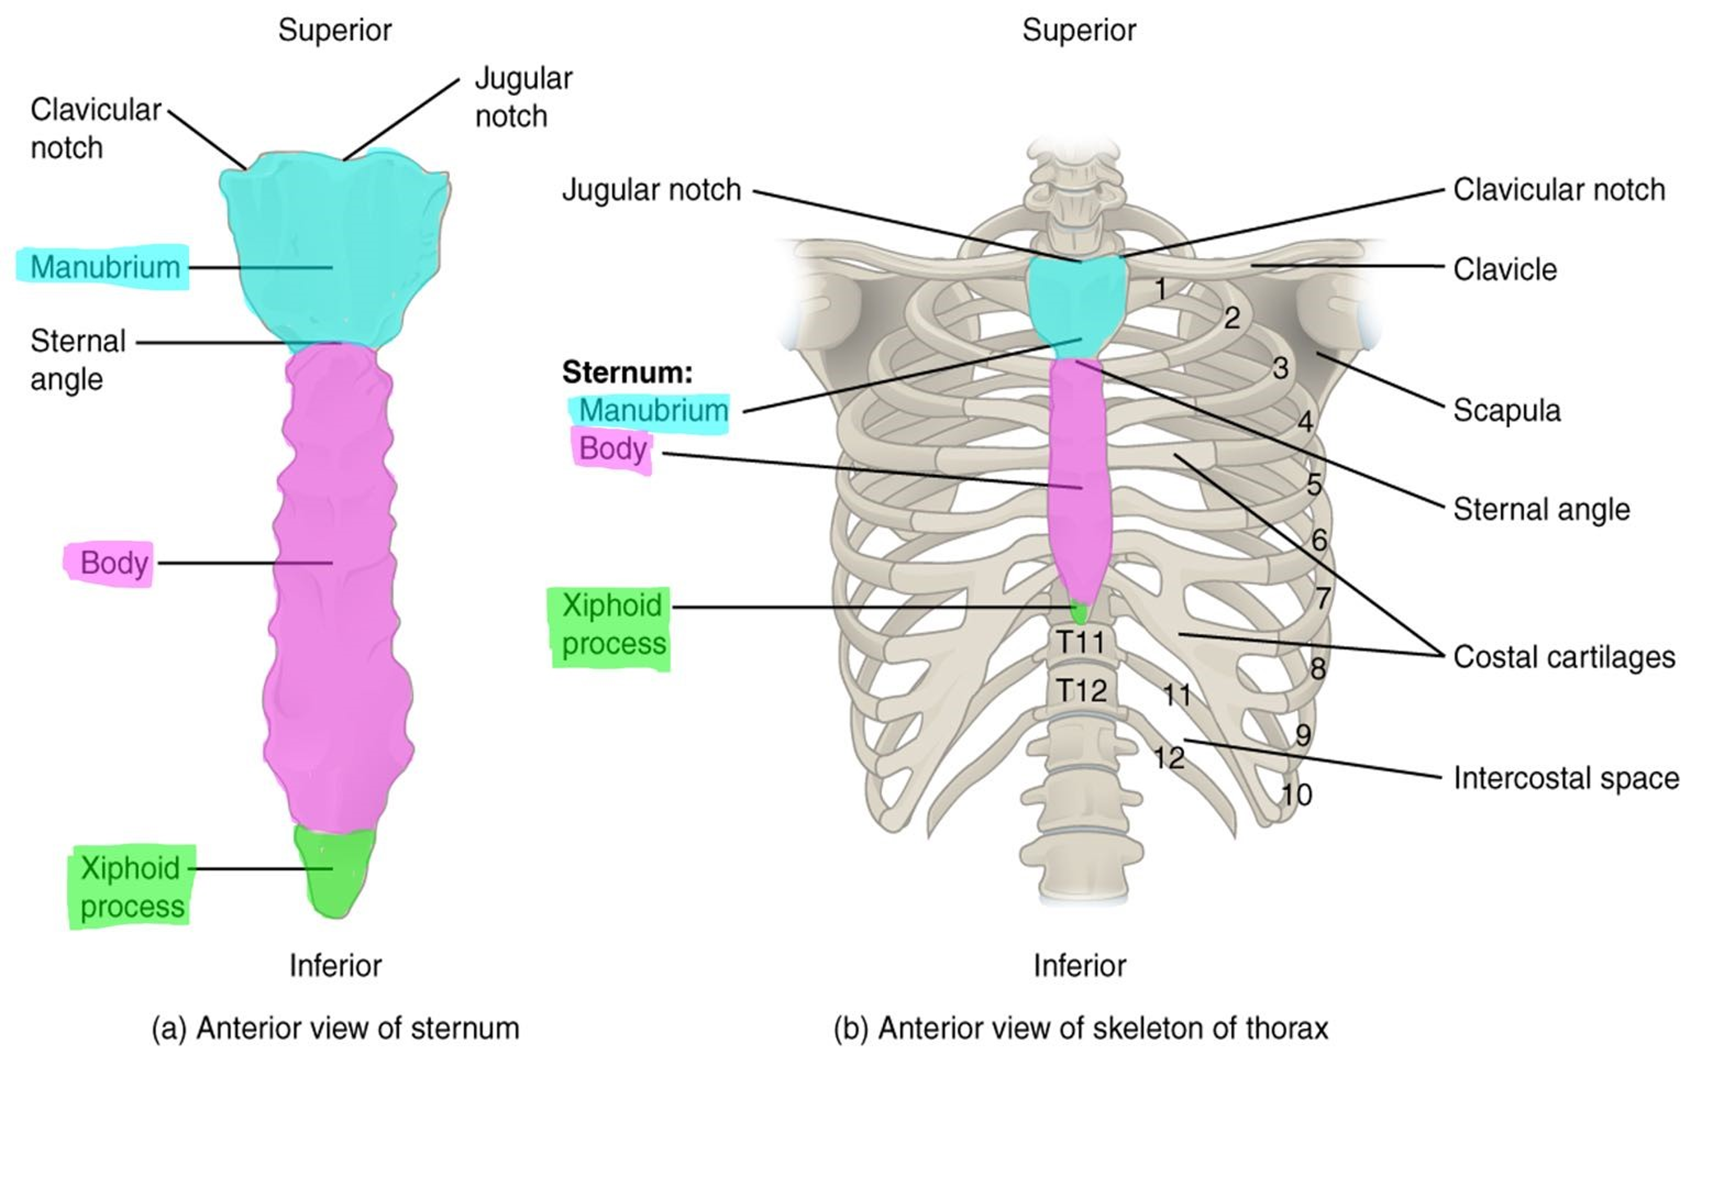
Sternum: (Figure 24)
The flat sternum consists of three parts. The superior manubrium, the body, and the inferior xiphoid process. The manubrium articulates with the clavicles, the costal cartilage of the 1st ribs, and part of the costal cartilage of the 2nd ribs. The largest part of the sternum, the body, articulates with the costal cartilages of ribs 2-7. The xiphoid process is the smallest part of the sternum. It typically completes ossification around age 40 and is an important attachment site for abdominal muscles.
Figure 24: Markings of the sternum.
Procedure:
1. Label the three types of ribs on the articulated skeleton using the labels.
2. Using a disarticulated rib, label the parts of the rib bone.
3. Look at the sternum of the disarticulated skeleton. Label the parts of the sternum.
4. Explain the function of the floating ribs.
5. Have your instructor check off your labeled bones.
Instructor’s initials for labeled model: ____________
Putting It All Together
As you leave the patient’s side, you realize that many bones of the axial skeleton were impacted by the car accident. The fractured skull involved various facial bones including the mandible, the zygomatic bone, and the temporal bone, the main bones that make up the jaw joint.
1. On the image below, circle and then label the areas of the skull that were fractured in your patient.
2. Now that you have learned the bones, let’s see if you can put it all together! The instructor has set up a quiz on the back table with an array of bones from this lab. Can you properly label the bones and bone markings that have been laid out?
- _________________________________________
- _________________________________________
- _________________________________________
- _________________________________________
- _________________________________________
- _________________________________________
- _________________________________________
- _________________________________________
- _________________________________________
- _________________________________________
Creative Commons Citations:
- Axial Skeleton Lab. Case Based OER Lab Manual for A&P I. © 2022 by G. Backus, H. Wangerin, and P. Rodgers is licensed under CC BY-NC-SA 4.0.
- Figures 1-24 © 2023 OpenStax Anatomy and Physiology 2e is licensed under CC BY 4.0 with color shading added by H. Wangerin.
- Anterior Skull, Inferior Skull, Lateral Skull, Internal Skull, Sample Bone Markings, Skulls to Color, Skull to Color, Jaw to Color, Sphenoid to Color, Fetal Skull, Vertebrae to Color, Vertebrae Markings, Cervical Vertebrae, Sacrum to Color, Ribs to Color © 2022 by H. Wangerin, using the Anatomage Table, is licensed under CC BY-NC-SA 4.0.
